Difference between revisions of "Progressive Capture Workflow"
| Line 34: | Line 34: | ||
* Stores attachments in the ''Attachments'' section of a request for easy access | * Stores attachments in the ''Attachments'' section of a request for easy access | ||
|style="width:400px"| | |style="width:400px"| | ||
| − | [[File:pcaddattachment.png |350px|link= | + | [[File:pcaddattachment.png |350px|link=]] |
|} | |} | ||
:::[[File:Information.png|14px|text-top|Information]] Attachments are regulated by the following [[Advanced Settings|system settings]] that restrict size and type: ''communications.maxfileUploadSize, security.fileUploadRestriction.webdav.enable, security.fileUploadRestriction.entity.fileAttachments.types'' | :::[[File:Information.png|14px|text-top|Information]] Attachments are regulated by the following [[Advanced Settings|system settings]] that restrict size and type: ''communications.maxfileUploadSize, security.fileUploadRestriction.webdav.enable, security.fileUploadRestriction.entity.fileAttachments.types'' | ||
| Line 55: | Line 55: | ||
* Output: Branch nodes that follow this will be able to use Team Name, Team ID, Anaylst Name, Analyst ID as criteria for branching | * Output: Branch nodes that follow this will be able to use Team Name, Team ID, Anaylst Name, Analyst ID as criteria for branching | ||
|style="width:400px"| | |style="width:400px"| | ||
| − | [[File:pcassignment.png | | + | [[File:pcassignment.png |350px|link=]] |
|} | |} | ||
</div> | </div> | ||
| Line 74: | Line 74: | ||
* Branch Options: Request Type | * Branch Options: Request Type | ||
|style="width:400px"| | |style="width:400px"| | ||
| − | [[File:pcrequesttype.png | | + | [[File:pcrequesttype.png |350px|link=]] |
|} | |} | ||
</div> | </div> | ||
| Line 93: | Line 93: | ||
* Branch Options: None | * Branch Options: None | ||
|style="width:400px"| | |style="width:400px"| | ||
| − | [[File:pcassets.png | | + | [[File:pcassets.png |350px|link=]] |
|} | |} | ||
</div> | </div> | ||
| Line 109: | Line 109: | ||
* Select Change Type | * Select Change Type | ||
|style="width:400px"| | |style="width:400px"| | ||
| − | [[File:pcchangetype.png | | + | [[File:pcchangetype.png |350px|link=]] |
|} | |} | ||
</div> | </div> | ||
| Line 126: | Line 126: | ||
* Select option for ''I need something'' | * Select option for ''I need something'' | ||
|style="width:400px"| | |style="width:400px"| | ||
| − | [[File:pccustomerrequesttype.png | | + | [[File:pccustomerrequesttype.png |350px|link=]] |
|} | |} | ||
</div> | </div> | ||
| Line 143: | Line 143: | ||
* Filter on Contacts or Co-workers | * Filter on Contacts or Co-workers | ||
|style="width:400px"| | |style="width:400px"| | ||
| − | [[File:pccustomersearch.png | | + | [[File:pccustomersearch.png |350px|link=]] |
|} | |} | ||
</div> | </div> | ||
| Line 161: | Line 161: | ||
* Configure fields to be displayed on the right hand side | * Configure fields to be displayed on the right hand side | ||
|style="width:400px"| | |style="width:400px"| | ||
| − | [[File:pccontactsearch.png | | + | [[File:pccontactsearch.png |350px|link=]] |
|} | |} | ||
</div> | </div> | ||
| Line 179: | Line 179: | ||
* Configurable field to be displayed on the right hand side | * Configurable field to be displayed on the right hand side | ||
|style="width:400px"| | |style="width:400px"| | ||
| − | [[File:pccoworkersearch.png | | + | [[File:pccoworkersearch.png |350px|link=]] |
|} | |} | ||
</div> | </div> | ||
| Line 196: | Line 196: | ||
* Provide root cause and workaround details | * Provide root cause and workaround details | ||
|style="width:400px"| | |style="width:400px"| | ||
| − | [[File:pckedetails.png | | + | [[File:pckedetails.png |350px|link=]] |
|} | |} | ||
</div></div> | </div></div> | ||
| Line 215: | Line 215: | ||
* Configurable organization fields for the right hand side | * Configurable organization fields for the right hand side | ||
|style="width:400px"| | |style="width:400px"| | ||
| − | [[File:pcorgdetails.png | | + | [[File:pcorgdetails.png |350px|link=]] |
|} | |} | ||
</div> | </div> | ||
| Line 232: | Line 232: | ||
* When preceded by the Service Details form the category will display the configured root category for the selected service | * When preceded by the Service Details form the category will display the configured root category for the selected service | ||
|style="width:400px"| | |style="width:400px"| | ||
| − | [[File:pcrequestcategory.png | | + | [[File:pcrequestcategory.png |350px|link=]] |
|} | |} | ||
</div> | </div> | ||
| Line 249: | Line 249: | ||
* Add a detailed description to the request | * Add a detailed description to the request | ||
|style="width:400px"| | |style="width:400px"| | ||
| − | [[File:pcrequestdetails.png | | + | [[File:pcrequestdetails.png |350px|link=]] |
|} | |} | ||
</div> | </div> | ||
| Line 265: | Line 265: | ||
* Select the Priority for the request | * Select the Priority for the request | ||
|style="width:400px"| | |style="width:400px"| | ||
| − | [[File:pcrequestpriority.png | | + | [[File:pcrequestpriority.png |350px|link=]] |
|} | |} | ||
</div> | </div> | ||
| Line 287: | Line 287: | ||
* Filter option by Service Category | * Filter option by Service Category | ||
|style="width:400px"| | |style="width:400px"| | ||
| − | [[File:pcservicedetails.png | | + | [[File:pcservicedetails.png |350px|link=]] |
|} | |} | ||
</div> | </div> | ||
Revision as of 18:48, 18 December 2016
Home > Administration > Service Manager > Progressive Capture
IntroductionProgressive Capture allows you to configure how and what information is collected or captured when a request is being raised. This includes default capture forms that are specific to Service Manager and the ability to create custom question forms. This page describes the available Service Manager forms which can be used in the Progressive Capture Designer, the provided default Progressive Capture Scripts, and some of the available advanced settings. |
Related Articles |
Progressive Capture Forms
Service Manager provides a number of default forms that are available to use when building the Progressive Capture scripts for raising requests. These forms can be made available to a progressive capture script by adding a Form node to your progressive capture and selecting the form name from within the properties of the node.
- Add Attachments
- The 'Add Attachments' form allows you to include files when raising a request. Multiple attachments can be added and individual descriptions can be applied to each.
- Add attachments such as screen shots while raising a request
- Browse local file system or drag and drop file
- Includes description of attachment for easy reference
- Stores attachments in the Attachments section of a request for easy access

 Attachments are regulated by the following system settings that restrict size and type: communications.maxfileUploadSize, security.fileUploadRestriction.webdav.enable, security.fileUploadRestriction.entity.fileAttachments.types
- Analyst Assignment
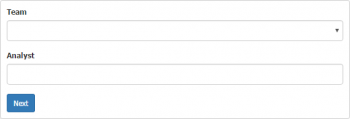
- The 'Analyst Assignment' provides options for assigning the request to a team and an owner. You can choose to assign the request to just a team or to a team and a specified analyst.
- Function: Search for Team and Owner to assign request
- Input: When preceded by the Service Details Form, only teams that support that service will be displayed
- Visibility: Analysts only
- Output: Branch nodes that follow this will be able to use Team Name, Team ID, Anaylst Name, Analyst ID as criteria for branching
- Analyst Request Type
- The 'Analyst Request Type' form allows the support staff to choose the type of request that will be created. This form is most commonly seen in the 'New Request' progressive capture flow as the support person may not know which type of request needs to be raised when they first start capturing information.
- Only the requests types that the analyst who is raising the request has rights to will be displayed
- Visibility: Analysts only
- Branch Options: Request Type

- Asset Details
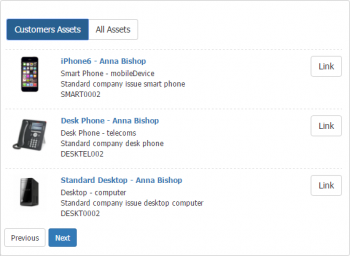
- The 'Asset Details' form allows an analyst to associate assets to the request. By default, all assets that are associated to the customer of the request are shown however it is also possible to perform a general search on assets that are in the system. It's possible to associate multiple assets to each request:
- Search all assets
- Input: Following a Search Co-worker form the assets belonging to the customer will be displayed
- Visibility: Analysts and Customers (Customers can only view and select their own assets)
- Branch Options: None
- Change Type
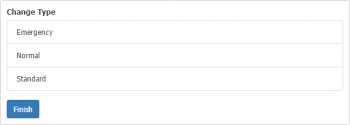
- The 'Change Type' form allows an analyst to select the type of change request that will be raised. This form is usually only seen on the new Change progressive capture flow:
- Select Change Type
- Customer Request Type
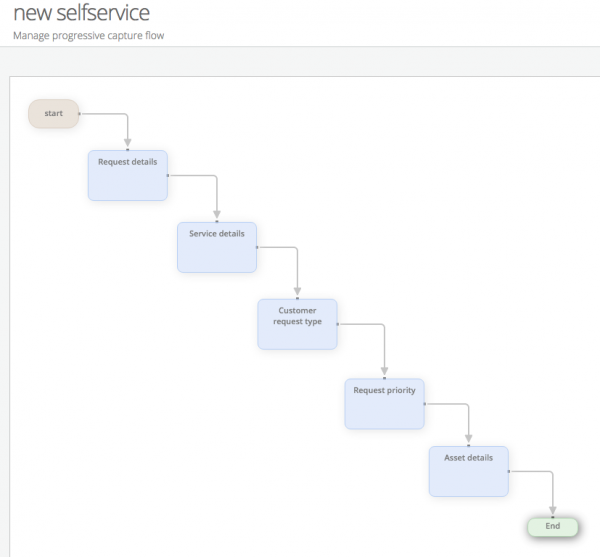
- The 'Customer Request Type' form allows the customer to choose what type of request they are raising. This PCF is most commonly seen on the 'New Self Service' progressive capture flow which is used by both the Hornbill Service and Customer portals. It is slightly different to the 'Analyst Request Type' form in that it only offers the ability to select a request type of Incident (Something is broken) or Service Request (I need something):
- Select option for Something is Broken
- Select option for I need something

- Customer Search
- The 'Customer Search' form allows an analyst to select a customer for the request. This search returns both Contacts and Co-workers. This form is useful when the a support team is supporting both external and internal customers.
- Search both Contacts and Co-workers
- Filter on Contacts or Co-workers

- Contact Search
- The 'Contact Search' form provides a search option for adding a contact as the customer for the request. The search results only displays contact records and is recommended to use when only providing external support.
- Search all contacts
- Configure fields to be displayed on the right hand side

- Co-worker Search
- The 'Co-worker Search' form provides a search option for adding a Co-worker as the customer for the request. This search results only displays co-worker records and is recommended to use when only providing internal support.
- Search all Co-workers
- Configurable field to be displayed on the right hand side

- Known Error Details
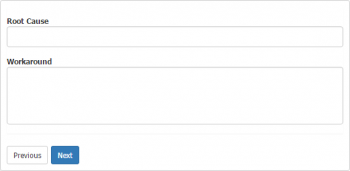
- The 'Known Error Details' form allows an analyst to specify root cause and workaround details for a known error. This form is usually only seen on the new Known Error progressive capture flow:
- Provide root cause and workaround details
- Organisation Details
- The 'Organisation Details' form allows an analyst to see additional information about the customer's organisation that is defined by a Hornbill administrator. There is no data captured in this PCF - it is purely informational only.
- Display only
- Will display the organisation of a previously selected contact
- Recommended use after the Contact Search
- Configurable organization fields for the right hand side

- Request Category
- The 'Request Category' form allows an analyst to specify a category when logging a request.
- Request Category selector
- When preceded by the Service Details form the category will display the configured root category for the selected service

- Request Details
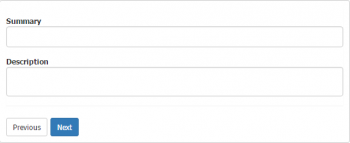
- The 'Request Details' form allows an analyst to enter both a summary and a description for the request.
- Add summary to the request
- Add a detailed description to the request
- Request Priority
- The 'Request Priority' form allows the priority of the request to be set.
- Select the Priority for the request

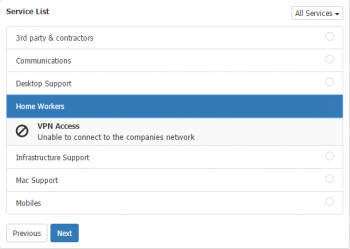
- Service Details
- The 'Service Details' form allows an analyst to specify a service when logging a request:
- Displays Request Catalog Items under each Service
- If preceded by the Customer, Co-worker, or Contact Search the Service Details will only show the subscribed services for the selected person
- <setting> can restrict the view so that the list of services also only includes the once supported by the analyst
- If preceded by the Requets Type form, only the Request Catalog Items that match that type will be displayed
- Branch Options: The name of the selected service can be used in a branch node
- Filter option by Service Category
Default Progressive Capture Scripts
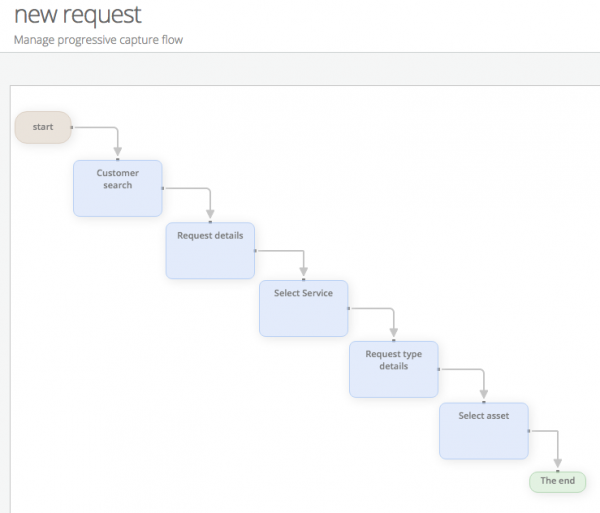
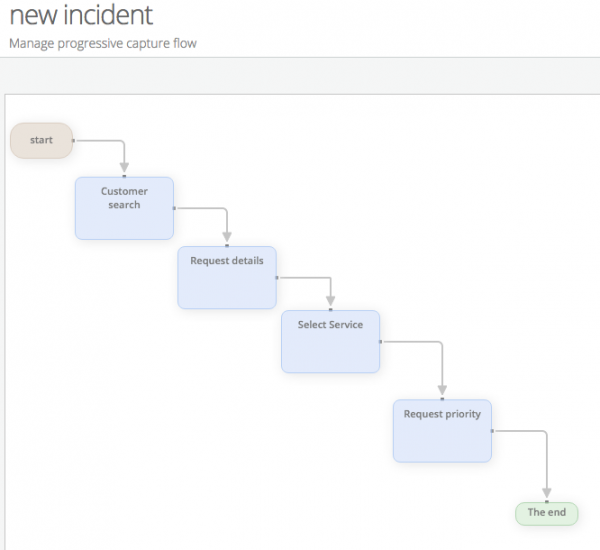
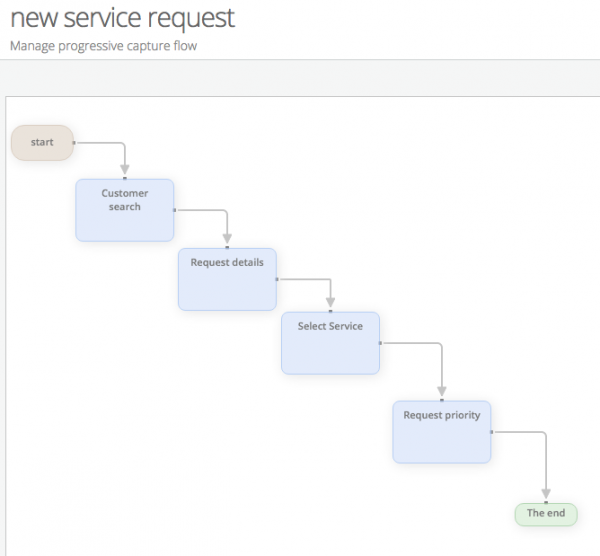
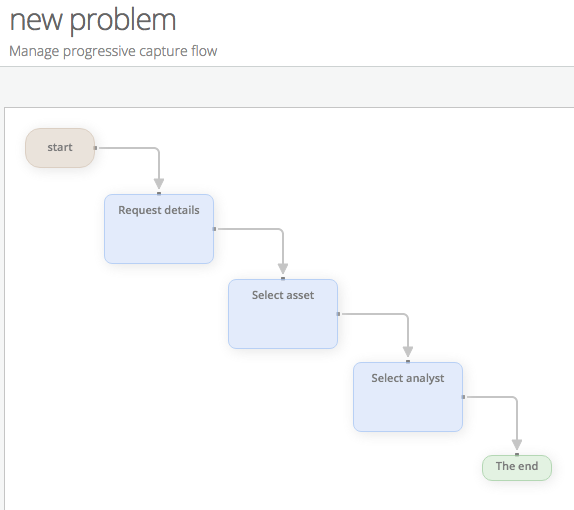
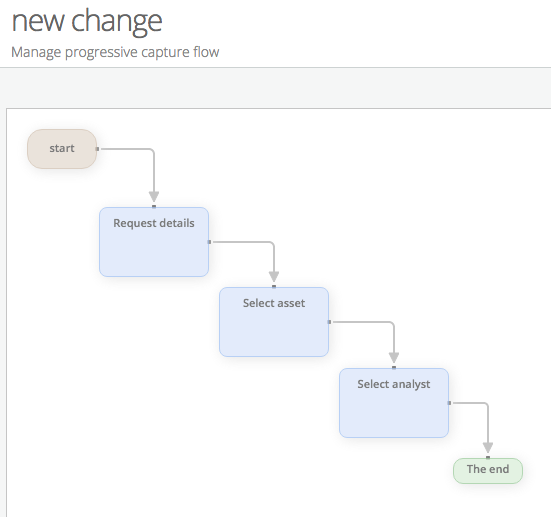
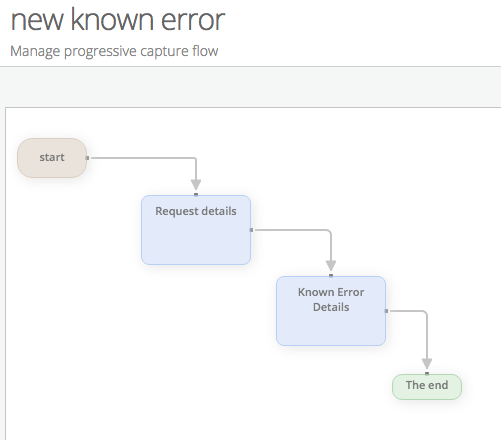
By default, Hornbill provide the following progressive capture flows. These can be edited, copied or deleted accordingly:
Settings
Service Manager settings are available to configure the default Progressive Captures that are used when raising requests.
- app.itsm.progressiveCapture.newRequest
- The named Progressive capture on this setting will be used when the Raise New option is used or when an email is used to raise a new request
- app.itsm.progressiveCapture.newIncident
- The named Progressive capture on this setting will be used when raising an Incident
- app.itsm.progressiveCapture.newServiceRequest
- The named progressive capture on this setting will be used
- app.itsm.progressiveCapture.newProblem
- Default when raising problems
- app.itsm.progressiveCapture.newKnownError
- Default when raising Known Errors
- app.itsm.progressiveCapture.newChange
- Default when raising a change
