Difference between revisions of "Inventory"
| (71 intermediate revisions by the same user not shown) | |||
| Line 1: | Line 1: | ||
{{bluebanner|[[Main_Page|Home]] > [[Administration]] > [[IT Operations Management|ITOM]] > Inventory|[[:Category:ITOM|Index]]}} | {{bluebanner|[[Main_Page|Home]] > [[Administration]] > [[IT Operations Management|ITOM]] > Inventory|[[:Category:ITOM|Index]]}} | ||
{{IntroAndLinks | {{IntroAndLinks | ||
| − | |The Inventory Viewer provides an interface to | + | |The Inventory Viewer provides an interface to organise discovered devices and categorize them as Managed / Un-Managed Devices, as well as removing them. |
| + | Once marked as Managed, a device subscription is consumed for a minimum of 30 days, after which this or any other Un-managed device will be able to re-use it. Inventory details and the execution of IT Automation jobs are only available for Managed Devices. | ||
| + | |||
| + | Lists are a great way to organise and maintain managed devices within the viewer and provide a mechanism for IT Automation Job deployment to multiple targets. | ||
| | | | ||
* [[IT Operations Management]] | * [[IT Operations Management]] | ||
| + | * [[Discovery Job]] | ||
}} | }} | ||
| − | == Inventory | + | == Inventory Toolbar == |
| + | The Inventory toolbar allows actions to be executed on one or more inventory items as detailed below and provides various filtering and refresh options. | ||
| + | [[File:ITOMInventoryToolbar.png|link=https://wiki.hornbill.com/images/3/30/ITOMInventoryToolbar.png]] | ||
| + | :{| | ||
| + | |- valign="top" | ||
| + | |style="width:500px"| | ||
{{Bullet1|Refresh|A refresh of the list may be required to display any new devices discovered while you are viewing the list}} | {{Bullet1|Refresh|A refresh of the list may be required to display any new devices discovered while you are viewing the list}} | ||
{{Bullet1|Show|}} | {{Bullet1|Show|}} | ||
| − | {{Bullet2|All Managed Inventory|Show only the devices that | + | {{Bullet2|All Managed Inventory|Show only the devices that categorised as ''Managed''}} |
| − | {{Bullet2|All Un-managed Inventory|Show only | + | {{Bullet2|All Un-managed Inventory|Show only those categorized as ''Un-managed''}} |
{{Bullet2|Add Selected To a Managed List|By selecting multiple devices in the list using the checkboxes, you can add these into an available Managed List.}} | {{Bullet2|Add Selected To a Managed List|By selecting multiple devices in the list using the checkboxes, you can add these into an available Managed List.}} | ||
{{Bullet2|Create List|Create a new list for managing or grouping devices}} | {{Bullet2|Create List|Create a new list for managing or grouping devices}} | ||
| − | {{Bullet1|Filter|Free Text filter to search by Name, Manufacturer, Model or Operating System}} | + | |style="width:500px"| |
| − | {{Bullet1|Action| | + | {{Bullet1|Free Text Filter|Free Text filter to search by Name, Manufacturer, Model or Operating System}} |
| + | {{Bullet1|Action Buttons|Each Action applies to one or more selected devices in the Inventory List}} | ||
{{Bullet2|Toggle Managed Status|Set Selected As Managed / Set Selected as Un-managed}} | {{Bullet2|Toggle Managed Status|Set Selected As Managed / Set Selected as Un-managed}} | ||
{{Bullet2|Add Selected to A Managed List|This is only available for Managed CIs)}} | {{Bullet2|Add Selected to A Managed List|This is only available for Managed CIs)}} | ||
{{Bullet2|Delete Device|This will permanently remove the device from the list}} | {{Bullet2|Delete Device|This will permanently remove the device from the list}} | ||
| − | + | |} | |
==Inventory List== | ==Inventory List== | ||
[[File:ITOMInventoryList.png|right|600px|link=https://wiki.hornbill.com/images/7/7d/ITOMInventoryList.png]] | [[File:ITOMInventoryList.png|right|600px|link=https://wiki.hornbill.com/images/7/7d/ITOMInventoryList.png]] | ||
| − | + | Displays discovered (Managed or Un-Managed) Inventory items and provides access to an items properties and Job Queue. User-defined lists are created and populated from here, and dynamic filtering is also available. Sort the list by clicking on the individual column headers, an indicator displayed next to the sort column stating the sort order as Ascending ([[File:AdminToolListHeaderAsc.png|12x12px]]) or Descending ([[File:AdminToolListHeaderDesc.png|15x15px]]). Select Multiple items from the list to execute actions on more than one item; alternatively, the dropdown button next to each item is used to perform actions for individual items. | |
| + | <br> | ||
| + | <br> | ||
| + | <br> | ||
| + | {|- valign="top" | ||
| + | |style="width:500px"| | ||
{{Bullet1|Action|Using this drop-down icon, you can select from several actions that you can apply against this individual inventory item}} | {{Bullet1|Action|Using this drop-down icon, you can select from several actions that you can apply against this individual inventory item}} | ||
{{Bullet1|Name|Device hostname. Clicking on the hostname will display a detailed ''Properties'' list for this inventory item}} | {{Bullet1|Name|Device hostname. Clicking on the hostname will display a detailed ''Properties'' list for this inventory item}} | ||
{{Bullet1|Manufacturer|Shows the devices manufacturer}} | {{Bullet1|Manufacturer|Shows the devices manufacturer}} | ||
{{Bullet1|Model|Devices model details}} | {{Bullet1|Model|Devices model details}} | ||
| + | |style="width:500px"| | ||
{{Bullet1|OS|The devices installed Operating System}} | {{Bullet1|OS|The devices installed Operating System}} | ||
{{Bullet1|Ping|Displays "Green" if the device was able to respond to a ping request}} | {{Bullet1|Ping|Displays "Green" if the device was able to respond to a ping request}} | ||
{{Bullet1|DNS|Displays "Green" if the device was able to be identified by a DNS lookup}} | {{Bullet1|DNS|Displays "Green" if the device was able to be identified by a DNS lookup}} | ||
| − | {{Bullet1|Discovered|Shows the discovery date for the device}} | + | {{Bullet1|Discovered On|Shows the discovery date for the device}} |
| + | |} | ||
==Device Properties== | ==Device Properties== | ||
| − | Clicking on the Device Name will display properties discovered for the selected | + | [[File:InventoryPropertiesPageBlur.png|right|400px|link=https://wiki.hornbill.com/images/2/26/InventoryPropertiesPageLarge.png]] |
| + | Clicking on the Device Name will display properties discovered for the selected item; the following information is available: | ||
:* Summary (Name, Discovered On, Ping, DNS) | :* Summary (Name, Discovered On, Ping, DNS) | ||
:* Manufacturer / Hardware (showing Model, Serial Number, CPU & Memory) | :* Manufacturer / Hardware (showing Model, Serial Number, CPU & Memory) | ||
| Line 40: | Line 58: | ||
:* Installed OS Options | :* Installed OS Options | ||
:* Installed Software (filterable) | :* Installed Software (filterable) | ||
| − | :* Job Queue | + | :* [[Job Queue]] |
| + | :*: Provides the same interface to that used within the main Job Queue, with the difference here being that only jobs for the selected item will be visible and able to be created. For further details on the functionality of this feature, refer to the [[Job Queue]] documentation: | ||
{{infobox|For Un-managed devices, only the Summary information is available.}} | {{infobox|For Un-managed devices, only the Summary information is available.}} | ||
| + | [[Category:ITOM]] | ||
| + | |||
| + | ==Managed Lists== | ||
| + | These lists provide a mechanism to allow for IT Automations or Runbook jobs execution across multiple devices. They are manually populated and contain managed devices, each of which can exist in various lists. | ||
| + | === Create a Managed List === | ||
| + | |||
| + | # Navigate to ('''''Home > ITOM > Inventory Viewer''''') | ||
| + | # From the Show filter Select '''+ Create List''' | ||
| + | # Enter a name for the List | ||
| + | # The new list will now appear in the list of filters | ||
| + | [[Category:ITOM]] | ||
| + | === Adding Devices to a List === | ||
| + | ====Multiple==== | ||
| + | # From the Inventory View select two or more Managed Devices | ||
| + | # Click the '''Add to Managed List''' [[File:MenuPlusWhite.png|23x22px]] button: | ||
| + | # The List is displayed showing the added entries | ||
| + | |||
| + | ====Individual==== | ||
| + | # Locate a Managed Device | ||
| + | # Click the dropdown and select '''+Add To Managed List''' | ||
| + | #:[[File:InventoryMenuAddToList.png|400x200px]] | ||
| + | [[Category:ITOM]] | ||
| + | ===Removing Devices from a List=== | ||
| + | ====Multiple==== | ||
| + | # Select the required List | ||
| + | # Click the checkbox next to each entry to be removed | ||
| + | # Select '''Remove Selected From ...''' [[File:MenuMinusButtonWhite.png|23x22px]] button | ||
| + | # Click '''Yes''' on the Confirmation box; to remove devices from the list | ||
| + | |||
| + | ====Individual==== | ||
| + | # From the Show dropdown, select a populated List | ||
| + | # Locate a Managed Device | ||
| + | # Click the dropdown and select '''+Remove From ...''' | ||
| + | # Click '''Yes''' on the Confirmation box, to remove devices from the list | ||
[[Category:ITOM]] | [[Category:ITOM]] | ||
Latest revision as of 11:12, 16 November 2021
| Home > Administration > ITOM > Inventory | Index |
IntroductionThe Inventory Viewer provides an interface to organise discovered devices and categorize them as Managed / Un-Managed Devices, as well as removing them. Once marked as Managed, a device subscription is consumed for a minimum of 30 days, after which this or any other Un-managed device will be able to re-use it. Inventory details and the execution of IT Automation jobs are only available for Managed Devices. Lists are a great way to organise and maintain managed devices within the viewer and provide a mechanism for IT Automation Job deployment to multiple targets. |
|
Inventory Toolbar
The Inventory toolbar allows actions to be executed on one or more inventory items as detailed below and provides various filtering and refresh options.

- Refresh
- A refresh of the list may be required to display any new devices discovered while you are viewing the list
- Show
- All Managed Inventory
- Show only the devices that categorised as Managed
- All Un-managed Inventory
- Show only those categorized as Un-managed
- Add Selected To a Managed List
- By selecting multiple devices in the list using the checkboxes, you can add these into an available Managed List.
- Create List
- Create a new list for managing or grouping devices
- Free Text Filter
- Free Text filter to search by Name, Manufacturer, Model or Operating System
- Action Buttons
- Each Action applies to one or more selected devices in the Inventory List
- Toggle Managed Status
- Set Selected As Managed / Set Selected as Un-managed
- Add Selected to A Managed List
- This is only available for Managed CIs)
- Delete Device
- This will permanently remove the device from the list
Inventory List
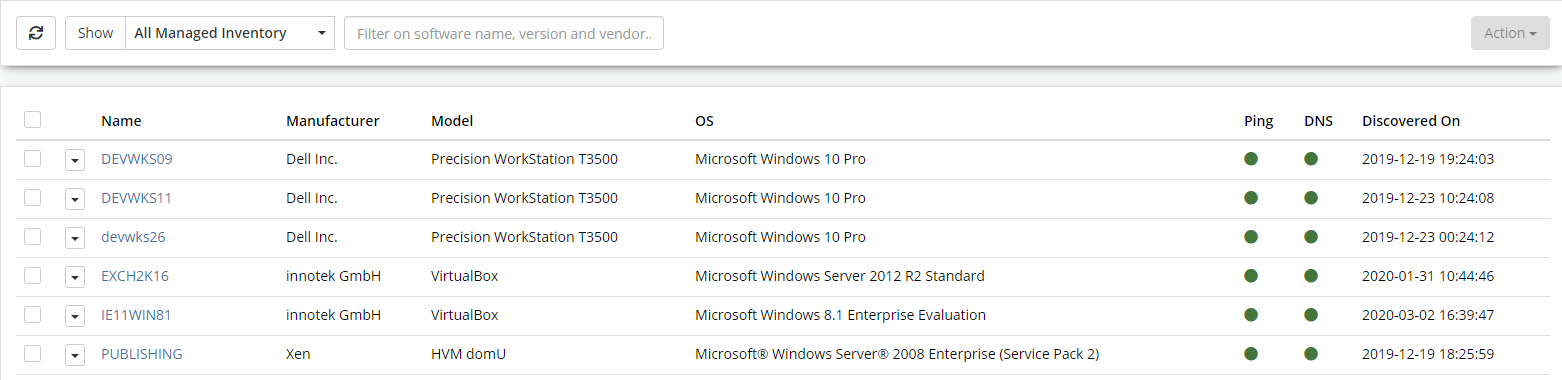
Displays discovered (Managed or Un-Managed) Inventory items and provides access to an items properties and Job Queue. User-defined lists are created and populated from here, and dynamic filtering is also available. Sort the list by clicking on the individual column headers, an indicator displayed next to the sort column stating the sort order as Ascending (![]() ) or Descending (
) or Descending (![]() ). Select Multiple items from the list to execute actions on more than one item; alternatively, the dropdown button next to each item is used to perform actions for individual items.
). Select Multiple items from the list to execute actions on more than one item; alternatively, the dropdown button next to each item is used to perform actions for individual items.
|
|
Device Properties
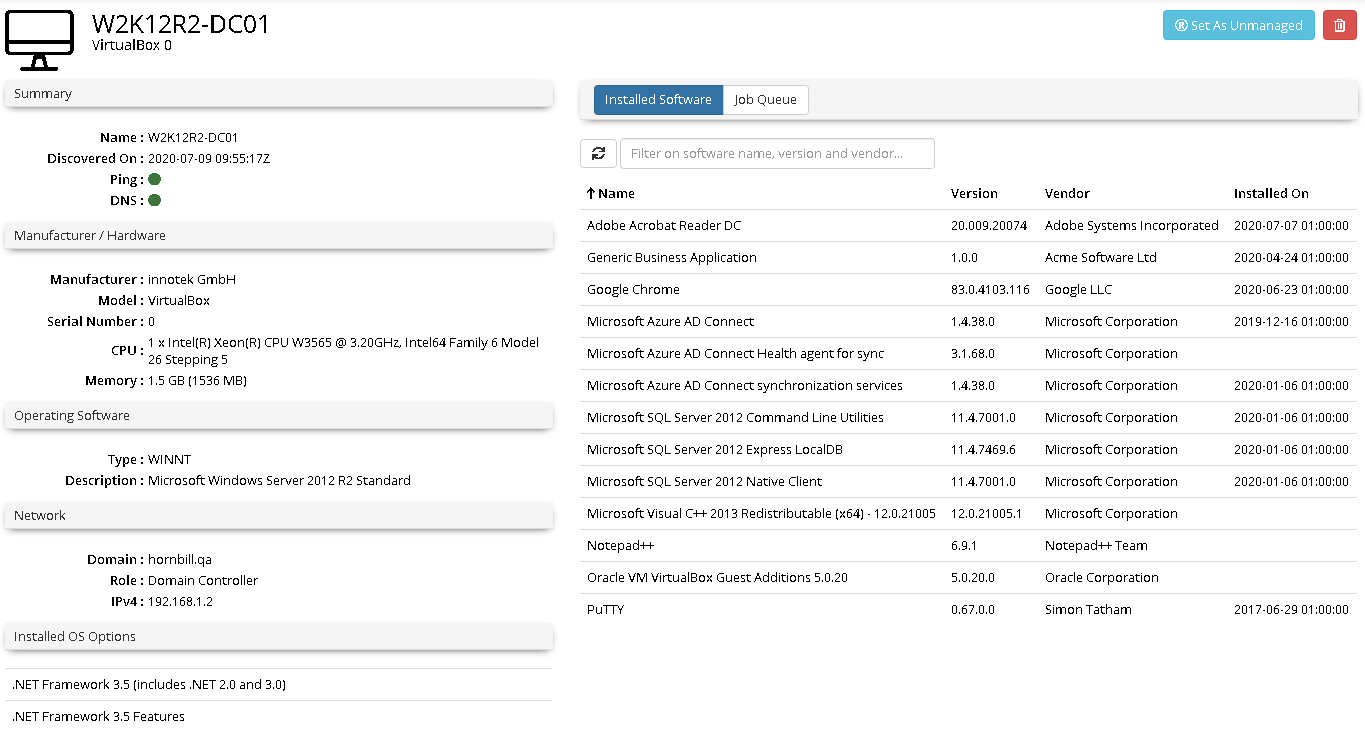
Clicking on the Device Name will display properties discovered for the selected item; the following information is available:
- Summary (Name, Discovered On, Ping, DNS)
- Manufacturer / Hardware (showing Model, Serial Number, CPU & Memory)
- Operating System
- Network
- Installed OS Options
- Installed Software (filterable)
- Job Queue
- Provides the same interface to that used within the main Job Queue, with the difference here being that only jobs for the selected item will be visible and able to be created. For further details on the functionality of this feature, refer to the Job Queue documentation:
- For Un-managed devices, only the Summary information is available.
Managed Lists
These lists provide a mechanism to allow for IT Automations or Runbook jobs execution across multiple devices. They are manually populated and contain managed devices, each of which can exist in various lists.
Create a Managed List
- Navigate to (Home > ITOM > Inventory Viewer)
- From the Show filter Select + Create List
- Enter a name for the List
- The new list will now appear in the list of filters
Adding Devices to a List
Multiple
- From the Inventory View select two or more Managed Devices
- Click the Add to Managed List
 button:
 - The List is displayed showing the added entries
Individual
- Locate a Managed Device
- Click the dropdown and select +Add To Managed List

Removing Devices from a List
Multiple
- Select the required List
- Click the checkbox next to each entry to be removed
- Select Remove Selected From ...
 button
 - Click Yes on the Confirmation box; to remove devices from the list
Individual
- From the Show dropdown, select a populated List
- Locate a Managed Device
- Click the dropdown and select +Remove From ...
- Click Yes on the Confirmation box, to remove devices from the list