Difference between revisions of "ITOM Quick Start Guide"
| Line 16: | Line 16: | ||
}} | }} | ||
| − | |||
A free preview access is available by default for all Hornbill subscribers with administrative rights and can access the administration portal. In order to gain access to ITOM, users will need to be assigned rights to the various features provided. A single system role is currently provided '''ITOM System Administrator''', and will allows full administrative access, additional details can be found in the section [[ITOM Roles and Rights]]. | A free preview access is available by default for all Hornbill subscribers with administrative rights and can access the administration portal. In order to gain access to ITOM, users will need to be assigned rights to the various features provided. A single system role is currently provided '''ITOM System Administrator''', and will allows full administrative access, additional details can be found in the section [[ITOM Roles and Rights]]. | ||
Revision as of 11:15, 27 January 2021
| Home > Administration > ITOM > Quick Start Guide | Index |
IntroductionHornbills ITOM offering provides the tools required for you to efficiently manage your computing devices with the following features:
|
|
A free preview access is available by default for all Hornbill subscribers with administrative rights and can access the administration portal. In order to gain access to ITOM, users will need to be assigned rights to the various features provided. A single system role is currently provided ITOM System Administrator, and will allows full administrative access, additional details can be found in the section ITOM Roles and Rights.
Site integration Service (SIS) Installation
The service is required to be installed on-premise and must have access to all devices that you wish to be managed. The role of SIS server service is to monitor the ITOM Job Queue and downloading any Jobs targeted for it. It will also handle the deploying of packages to remote devices and executing the payload.
Minimum requirements
- OS: Windows Server 2012, 2012 R2, 2016 or 2019
- RAM: 4GB
- Free Disk: 10GB
Where to Install
You can install the service on any existing Windows computer running one of the supported OS’s. The SIS is not processor intensive and will not require significant disk usage.
We would recommend that the SIS is not installed on a Domain Controller or Desktop OS.
Adding an SIS Connector
- From the ITOM page select Site Integration Services
- Click the “Add SIS connector”
 button
 - Enter your required details:
- Name - name used to identify the SIS server to the Hornbill Instance
- Group - Should be a least one default group, others can be selected via drop down if created previously
- Click the Create Site Integration Service button

- The Authorisation Key is displayed, and should be recorded for later use
- Return to the Site Integration Services list
- Select the Not Paired filter
- The Authorisation Key is temporary and will expire after 1 hour AND the SIS record will need recreating.
Download and Installation of the SIS
- From the Site Integration Services list, Click the Download Site Integration Server
- Locate and Execute the Downloaded executable

- Click Install
- Click Ok to Confirm the Installation
- Close the Install dialog
- Open the Services MMC Console
- Start the EspSisService

Server Pairing
- Switch back to the Browser and refresh the page (http://localhost :11117)

- Enter the instance ID
- Enter the Authorization Code recorded earlier
- Click the Pair with Instance button

ITOM Admin Account Requirements
Windows NT Accounts
NT Accounts used for the ITOM Admin Credentials will require the following additional rights to a be applied:
- Replace a process-level token. (SeAssignPrimaryTokenPrivilege)
- Act as part of the operating system. (SeTcbPrivilege)
You should create a new account solely be used to deploy and execute ITOM packages. Along with the above additional privileges, the account will require relevant rights/permissions to access computers over the network.
Additional accounts requiring creation, are dependent on the package(s) used and the context to run as; further information is available within the ITOM package library documented for each package under the section KeySafe Configuration. (https://wiki.hornbill.com/index.php/ITOM_Package_Library)
Creating a Hornbill KeySafe entry
- From the Hornbill Administration page navigate to (Home > System > Security > KeySafe)
- Click the Create New Key button
- Select Type as Username + Password
- Ensure that the KeySafe entry type is Username + Password and not Username + Password + Pre-Shared Key, as the entry will not be visible within ITOM

- Enter the following details:
- Title: Network Admin
- Domain Username: (example: DOMAIN\Username or username@domain)
- Password:
- Click Create Key
Configuring a Discover Job
Navigate to the ITOM Job Queue (Home > ITOM > Job Queue)
Click the Create New button and select Discovery Job
Enter the following details:
Name: AD Discovery using DCOM
Site Target: [Server] SIS Demo
Protocol: DCOM
Discovery Mode: Active Directory
Container: train1. hornbill.edu
Admin Credentials: Network Admin
Use Default Ping Check Settings
Click Create button

Review the Console output locate and confirm the following:
Monitor:
Enumerating child OU
Scan found X computers for detailed discovery
Performing WMI discovery of X computers
Summary
=======
Successful Discovery
All Computers
The discovery was executed successfully. The results are now being imported.
10:11:26 Discovery import complete. Added:X Updated:X Skipped:X Missing:X Failed:X
Console Output:
Review Summary, confirming successful discovery, and noting any failures.
Debug:
Note any errors, success here implies that the Discovery process did not fail, and not that all devices were detected and were able to be accessed.
Inventory Viewer
- Navigate to the ITOM Inventory (Home > ITOM > Inventory Viewer)
- Select All Un-Managed Inventory

- Click on the Name of an Un-Managed inventory Item
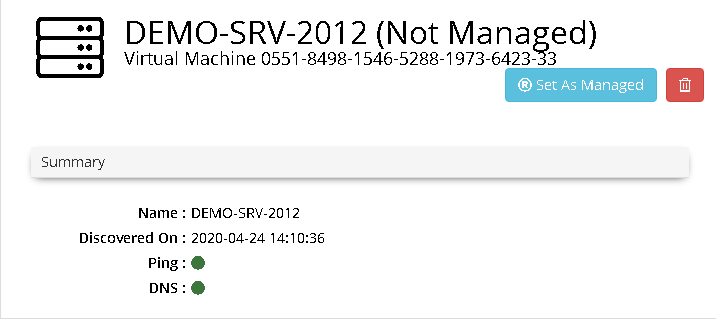
- Click check next to the heading Name to select All Discovered Devices

- Click the Register button
- Click Yes to confirm
- Select All Managed Inventory
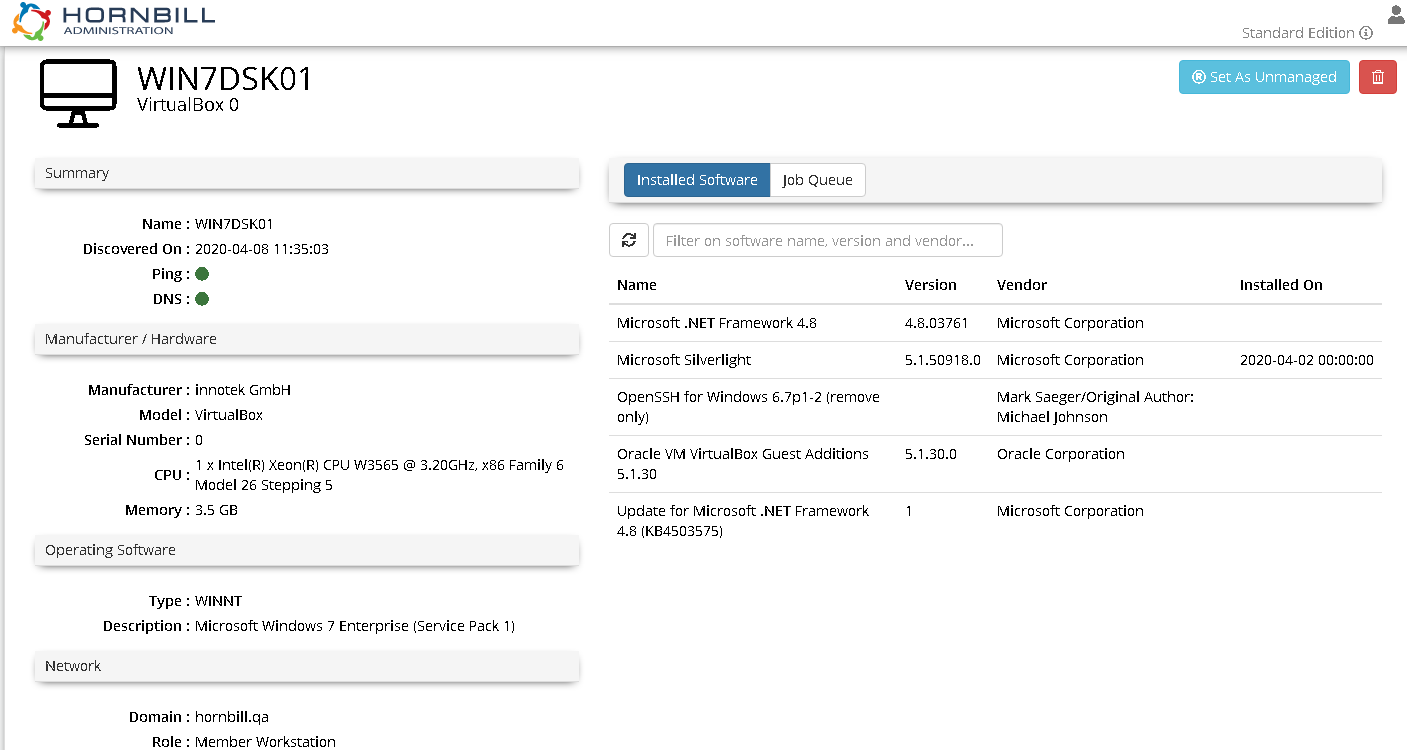
Inventory Properties
- Click on the Name of a Managed inventory Item
- Review the properties
Installed Packages
Package Library
- Navigate to (Home > ITOM > Installed Packages)
- Click the Package Library
 button

Click Install on both the Active Directory Group and User Management packages
Click Install on Windows Disk Cleanup
Click Close
Uploading Packages
- Click the Package Upload
 button
 - Select the provided package file: Demo.pkg
- Click Open
- Repeat for all other provided packages

IT Automation Job
Single Computer
- Navigate to (Home > ITOM > Job Queue)
- Click the Create New button, and select IT Automation
- Enter Name: Harry Hornbill on Single Computer
- Click the Installed Packages button
- Select Training > Demonstration > Harry Hornbill – The Bird, The Legend
- Click Apply
- Set Site Target to Server and select an Instance
- Set Target Device to Inventory and select a Device
- Set Admin Credentials to Network Admin
- Click Create
Monitor:

Confirm job executed Successfully
Console Output:
Displays the output as would be displayed if the package were manually executed from within a “cmd” console on the target device.
Debug Log:
Note any errors, success here implies that the package executed successfully, the output will be dependant on the package being executed.
Multiple Computers
- Navigate to (Home > ITOM > Job Queue)
- Click the Create New button, and select IT Automation
- Enter Name: Harry Hornbill on Multiple Computers
- Click the Installed Packages button
- Select Training > Demonstration > Harry Hornbill – The Bird, The Legend
- Click Apply
- Set Site Target to Server and select an Instance
- Set Target Device to Inventory and select a Device
- Set Admin Credentials to Network Admin
- Click Create

Click on a Job Name to view the Individual Child Job
Click Parent Link in the Summary to Return to Parent Job

Job Scheduling
Discovery
- Navigate to (Home > ITOM > Job Scheduling)
- Click the Create New button, and Select Discovery Schedule
- Enter the following details:
- Name: AD Discover
- Schedule: Run Every Period
- Every (n) Minutes: 15
- Description: Scheduled AD Discovery
- Site Target: Server | SIS Instance
- Protocol: DCOM
- Discovery Mode: Active Directory
- Container: horbnbill.edu
- Admin Credentials: Network Admin
- Ensure Next Scheduled Date and Time is set to a couple of minutes in the future
- Click Enable Schedule
- Navigate to (Home > ITOM > Job Scheduling)

Wait for the Job schedule Time, and Click on the AD Discovery Job Name
Click the Job History
Click on the Scheduled AD Discover Name
IT Automation
Windows Disk cleanup
- Navigate to (Home > ITOM > Job Scheduling)
- Click the Create New button, and Select IT Automation Schedule
- Enter the following Schedule details:
- Name: Windows Disk Cleanup
- Schedule: Run daily
- Ent the following IT Automation Job Settings:
- Package: private:hornbill > Disk Cleanup > Windows Disk Cleanup
- Site Target: SIS Server
- Target Device: List| Test Servers
- Admin Credentials: Network Admin
- Reference: Demo Job
- Set the following Operation Parameters to True:
InternetCacheFiles, Recycle Bin, and Temporary Files
Ensure Next Scheduled Date and Time is set to a couple of minutes in the future
Click Enable Schedule
Navigate to (Home > ITOM > Job Scheduling)
Wait for the Job schedule Time, and Click on the Job Name: Windows Disk Cleanup
Click Job History

Click on the Job Name: Windows Disk Cleanup (with the highest Job Id)

Review the list of jobs, and confirm that all are successful
Click on the Name of any Job entry in the list and review the Details
To return to the parent Click the link shown in the Summary section