ITOM Quick Start Guide
| Home > Administration > ITOM > Quick Start Guide | Index |
IntroductionThe following guide takes you through the steps required to get up and running with ITOM, including installing the Site Integration Service, discovering devices and package execution.
Quick-Start Pre-requisitesTo follow this guide, you must have access to a Hornbill instance, with a user with the ITOM Administrator role added. A Windows computer with a membership to an Active Directory domain, for the installation of the SIS, is required. You will also require access to a Windows Domain Administrator account in order to retrieve inventory details via WMI and deploy and execute Package operations.
|
|
Site integration Service (SIS) Installation
The SIS's role is to monitor the ITOM Job Queue, download any Jobs targeted to it for device discovery or package deployment and execution. The service is available for download via the Hornbill Instance and can be installed at any time; however, before you can use it, a Site connector must exist on your Hornbill Instance and the SIS paired with it.
Minimum requirements for the SIS
- OS: Windows Server (64bit) 2012, 2012 R2, 2016 or 2019
- RAM: 2GB
- Free Disk: 10GB
The following set of steps will guide you through the process of getting your SIS up and running:
Adding an SIS Connector
First lets setup an SIS connector and generate the Authorisation key required for the pairing process.
- From the ITOM page select Site Integration Services
- Click the “Add SIS connector”
 button
 - Enter your required details:
- Name - Unique identifer for the SIS Connector
- Group - The default group can be used
- Click the Create Site Integration Service button

- Make a note of the Authorisation Key, required for later use during the pairing process
- Return to the Site Integration Services list
- Select the Not Paired filter
- The Authorisation Key is temporary and will expire after 1 hour, AND the SIS record will need recreating.
Download and Installation of the SIS
The installation software is downloaded from the SIS list within the Admin Portal, and should be executed on the server nominated to host the SIS.
- From the Site Integration Services list, Click the Download Site Integration Server button
- Locate and Execute the Downloaded executable

- Click Install
- Click OK to Confirm the Installation
- Close the Install dialog
-
The service will not be started automatically you must manually start the process or configure it to be automatically started.
- Open the Services MMC Console
- Start the EspSisService

Server Pairing
Once the service has been started, the pairing process can be completed via the service web page, using the Authorisation Code generated when creating the SIS connector. If you do not have the code or have forgotten it, you can view it from the SIS Connector properties in the Admin Portal. If the code has expired, you will need to remove the existing connector and create a new one to generate a new code.
- Switch back to the Browser and refresh the page (http://localhost:11117)

- Enter the instance ID
- Enter the Authorization Code recorded earlier
- Click the Pair with Instance button

After a successful pairing, the status page appears displaying information related to the SIS service, with additional details available via the Show more button.
ITOM Admin Account Requirements
Before a successful Discovery or Automation can be actioned, one or more windows NT accounts will be required. It is recommended that you create a new admin domain account for Windows NT computers and an account with root privileges for Linux / Unix environments.
Windows NT Accounts
ITOM Admin Credentials will require a Windows NT Administrator account with the following additional rights to be applied:
- Replace a process-level token. (SeAssignPrimaryTokenPrivilege)
- Act as part of the operating system. (SeTcbPrivilege)
Additional user accounts may also require creation; these are dependent on the package used and the context of security needed; further information is available within the ITOM package library documentation for each Package under the section KeySafe Configuration. (https://wiki.hornbill.com/index.php/ITOM_Package_Library)
Linux / Unix
ITOM Admin Credentials will require an account with root user privileges when used for Linux or Unix devices; accounts that require the use of sudo cannot be used.
Creating a Hornbill KeySafe entry
Once you have created the OS Accounts with the required rights and permissions the account will need to be added to the Hornbill KeySafe in order for it to be used for discovery and IT Automations. The following will guide you through the process of creating a Keysafe entry on your Hornbill Instance, and can be used for adding both Windows and Linux accounts that require username and password entry:
- From the Hornbill Administration page navigate to (Home > System > Security > KeySafe)
- Click the Create New Key button
- Select Type as Username + Password
- Ensure that the KeySafe type is Username + Password and not Username + Password + Pre-Shared Key, as the entry will not be visible within ITOM. SSH Private Key entry can also be used for devices that utilise ssh and public key authentication has been configured.

- Enter the following details:
- Title: Network Admin
- Domain Username: (example: DOMAIN\Username or username@domain)
- Password:
- Click Create Key
Configuring a Discover Job
To view the properties of a device or to execute IT Automations on a device, it must exist within the Inventory. The population of the inventory is undertaken by the execution of one or more discovery jobs. In this example, you will configure a discovery using Windows Active Directory, connecting to devices via WinRM to retrieve the properties.
Navigate to the ITOM Job Queue (Home > ITOM > Job Queue)
Click the Create New button and select Discovery Job
Enter the following details:
Name: AD Discovery using WinRM
Site Target: SIS Demo
Protocol: WinRM
Discovery Mode: Active Directory
Container: <windows domain> (example:hornbill.qa)
Admin Credentials: <your keysearch entry>
Click Create button
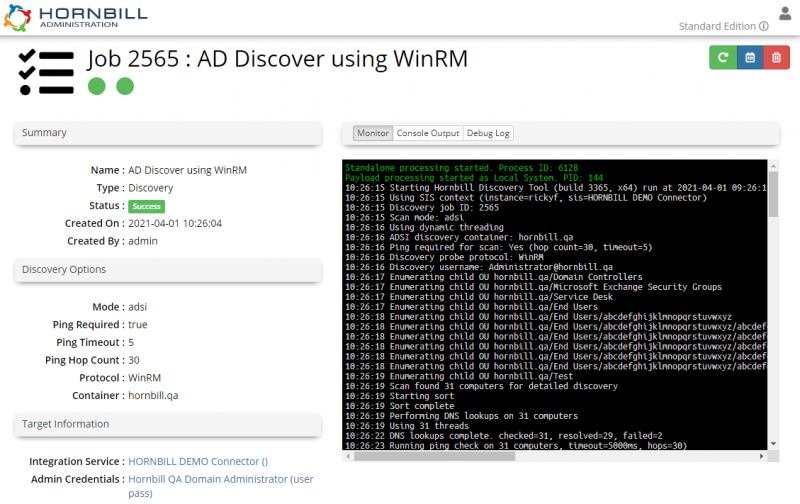
You can monitor the progress of the job via the monitor, and once the job has completed, the Console Output and Debug log are displayed. These provide a view of the raw output from the process execution on the target device and the debug logging produced by the target device's running process.
Monitor:
Enumerating child OU
Scan found X computers for detailed discovery.
Performing WMI discovery of X computers
Summary
=======
Successful Discovery
All Computers
The discovery was executed successfully. The results are now being imported.
10:11:26 Discovery import complete. Added:X Updated:X Skipped:X Missing:X Failed:X
Console Output:
Review Summary, confirming successful discovery, and noting any failures.
Debug:
If errors are identified during the process execution, the log details will provide additional information to help diagnose the failure.
success here implies that the Discovery process did not fail and not that all devices were detected and were able to be accessed.
Inventory Viewer
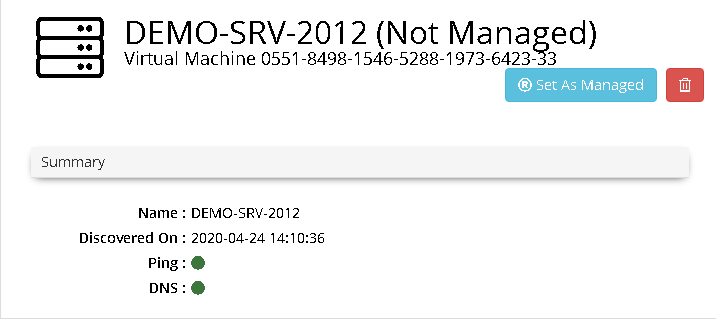
Allows you to Browse and Manage all discovered devices; from here, you can remove unwanted devices and modify a device's Managed status. When a device is initially discovered, it will be classified as Un-Managed, and only basic properties will be visible. IT Automations will not be able to be executed on these devices until it is classified as a Managed Device, allowing access to its full properties.
Registering a Device as Managed
- Navigate to the ITOM Inventory (Home > ITOM > Inventory Viewer)
- Select All Un-Managed Inventory

- Click on the Name of an Un-Managed inventory Item
Initially all discovered devices will appear as Un-Managed devices with only basic properties visible.
- Pressing the Set As Managed button links a subscription to the device, which is consumed for a minimum of 30 days; as stated in the message provided, once confirmed, the device's properties will become visible.
- Use the Breadcrumbs to return to the Inventory Viewer
Registering Multiple Devices as Managed
Setting devices as Managed individually is not always desirable, a more efficient method is to set multiple devices at the same time.
- Click check next to the heading Name to select All Discovered Devices
Individual devices can be selected / deselected by clicking the check box adjacent to each entry.

- Click the The Set As Managed
 button on the toolbar
 - Click Yes to confirm
- Select All Managed Inventory
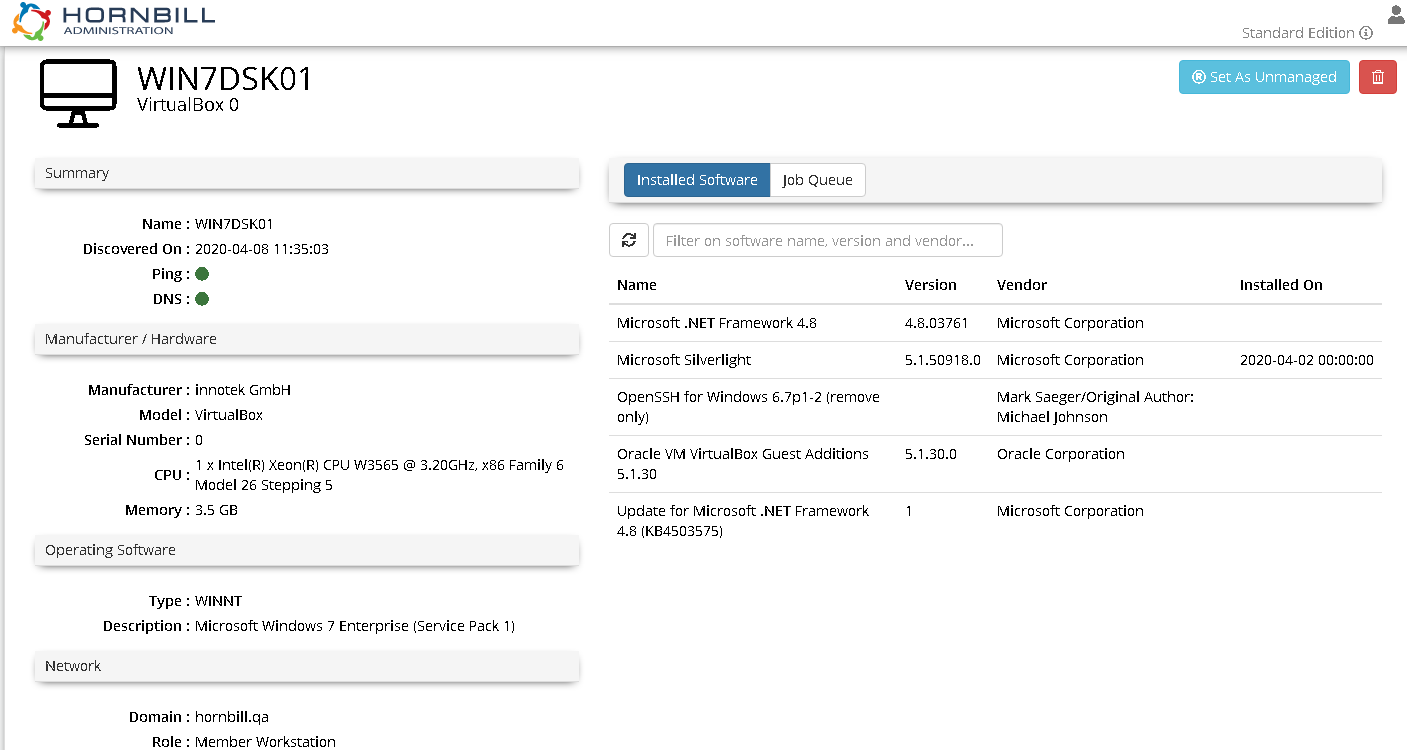
Inventory Properties
- Click on the Name of a Managed inventory Item
Installed Packages
Before any IT Automations can be configured, the required packages will need to be available and listed in the Installed Packages list. There are few ways for Packages to be installed depending on your subscription, including manually uploading or creating your own package from scratch. The Package Library is a more convenient method and contains several packages produced and supported by Hornbill, from which you can install, update or remove.
Package Library
The packages that are available will depend on your subscription, all Windows Management packages will be available as standard. The following steps will take you through the installation of the Active Directory and Windows Management packages, available to all subscription levels:
- Navigate to (Home > ITOM > Installed Packages)
- Click the Package Library
 button

Click Install on both the Active Directory Group and User Management packages
Click Install on Windows Disk Cleanup
Click Close
IT Automation Job
Once packages have been installed, IT Automation jobs can execute specific actions on individual or multiple devices. In the following examples, the steps will guide you through configuring an Automation on both a single device and across multiple devices.
Single Computer
The following steps will guide you through the process of configuring and executing a IT Automation Job to execute an action from the Windows AD Managemnet package to create a new user within an Active Directory Domain.
- Navigate to (Home > ITOM > Job Queue)
- Click the Create New button, and select IT Automation
- Enter Name: Create User: Andy Smith
- Click the Installed Packages button
- Select private:hornbill > Managing Active Directory > Active Directory User Management
- Click Apply
- Operation should be defaulted to Create
- Set Site Target to Server and select your SIS Connector
- Set Target Device to Inventory and select your Domain Controller
- You can also select any discovered device that is running the Remote Server Administration Tools (RSAT)
- Set Admin Credentials to Network Admin
- Enter the following Details:
- Given Name : Andy
- Surname : Smith
- SamAccountName : AndySmith
- AccountPassword : Passw0rd
- Display Name : Andy Smith
- Name : Andy Smith
- Click Create
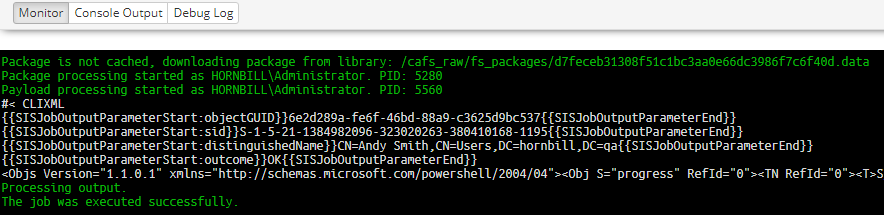
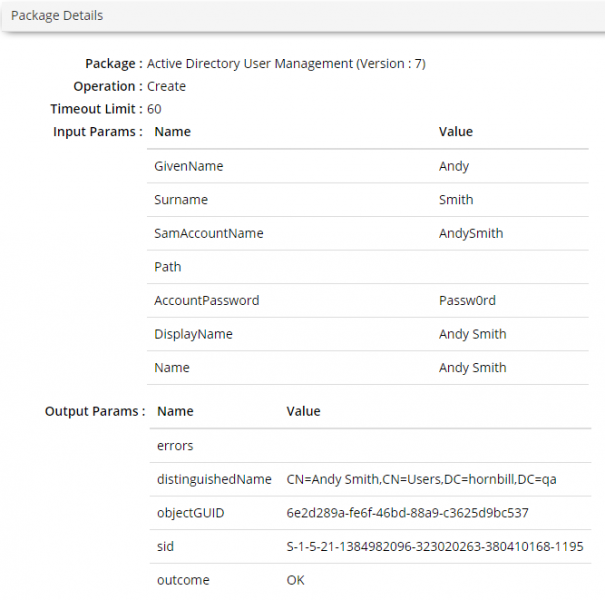
- The monitor tab shows the raw output from the job; you will see the last entry is "The job was executed successfully". However, that only confirms that the process executed and not if the action successfully created the user. The information showing the outcome of the create operation will be within the block of text output in white and will vary depending on the package. In this example, the text {{SISJobOutputParameterStart:outcome}}OK{{SISJobOutputParameterEnd}} shows that the outcome was successful and the action created the user. In many cases, it may difficult to locate the relevant output parameters to identify the outcome. In these cases, the Package Details section provides a list of both input and output parameters in a user-friendly manner:
Multiple Computers
You can perform a package operation across several devices using a single Job when the target is specified using an Inventory List. The list must already exist and populated with one or more devices; they are created and managed via the ITOM Inventory. The following steps will guide you through the process of configuring an IT Automation that executes an action from the Windows Management package to restart the print service on multiple Windows devices.
- Navigate to (Home > ITOM > Job Queue)
- Click the Create New button, and select IT Automation
- Enter Name: Restart Print Spooler
- Click the Installed Packages button
- Select provate:hornbill > Managing Windows Devices > Windows Management (...)
- Click Apply
- Set Operation to: Service - Restart
- Set Site Target to Server and select an Instance
- Set Target Device to: Inventory and select a Device
- Set Admin Credentials to Network Admin
- Click Create

Click on a Job Name to view the Individual Child Job
Click Parent Link in the Summary to Return to Parent Job

Job Scheduling
The versatile Job scheduler allows you to configure an IT Automation, Discovery or Runbook Process to execute to a specified schedule. It is typically used for Jobs that require execution more than once at specific times and days, such as backups, maintenance, and reporting scripts.
Discovery
Device discovery is a good candidate for scheduled jobs, and is usually scheduled to execute daily, following steps will guide you through process of scheduling a Windows AD discovery Job.
- Navigate to (Home > ITOM > Job Scheduling)
- Click the Create New button, and Select Discovery Schedule
- Enter the following details:
- Name: AD Discover
- Schedule: Run Every Period
- Every (n) Minutes: 60
- Description: Scheduled AD Discovery
- Site Target: Server | SIS Instance
- Protocol: DCOM
- Discovery Mode: Active Directory
- Container: horbnbill.edu
- Admin Credentials: Network Admin
- Ensure Next Scheduled Date and Time is set to a couple of minutes in the future
- Click Enable Schedule
- Navigate to (Home > ITOM > Job Scheduling)

Wait for the Job schedule Time, and Click on the AD Discovery Job Name
Click the Job History
Click on the Scheduled AD Discover Name
IT Automation
IT Automation jobs can be scheduled to execute any package operation and are most commonly used for tasks executed regularly to a specific schedule, such as maintenance type operations.
Windows Disk Cleanup
The Windows Disk Cleanup package is commonly used on a regular basis to clear down temporary files, unused system files and various other files from a Windows computer. The following will guide you through the process of setting up a schedule to execute the package operation on a weekly basis.
- Navigate to (Home > ITOM > Job Scheduling)
- Click the Create New button, and Select IT Automation Schedule
- Enter the following Schedule details:
- Name: Windows Disk Cleanup
- Schedule: Run daily
- Ent the following IT Automation Job Settings:
- Package: private:hornbill > Disk Cleanup > Windows Disk Cleanup
- Site Target: SIS Server
- Target Device: List| Test Servers
- Admin Credentials: Network Admin
- Reference: Demo Job
- Set the following Operation Parameters to True:
InternetCacheFiles, Recycle Bin, and Temporary Files
Ensure Next Scheduled Date and Time is set to a couple of minutes in the future
Click Enable Schedule
Navigate to (Home > ITOM > Job Scheduling)
Wait for the Job schedule Time, and Click on the Job Name: Windows Disk Cleanup
Click Job History

Click on the Job Name: Windows Disk Cleanup (with the highest Job Id)

Review the list of jobs, and confirm that all are successful
Click on the Name of any Job entry in the list and review the Details
To return to the parent Click the link shown in the Summary section