Difference between revisions of "Manage Activity Templates"
Jump to navigation
Jump to search
| (94 intermediate revisions by 2 users not shown) | |||
| Line 1: | Line 1: | ||
| − | + | {{breadcrumb|[[Main Page|Home]] > [[Collaboration]] > [[My Activities]] > Manage Activity Templates|Collaboration}} | |
| − | + | {{Section| | |
| − | |||
| − | { | ||
| − | |||
| − | |||
==Introduction== | ==Introduction== | ||
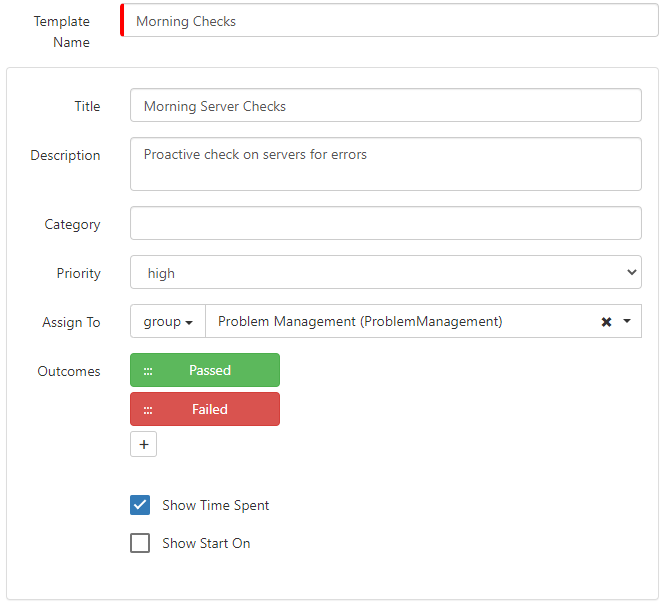
| − | + | Activity Templates can be set up to provide users with selectable, pre-defined templates the are used for common activities. This ensures that all users that perform a particular activity are using the same configuration. Templates are only available to use when manually creating an activity. | |
| − | + | [[file:ActivityTemplate.png|right|border|350px|link=https://wiki.hornbill.com/images/0/02/ActivityTemplate.png]] | |
| + | <br> | ||
| + | Templates allow you to set up the following: | ||
| + | :* Title | ||
| + | :* Description | ||
| + | :* Category | ||
| + | :* Priority | ||
| + | :* Assign to | ||
| + | :* Outcomes | ||
| + | :* Show ''Time Spent'' | ||
| + | :* Show ''Start On'' | ||
| + | :* Add a Checklist | ||
| | | | ||
| − | | | + | {{RightBox|In This Article| |
| − | + | :* [[#Access|Access]] | |
| − | + | :* [[#Add a New Template|Add a New Template]] | |
| + | :* [[#Outcomes|Outcomes]] | ||
| + | :* [[#Checklists|Checklists]] | ||
| + | :* [[#Managing Existing Templates|Managing Existing Templates]] | ||
| + | }} | ||
| + | {{RightBox|Related Articles| | ||
| + | :* [[Activities]] | ||
:* [[My Activities]] | :* [[My Activities]] | ||
| − | | | + | :* [[Roles]] |
| − | == | + | :* [[Manage Activity Categories]] |
| − | [[ | + | }} |
| − | + | }} | |
| − | + | {{Section| | |
| + | ==Access== | ||
| + | ===Roles=== | ||
| + | A user must have one of the following [[Roles|roles]] in order to access the option for managing templates. | ||
| + | {{bullet1|Admin Role|Any user with the ''Admin Role'' will have access to manage the Activity Templates}} | ||
| + | {{bullet1|Activities Template Manager|This roles allows you to provide access to non-administrative users}} | ||
| − | + | ===Manage Templates=== | |
| − | + | The ''Manage Templates'' option can be accessed from the main toolbar located in the ''Activities'' view. This option will only be visible if one of the above roles have been assigned to the user. | |
| − | + | :# Select the '''Home''' icon in the left hand Application Bar | |
| − | + | :# Select '''My Activities''' | |
| − | == | + | :# In the Activities Tool Bar select the drop down option on the far right |
| − | + | :# Select '''Manage Templates''' | |
| − | + | | | |
| + | {{rightBox|Watch Me Access Activity Templates| | ||
| + | [[file:AccessActivityTemplates.mp4|400px|center]] | ||
| + | }} | ||
| + | }} | ||
| + | {{TOP}} | ||
| + | {{Section| | ||
| + | ==Add a New Template== | ||
| + | ===Key Fields=== | ||
| + | Click on [[File:template_add_new.png]] to create a new template. A blank form will be displayed on the right hand side. | ||
| + | {{bullet1|Template Name|This is the only mandatory field. This will be displayed within a list of available templates on an Activity form. This is only used to identify the template and is not used within the activity itself.}} | ||
| + | {{bullet1|Title|This will populate the title field of the activity which is visible within the Activity list and in any component where activities are displayed}} | ||
| + | {{bullet1|Description|This will populate the description field of the activity. Here you will provide details of the activity that needs to be carried out.}} | ||
| + | {{bullet1|Category|This will populate the category field. Information on creating and managing the available categories can be found '''[[Manage Activity Categories|here]]'''}} | ||
| + | {{bullet1|Priority|Options include ''High'', ''Normal'', and ''Low''}} | ||
| + | {{bullet1|Assign to|Predefine the user, role, or group that the activity will be assigned to.}} | ||
| + | {{bullet1|Outcomes|The default outcome is '''Done'''. This can be modified and additional outcomes can also be defined. See '''[[#Outcomes|Outcomes]]'''}} | ||
| + | {{bullet1|Show ''Time Spent''|Checking this option will expose the ''Time Spent'' field when completing an activity. This is useful if you want to track the amount of time that the activity took.}} | ||
| + | {{bullet1|Show ''Start On''|Checking this option will expose the ''Starts On'' field on the activity}} | ||
| + | {{bullet1|Add a Checklist|Add a list of things that need to be done as part of this activity. See '''[[#Checklists|Checklists]]'''}} | ||
| + | | | ||
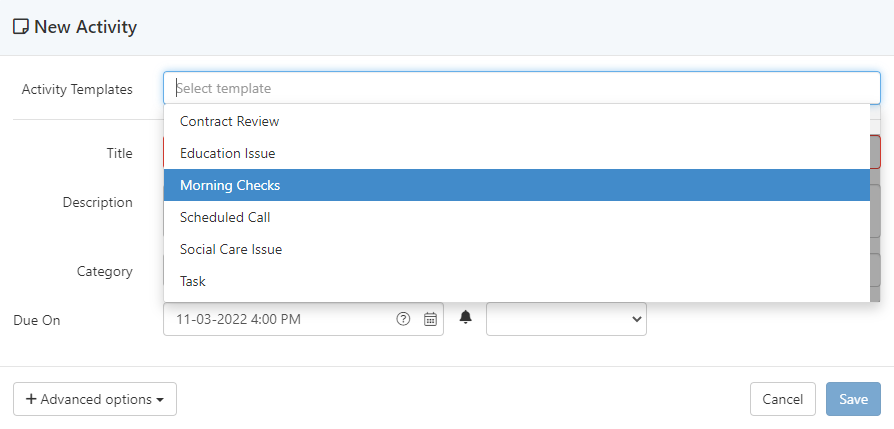
| + | {{rightBox|Selecting a Template From a New Activity| | ||
| + | [[file:activityTemplateSelection.png|400px|border|link=https://wiki.hornbill.com/images/a/a5/ActivityTemplateSelection.png]] | ||
| + | }} | ||
| + | }} | ||
| + | {{TOP}} | ||
| + | {{Section| | ||
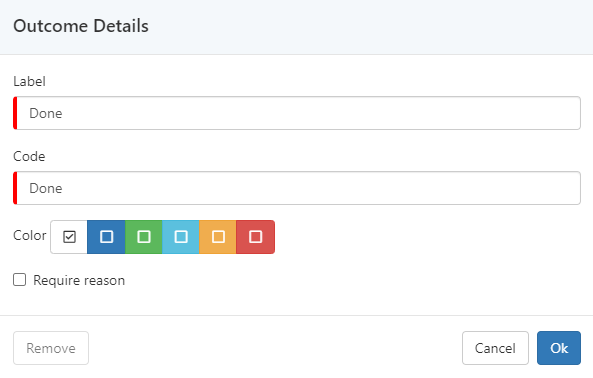
| + | ==Outcomes== | ||
| + | When an Activity is being completed, a user can select the outcome of the activity. New Templates have the default outcome set to '''Done'''. You may want to change this or add more outcomes to allow a user to select alternative outcomes such as ''Not Done'', ''Passed'', ''Failed'', etc. | ||
| + | ===Add an Outcome=== | ||
| + | [[file:ActivityTemplateOutcome.png|right|400px|border|link=https://wiki.hornbill.com/images/8/81/ActivityTemplateOutcome.png]] | ||
| + | Click on the + to add a new Outcome | ||
| + | {{bullet1|Label|The display name for the outcome which will be seen by the user when completing the activity}} | ||
| + | {{bullet1|Code|The code which will be attributed to the outcome and could be used for reporting purposes}} | ||
| + | {{bullet1|Colour|Choose a colour which will be used for the outcome when the user is completing the activity}} | ||
| + | {{bullet1|Require Reason|Tick if you want to make it mandatory for the user completing the activity to have to provide a note when choosing this outcome for the activity.}} | ||
| − | + | ===Manage Existing Outcomes=== | |
| − | + | {{bullet1|Update|Click on an existing ''Outcome'' to display the properties box. Make any required changes and click on ''Save''}} | |
| + | {{bullet1|Remove|Click on an existing ''Outcome'' to display the properties box. Click on the ''Remove'' button.}} | ||
| + | |}} | ||
| + | {{TOP}} | ||
| − | + | {{Section| | |
| − | + | ==Checklists== | |
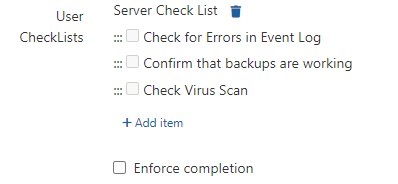
| − | + | One or more checklists can be added to a Template. These checklists will be presented to the user on the Activity Form where they can check off each item as they are completed. This can complement the description of the task with a definitive list of items that need to be done as part of the activity. Checklists interact with the Progress Bar of an activity and with each item that is checked, the Progress Bar will be reflected. | |
| − | + | [[File:activityTemplateChecklist.png|border|right|link=https://wiki.hornbill.com/images/4/4f/ActivityTemplateChecklist.png]] | |
| − | + | {{bullet1|List|More than one list can be configured. Enter the name of the list and add additional lists if required}} | |
| − | + | {{bullet1|Item|Each list is made up of items. Each item will be displayed with a checkbox within the activity that can be selected by the user when completed}} | |
| + | {{bullet1|Enforce Completion|When selected, all ''Items'' must be checked before the activity can be completed.}} | ||
| + | |}} | ||
| + | {{TOP}} | ||
| + | {{Section| | ||
| + | ==Managing Existing Templates== | ||
| + | A list of all existing Activity Templates are displayed under the '''Activity Templates''' view, select an existing template to do the following: | ||
| − | + | {{bullet1|Edit|Edit the content of an existing activity template and then use the '''Update''' button to apply the changes. The Changes will only apply to new activities which use the template from that point forward}} | |
| + | {{bullet1|Remove|Click on the ''Remove'' button to remove the activity template. This will permanently delete the activity template. This will not effect existing activities which were created using the template}} | ||
| + | {{bullet1|Copy|Copy an existing activity template by using the '''Save as New''' button and giving the new template a different name}} | ||
| + | |}} | ||
| + | {{TOP}} | ||
[[Category:Collaboration]] | [[Category:Collaboration]] | ||
Latest revision as of 14:56, 4 November 2022
| Home > Collaboration > My Activities > Manage Activity Templates | Index |