Difference between revisions of "IT Automation Job"
| (46 intermediate revisions by the same user not shown) | |||
| Line 1: | Line 1: | ||
| − | {{Bluebanner|[[Main Page|Home]] > [[IT Operations Management|ITOM]] > [[Job Queue]] > Create New|[[:Category:ITOM|Index]]}} | + | {{Bluebanner|[[Main Page|Home]] > [[IT Operations Management|ITOM]] > [[Job Queue]] > [[Create New Job]] > IT Automation Job|[[:Category:ITOM|Index]]}} |
{|style="width: 100%" | {|style="width: 100%" | ||
|- valign="top" | |- valign="top" | ||
|style="width:73%"| | |style="width:73%"| | ||
==Introduction== | ==Introduction== | ||
| − | IT Automation jobs are executed on Managed Devices from within the ITOM Inventory | + | IT Automation jobs are executed on Managed Devices selected from within the ITOM Inventory and can be initiated from various sources such as a Hornbill Business Process or AutoTask. Jobs can be executed on an ad-hoc basis as well as scheduled, or via a Runbook process, all configured via the Hornbill Administration portal. Packages are used to provide the automation payload and may require prerequisites to be in place along with security credentials. This information and details of all configurable parameters are provided via the Package documentation found in the [[ITOM Package Library]]. |
|style="width:5%"| | |style="width:5%"| | ||
| | | | ||
| Line 11: | Line 11: | ||
== Related Articles == | == Related Articles == | ||
* [[IT Operations Management]] | * [[IT Operations Management]] | ||
| − | |||
* [[ITOM Package Library]] | * [[ITOM Package Library]] | ||
* [[Site Integration Services]] | * [[Site Integration Services]] | ||
| Line 17: | Line 16: | ||
|} | |} | ||
| − | ==IT Automation Job | + | == Creating an IT Automation Job== |
| − | + | # Select the '''Create New''' option | |
| − | + | # Select '''IT Automation Job''' | |
| − | + | # Enter Name to identify the Job | |
| − | + | # Select the required Pacakage via the [[File:SelectPackageButton.png|30x30px]] button | |
| − | + | # Select the Run Operation | |
| − | + | # Select a Site Target (SIS) | |
| − | + | #:This can be a single Server or a Group | |
| − | + | # Select the required Target Machine | |
| − | + | #:This can be from a previously created List, the Discovered Inventory list or Manually entered | |
| − | + | # Enter the relevant Credentials as required | |
| − | + | #:The selected Run Operation determines this | |
| − | + | # Enter any necessary parameters | |
| + | #:The selected Run Operation determines this | ||
| + | # Click Create button | ||
| − | + | [[Category:ITOM]] | |
| − | |||
| − | + | ==Job Properties== | |
| − | + | {{Bullet1|Name|Name provided to identify the IT Automation Job}} | |
| − | + | {{Template:IT Automation Job Properties}} | |
| − | |||
| − | + | == Job Details == | |
| − | + | [[File:JobQueueAutomationJobDetailsFade.png|350px|right|link=https://wiki.hornbill.com/images/b/b2/JobQueueAutomationJobDetails.png|ITOM IT Automation Job Properties]] | |
| − | + | Once the job has been created, details will be displayed showing information relating to the job, including the status of the job. Monitoring, Console and Debug Logging are provided for displaying a jobs progress and to aid with troubleshooting failures. | |
| − | + | {{Bullet1|Summary|Shows the current status of the job and its name along with who created it and when}} | |
| − | + | {{Bullet1|Package Details|Displays details of the deployment package, configured operation along with any arguments that were specified and job timeout limit}} | |
| − | + | {{Bullet1|Target Information|Provides details of the SIS server that will facilitate the job, target machine and the security keys used}} | |
| − | + | {{Bullet1|Execution Details|The execution details show when the job was started and completed along with any result code}} | |
| − | |||
| − | |||
[[Category:ITOM]] | [[Category:ITOM]] | ||
| − | === Monitor === | + | ===Monitor=== |
| − | The Monitor frame provides information relating to the execution of the job | + | The Monitor frame provides information relating to the execution of the job; the details shown will be dependant on the type of discovery or package that is being been executed. |
[[image:jobMonitorWhoAmI-Identity.png]] | [[image:jobMonitorWhoAmI-Identity.png]] | ||
| Line 57: | Line 54: | ||
The above example shows that the process has started and provides an id, which can be used to identify the task executing the package on the target machine. Depending on the package configuration, the monitor will specify more than the process ID. In the above case, the package is configured to execute an executable program as a specific user, using the "Run As Credentials". The first ID is for the process that triggers the package execution, which triggers another process to run an executable using the provided credentials. | The above example shows that the process has started and provides an id, which can be used to identify the task executing the package on the target machine. Depending on the package configuration, the monitor will specify more than the process ID. In the above case, the package is configured to execute an executable program as a specific user, using the "Run As Credentials". The first ID is for the process that triggers the package execution, which triggers another process to run an executable using the provided credentials. | ||
| − | All console output from the process will be displayed after this and will dependant on the package contents and configuration. Once the job has completed if there are any output parameters they are processed and displayed, and confirmation of the job successful completion or failure will be output. | + | ===Console Output=== |
| + | All console output from the process will be displayed after this and will dependant on the package contents and configuration. Once the job has completed if there are any output parameters, they are processed and displayed, and confirmation of the job successful completion or failure will be output. | ||
Once the job has completed the Console Output and Debug Log frames will become enabled. The Console Output provides a view of only the console output, including any error messages. | Once the job has completed the Console Output and Debug Log frames will become enabled. The Console Output provides a view of only the console output, including any error messages. | ||
| Line 63: | Line 61: | ||
[[image:jobConsoleWhoAmI-Identity.png]] | [[image:jobConsoleWhoAmI-Identity.png]] | ||
| − | In cases where the | + | ===Debug Log=== |
| + | In cases where the Package may have failed or completed incorrectly, the Debug Log can be used to review errors and other technical information. | ||
[[image:jobDebugLogWhoAmI-Identity.png]] | [[image:jobDebugLogWhoAmI-Identity.png]] | ||
| − | The | + | The Log provides three sections: |
| + | |||
| + | {{Bullet1|Full|Full debug log information}} | ||
| + | {{Bullet1|Standard|Information log entries}} | ||
| + | {{Bullet1|Problem|Warning and Error, entries that may identify potential problems}} | ||
| − | + | {{infobox|The sections output will depend on the job, and thus some sections may not be available}} | |
| − | |||
| − | When a job is cancelled its process will be sent a close message, therefore, allowing the process to close itself and all child processes in an orderly fashion | + | ===Action Buttons=== |
| + | {{Bullet1|Activate this Job|Enables a Deferred Job to be Activated for processing}} | ||
| + | {{Bullet1|Copy this Job|Copies the job's properties and allows for a new job to be created once edited}} | ||
| + | {{Bullet1|Cancel|When a job is cancelled its process will be sent a close message, therefore, allowing the process to close itself and all child processes in an orderly fashion}} | ||
| + | {{Bullet1|Abort|Aborting a Job causes the Job to be forcefully terminated immediately possibly causing child processes to be orphaned, and should only be used as a last resort}} | ||
Latest revision as of 11:24, 14 December 2020
| Home > ITOM > Job Queue > Create New Job > IT Automation Job | Index |
IntroductionIT Automation jobs are executed on Managed Devices selected from within the ITOM Inventory and can be initiated from various sources such as a Hornbill Business Process or AutoTask. Jobs can be executed on an ad-hoc basis as well as scheduled, or via a Runbook process, all configured via the Hornbill Administration portal. Packages are used to provide the automation payload and may require prerequisites to be in place along with security credentials. This information and details of all configurable parameters are provided via the Package documentation found in the ITOM Package Library. |
Related Articles |
Creating an IT Automation Job
- Select the Create New option
- Select IT Automation Job
- Enter Name to identify the Job
- Select the required Pacakage via the
 button
 - Select the Run Operation
- Select a Site Target (SIS)
- This can be a single Server or a Group
- Select the required Target Machine
- This can be from a previously created List, the Discovered Inventory list or Manually entered
- Enter the relevant Credentials as required
- The selected Run Operation determines this
- Enter any necessary parameters
- The selected Run Operation determines this
- Click Create button
Job Properties
- Name
- Name provided to identify the IT Automation Job

- Package
- Package used to provide the IT Automation payload

- Run Operation
- Operation to perform using the package
- Site Target
- Specify the SIS Server or Group that will facilitate the Automation Job
- Target Device
- Select the Device(s) that the Operation will target
- List
- Target Devivces are sourced from a pre-created Inventory List
- Inventory
- Select a Device from the ITOM Inventory
- Manual
- Manually entered device name, that must already exist in the ITOM Inventory and is marked as a Managed device
- Credentials
- Sourced from the KeySafe, provides the security context to be used for package deployment and execution
- Admin Credentials
- Security Context used to deploy the package onto the target device(s)
- Run As Credentials
- Security Context used to execute the package on the target device(s) (if not provided then Admin Credentials are used)
- Extra Credentials
- Optional credentials used as part of the functionality within the package
- Operation Parameters
- Once a package and a Run Operation has been selected, any related parameters will be displayed; mandatory fields are highlighted and hints may be provided in the input box.
Job Details
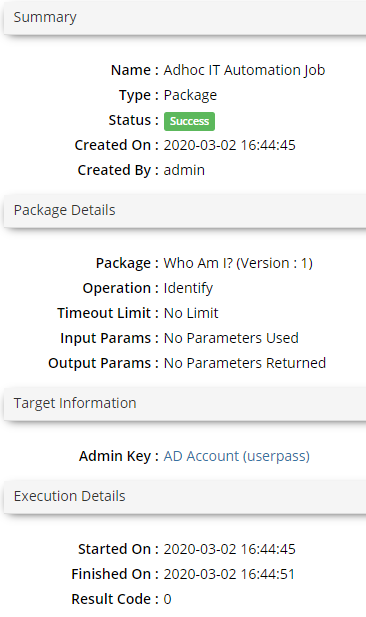
Once the job has been created, details will be displayed showing information relating to the job, including the status of the job. Monitoring, Console and Debug Logging are provided for displaying a jobs progress and to aid with troubleshooting failures.
- Summary
- Shows the current status of the job and its name along with who created it and when
- Package Details
- Displays details of the deployment package, configured operation along with any arguments that were specified and job timeout limit
- Target Information
- Provides details of the SIS server that will facilitate the job, target machine and the security keys used
- Execution Details
- The execution details show when the job was started and completed along with any result code
Monitor
The Monitor frame provides information relating to the execution of the job; the details shown will be dependant on the type of discovery or package that is being been executed.

The above example shows that the process has started and provides an id, which can be used to identify the task executing the package on the target machine. Depending on the package configuration, the monitor will specify more than the process ID. In the above case, the package is configured to execute an executable program as a specific user, using the "Run As Credentials". The first ID is for the process that triggers the package execution, which triggers another process to run an executable using the provided credentials.
Console Output
All console output from the process will be displayed after this and will dependant on the package contents and configuration. Once the job has completed if there are any output parameters, they are processed and displayed, and confirmation of the job successful completion or failure will be output.
Once the job has completed the Console Output and Debug Log frames will become enabled. The Console Output provides a view of only the console output, including any error messages.

Debug Log
In cases where the Package may have failed or completed incorrectly, the Debug Log can be used to review errors and other technical information.

The Log provides three sections:
- Full
- Full debug log information
- Standard
- Information log entries
- Problem
- Warning and Error, entries that may identify potential problems
- The sections output will depend on the job, and thus some sections may not be available
Action Buttons
- Activate this Job
- Enables a Deferred Job to be Activated for processing
- Copy this Job
- Copies the job's properties and allows for a new job to be created once edited
- Cancel
- When a job is cancelled its process will be sent a close message, therefore, allowing the process to close itself and all child processes in an orderly fashion
- Abort
- Aborting a Job causes the Job to be forcefully terminated immediately possibly causing child processes to be orphaned, and should only be used as a last resort