Difference between revisions of "Working with Organizations"
| Line 43: | Line 43: | ||
===Contacts=== | ===Contacts=== | ||
| + | |||
| + | Create and add contact's to the organization using the '''Person''' icon in the tool bar. | ||
| + | * Complete the mandatory first and last names, and optionally add job role and contact details. | ||
| + | * Select '''More''' and add additional detail including language preferences (this is important if they will use the customer portal and for viewing content in their native language). | ||
| + | |||
| + | Existing contact's of an organization can be viewed from the '''Contact's''' collapsable section. | ||
| + | * '''Primary''' Contact - Use the '''Flag''' icon to mark one contact as a primary contact | ||
| + | * '''Archive''' - Mark a contact as archived using the '''Trash can''' icon | ||
| + | * '''Details''' - Click on the contact name to open their contact details record. | ||
===Service Contracts (Beta)=== | ===Service Contracts (Beta)=== | ||
Revision as of 13:25, 1 August 2017
IntroductionManage your customers, your activities with them, associated contact's, notes and documentation. |
Related Articles |
Features
Activity Stream
The activity stream (timeline) provides the ability to collaborate on all matters relating to the organization. Any user who has access to the organization record will be able to view, post, comment, and follow organisations. Following an organisation will push any updates to their timeline to your News Feed, so you can keep informed in real time about updates to all organizations you are interested in.
- As well as manually posting, and commenting, any administrative actions such as adding a member, creating an activity, linking an attachment will be recorded on the organizations timeline.
- View the Activity Stream link in the related information section for more information on working with Activity Streams.
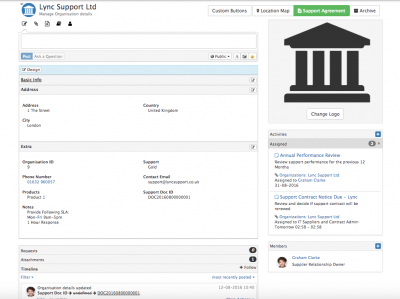
Organizations Details
Record the important information about each organization.
- By default the fields are organized into logical sections.
- Administrators can move fields from one section to another, add custom fields and manage the attributes of existing fields.
- Edit organizations details by selecting the Notepad icon in a details section
- All changes will be recorded in the organizations timeline, including who performed the action, when and what the value changed from and to.
Contacts
Create and add contact's to the organization using the Person icon in the tool bar.
- Complete the mandatory first and last names, and optionally add job role and contact details.
- Select More and add additional detail including language preferences (this is important if they will use the customer portal and for viewing content in their native language).
Existing contact's of an organization can be viewed from the Contact's collapsable section.
- Primary Contact - Use the Flag icon to mark one contact as a primary contact
- Archive - Mark a contact as archived using the Trash can icon
- Details - Click on the contact name to open their contact details record.
Service Contracts (Beta)
Documents
Requests
Attachments
Activities
Members
Administration
- Users with the Form Designer role, will be able to add custom fields, hide existing fields, edit their properties, and edit which sections of the organisation record, fields are displayed in. This can achieved by dragging and dropping the fields into the required sections. With the Form Designer role, users will see a Design option to go into edit mode.
- Custom Buttons - Create custom buttons on the organisations details. Typical use of organisations custom buttons could be to link to a document (held in Document Manager, or other externally accessible cloud solution)
To create custom button, define the required URL, add in the variable (if required), in the above example possibly a document id held in one of organisations custom fields, give it a title, tooltip, icon and colour
