Difference between revisions of "Service Manager Mobile"
| Line 1: | Line 1: | ||
| − | {{bluebanner|[[Main Page|Home]] > [[Hornbill Mobile]] > Service Manager Mobile|[[ | + | {{bluebanner|[[Main Page|Home]] > [[Hornbill Mobile]] > Service Manager Mobile|[[:Category:Mobile|Index]]}} |
| − | {{IntroAndLinks|The Service Manager Application is accessible to co-workers using the [[Hornbill Mobile]] App. This is available for both Android and iOS users. This provides mobile support staff an option to create, view, and manage their Service Manager request queue.| | + | {{IntroAndLinks|The Service Manager Application is accessible to co-workers using the [[Hornbill Mobile]] App. This is available for both Android and iOS users. This provides mobile support staff an option to create, view, and manage their Service Manager request queue. The Request List can be access on the main Mobile App menu, within the Service Manager section| |
:* [[Hornbill Mobile]] | :* [[Hornbill Mobile]] | ||
:* [[Reassign_%26_Resolve_Requests|Request Details & Options]] | :* [[Reassign_%26_Resolve_Requests|Request Details & Options]] | ||
Revision as of 00:33, 17 June 2020
| Home > Hornbill Mobile > Service Manager Mobile | Index |
IntroductionThe Service Manager Application is accessible to co-workers using the Hornbill Mobile App. This is available for both Android and iOS users. This provides mobile support staff an option to create, view, and manage their Service Manager request queue. The Request List can be access on the main Mobile App menu, within the Service Manager section |
|
Default View
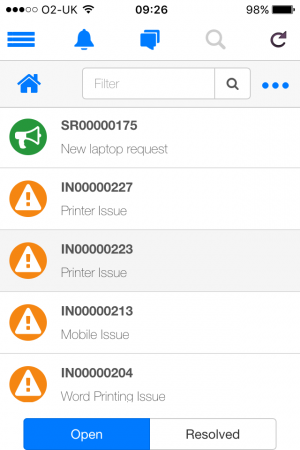
The default View will show Requests which are assigned to the Co-worker directly.
- Search & View Requests
- Update & Collaborate on Requests
- Reassign & Resolve Requests
Search & View Requests
Co-Workers have various options available to them to change the default view by creating their own Home View, create and filter adhoc, and use a Quick Filter option to narrow the results down.
List Order
By default the list of requests are displayed starting with the oldest requests first, based on the Logged On date. Using the arrow icon at the top of the list you can reverse this view to show the newest requests first.
Setting a Home View
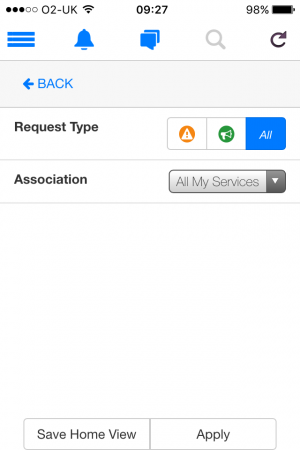
- Select the three dot button at the top of the request list to open the filter builder.
- The Co-worker will be presented with the icons for the request types they have the rights to view. Choose a specific request type, or all requests for the view you wish to create.
- The Co-worker will also have the option to create the view based on the following options:
- My Requests
- All My Teams
- All My Services
- Specific Teams they are a member of
Once the Home View has been defined you will be returned to the request list with this view applied. If you have chosen to use adhoc views, you can easily return to your Home View from the request list by selecting the Home icon at the top of the request list.
Using Adhoc Views
In the same way as creating a permanent home view, it is also possible to define and use adhoc views, as needed. Simply following the same instructions for creating a home view, but when saving the view rather than selecting Save Home View option choose Apply this will simply apply the view criteria and return you to the request list.
- Select the three dot button at the top of the request list to open the filter builder.
- The Co-worker will be presented with the icons for the request types they have the rights to view. Choose a specific request type, or all requests for the view you wish to create.
- The Co-worker will also have the option to create the view based on the following options:
- My Requests
- All My Teams
- All My Services
- Specific Teams they are a member of
Once the relevant options have been selected, select the Apply option for the view to be created and applied to the request list.
Request List Quick Filter
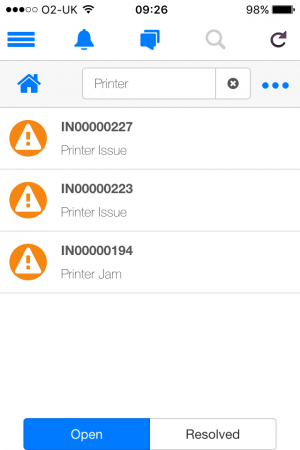
To make finding specific requests easier, a Co-Worker can use the Quick Filter search option at the top of the request list. This will search within the parameters of the currently applied view and will automatically filter the list results based on matching criteria.
The fields in the requests which the quick filter uses to compare include:
- Reference
- Summary
- Details
- Status
- Owner
- Customer
Dismiss the quick filter condition by selecting the x next to the quick filter.


