Difference between revisions of "Schedule Action Item"
Jump to navigation
Jump to search
| Line 1: | Line 1: | ||
<div style="border:1px solid #90C0FF; background:#D0E0FF; width:99%; padding:4px; margin-bottom:10px;"> | <div style="border:1px solid #90C0FF; background:#D0E0FF; width:99%; padding:4px; margin-bottom:10px;"> | ||
| − | __NOTOC__[[Main Page|Home]] > Service Manager | + | __NOTOC__[[Main Page|Home]] > [[Service Manager]] > Schedule Action Item |
</div> | </div> | ||
{|style="width: 100%" | {|style="width: 100%" | ||
Revision as of 17:47, 16 June 2017
Home > Service Manager > Schedule Action Item
IntroductionThe Schedule Action Item lets you define a start and end date for when this request will be implemented. This feature is only available for Change Requests and Releases. |
Related Articles |
Adding and Removing a Schedule
The Schedule Action can be used for both adding a schedule and removing a schedule. A From and a To date fields are provided
- Schedule Change
- Both a From and a To date are required when scheduling a change or release. Once the dates are entered you can click on the Schedule Change button to add the schedule and have it display on the Calendar.
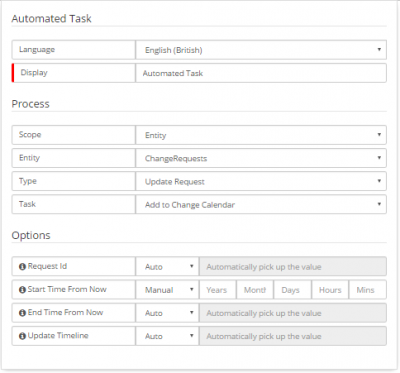
BPM Workflow Automation
The adding and removing of a Change Schedule can be automated within the BPM Workflow.
- Add to Change Calendar
- The From and To dates are set by selecting the number of days from the point that this step in the process is reached. For example Start this change 5 days from now and finish in 6 days from now. The corresponding dates will be automatically added.
- Remove from Change Calendar
- This will remove both the From and To dates from a change request. This can be useful for when a change or release has been rejected after it has been scheduled or you may want to remove the change from the Change Calendar once the change / release has been completed.