SSO Example Config Microsoft ADFS 2.0 for User Accounts
Home > Integration > Essential Integrations > Single Sign On with SAML 2.0 > SSO Example Config Microsoft ADFS 2.0
Related Articles |
IMPORTANT NOTICE
Information provided in this document is provided "as is" without warranty of any kind, either expressed or implied, including limitation warranties of merchantability or fitness for a particular purpose. Hornbill uses all reasonable efforts to include accurate and up-to-date information in this document; it does not, however, make any warranties or representations as to its accuracy or completeness. Hornbill will periodically add, change, improve, or update the information in this document without notice.
While we make every effort to ensure this information is both accurate and useful to you, we want to remind you that we are not experts on vendor specific iDP implementations of SAML 2.0 and are therefore not always able to provide support or troubleshooting advice with customer specific Identity Provider or Federated Directory Services implementations. We adhere strictly to the SAML 2.0:2005 standard and will talk in the language and terminology set out in that standard rather than any vendor-specific terminology which can in some cases be different and confusing if not properly understood. We expect that any troubleshooting in relation to configuring Hornbill for SSO will be carried out jointly between Hornbill and your own in-house or contracted expert that understands both SAML 2.0 and your specific federated directory services provider you have deployed within your organisation will be available. It is not practical for Hornbill's technical staff to be experts in the multitude of iDP solutions or customer-specific deployments of the same that are in use.
Hornbill Meta Data
Prior to embarking on your configuration of the necessary ADFS Relying Party Trusts as detailed below, it will be necessary to navigate to Hornbill Administration and obtain the Service Provider meta data that will be used during the configuration of your trusts. The Service Provider meta data file contains such things as the Service Provider Entity Id and Assertion Consumer Service (ACS) binding that your IdP needs to communicate during the authentication process.
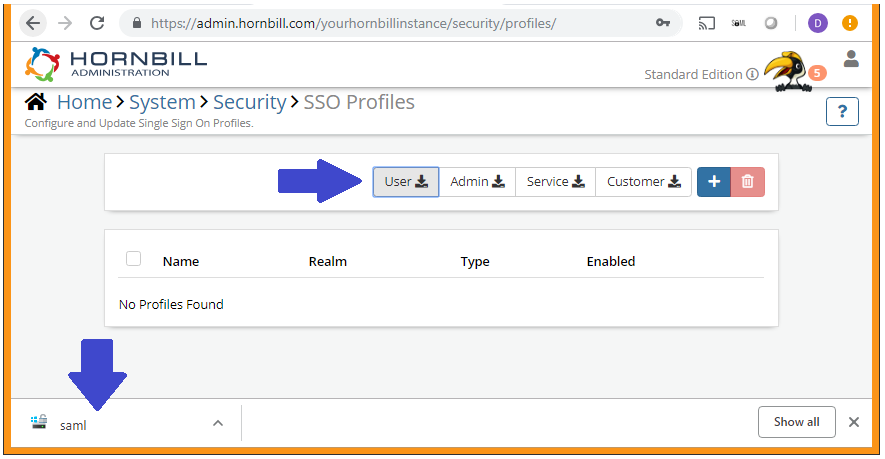
Log into Hornbill Administration and navigate to Home > system > Security > SSO Profiles. Located towards the top right of the list are four buttons labelled "User", "Admin", "Service", and "Customer". Clicking one of these will download the Hornbill meta data file for the associated Service URL.
USER - contains information for https://live.hornbill.com/[your instance name]
ADMIN - contains information for https://admin.hornbill.com/[your instance name]
SERVICE - contains information for https://service.hornbill.com/[your instance name]
CUSTOMER - contains information for https://customer.hornbill.com/[your instance name]
What Meta data files do I need to download?
You will need to create a relying party trust in ADFS to represent each of the Hornbill URL's that will be used to access your Hornbill instance and you will need the corresponding meta data files to support the creation of the trusts.
- "User" and "Admin" are always necessary. Therefore as a minimum you will have two relying party trusts which require the corresponding metadata.
- "Service" and "Customer" represent the two portals that are available as part of the Hornbill solution. Whether you need to create a relying party trust to cater for each of these will be dependent on how you are using the Hornbill solution. The "Service" metadata file is required if you are implementing the Service Portal (This portal is used to deliver services to employees within your own organisation). The "Customer" metadata file is only required if you are setting up SSO for the Customer Portal (This portal is used to provide services to those outside of your organisation).
Configuring Microsoft ADFS 2.0 to work as an iDP for Hornbill User Accounts
Connect to your ADFS server and open the ADFS Management Panel
- Open AD FS 2.0 > Trusted Relationships > Relying Party Trusts
- Click Add Relying Party Trust...
- Click Start
- Click Import data about the relying party from a file and click the browse button
- Select the remote file you downloaded from the SSO Profiles page in Hornbill Administration
- Click Next
- Enter a Display Name and click Next
- Choose Permit all users to access this relying party and click Next
- Click Close
- Open the Edit Claim rules panel (click on Edit Claim Rules...) if it doesn't open automatically
- Click Add Rule
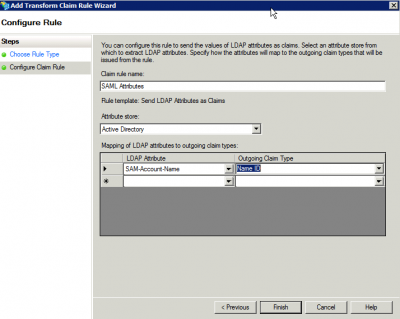
- Select Send LDAP Attributes as Claims
- Enter a rule name and select Active Directory as your attribute store
- You must set the name ID as your Hornbill instance uses this to identify the user
- You can add other attributes if necessary (See Auto Provisioning Additional Configuration, below)
- Click Finish and OK to save
Auto Provisioning Additional Configuration (Optional)
Suppose you wish to use auto-provisioning, aside from the Name ID above. In that case, you will need to specify additional claim rule mappings to send the user details from your ADFS server to Hornbill for use in account provisioning:
- In the ADFS Management Panel, open Trust Relationships > Relying Party Trusts
- Select the Service for your User Application
- Click 'Edit Claim Rules..'
- Click 'Edit Rule'
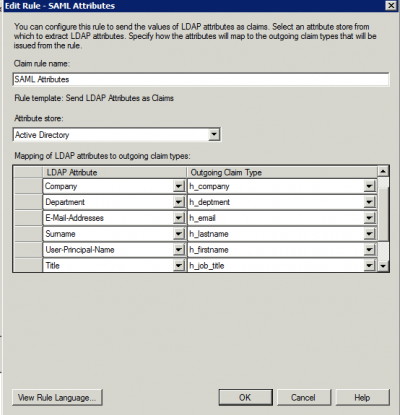
- Map your LDAP attributes to outgoing attributes (for simplicity, you should type the outgoing claim type in rather than selecting them from the drop-down)
- An example claim rule complete with the additional attributes to be used during auto-provisioning as detailed in the image on the right. The LDAP attributes shown are a typical example; however you should check that your directory contains the information you would expect within those attributes, i.e. check that "department" does include the department name etc.


