Difference between revisions of "Package Creator"
m |
|||
| (250 intermediate revisions by 2 users not shown) | |||
| Line 2: | Line 2: | ||
{{IntroAndLinks | {{IntroAndLinks | ||
| | | | ||
| − | The Package Creator allows | + | The Package Creator allows for the creation of user-defined Packages for use on an instance. A Package consists of a single Package Info file and with additional resource files where required. The info file contains all the details regarding operations and all parameters that may be necessary. Although it is possible to create a Package manually, a form-based editor is provided to simplify uploading and organising resources. These files are used to provide or support a package's operations a can be a combination of one or more scripts, executables and other supported filetypes. In addition to uploading files, an interface is also provided to create and edit various file types via a browser-based editor that supports syntax highlighting. |
| | | | ||
| + | * [[ITOM Package Creator Quick Guide]] | ||
* [[ITOM Package Library]] | * [[ITOM Package Library]] | ||
| − | |||
}} | }} | ||
| − | ==Toolbar== | + | ===Toolbar=== |
| + | [[File:PackageCreatorListFade.png|right|350px|link=https://wiki.hornbill.com/images/6/6e/PackageCreatorList.png]] | ||
| + | <!--[[File:ITOMPackageCreatorToolbar.png]]--> | ||
:{| | :{| | ||
|- valign="top" | |- valign="top" | ||
|style="width:500px"| | |style="width:500px"| | ||
{{Bullet1|Refresh|}} | {{Bullet1|Refresh|}} | ||
| − | {{Bullet1|Target OS| | + | {{Bullet1|Target OS|Operating System that the package was designed for execution}} |
| − | + | {{Bullet2|Windows 32/64-bit|}} | |
| − | + | {{Bullet2|Apple macOS|}} | |
| − | {{Bullet2|Windows 32-bit|}} | + | {{Bullet2|Generic Linux|}} |
| − | {{Bullet2| | ||
| − | {{Bullet2| | ||
|style="width:500px| | |style="width:500px| | ||
{{Bullet1|Purpose|Dynamic list populated from the Purpose field of entriies in the list}} | {{Bullet1|Purpose|Dynamic list populated from the Purpose field of entriies in the list}} | ||
| − | {{Bullet1|Filter|Free text filter on Package}} | + | {{Bullet1|Filter by package|Free text filter on Package}} |
| − | {{Bullet1|[[#Create a Package| | + | {{Bullet1|[[#Create a New Package|Create a Package]]|Create an IT Automation Package}} |
| − | {{Bullet1|Delete|Delete selected Package(s)}} | + | |style="width:500px| |
| + | {{Bullet1|[[#Delete a Package|Delete]]|Delete selected Package(s)}} | ||
|} | |} | ||
| − | ==Package | + | ===Package List=== |
| − | |||
:{| | :{| | ||
|- valign="top" | |- valign="top" | ||
| Line 33: | Line 33: | ||
{{Bullet1|Purpose|Summary of the intended use of the package}} | {{Bullet1|Purpose|Summary of the intended use of the package}} | ||
{{Bullet1|Target OS|Operating System that the package was designed for execution}} | {{Bullet1|Target OS|Operating System that the package was designed for execution}} | ||
| + | |style="width:500px"| | ||
{{Bullet1|Published|Late Published version of the packacge}} | {{Bullet1|Published|Late Published version of the packacge}} | ||
| − | |||
{{Bullet1|Created On|Date that the package was created}} | {{Bullet1|Created On|Date that the package was created}} | ||
{{Bullet1|Created By|The account used to create the package}} | {{Bullet1|Created By|The account used to create the package}} | ||
| + | |style="width:500px"| | ||
{{Bullet1|Last Updated On|Date the package was last updated}} | {{Bullet1|Last Updated On|Date the package was last updated}} | ||
{{Bullet1|Last Updated By|The account last used to update the package}} | {{Bullet1|Last Updated By|The account last used to update the package}} | ||
| Line 42: | Line 43: | ||
<br/> | <br/> | ||
| − | ==Create a Package== | + | ===Create a New Package=== |
| − | + | # From the '''Package Creator''' list, click the [[File:NewPackageButton.png|23x22px]] button | |
| − | + | # Enter a new '''Package Name''' | |
| + | # Click '''Create''' | ||
| + | |||
| + | ===Open an Existing Package=== | ||
| + | # Locate the Package in the '''Package Creator''' list | ||
| + | # Click on the Package name | ||
| + | |||
| + | ===Delete a Package=== | ||
| + | # From the '''Package Creator''' list | ||
| + | # Click the tick box next to each package to delete | ||
| + | # Click the [[File:jobInfoDeleteButton.png|23x22px]] button | ||
| + | |||
| + | =Package Editor= | ||
| + | The package editor displays a list of resources used, one of which is the Package Info file created by the system. This file contains the configuration details that define the packages operations and how any additional resources are used. Selecting the file displays a form used to edit the details; it is also possible to edit the file in its raw XML format via the built-in editor. Additional resources such as scripts, data files can be created directly from within the interface via an editor, administrators can upload binary files such as executables and windows installer files. | ||
| + | |||
| + | ==Package Content Toolbar== | ||
[[File:PackageContentEmptyFrame.png|right|350px]] | [[File:PackageContentEmptyFrame.png|right|350px]] | ||
| + | :{| | ||
| + | |- valign="top" | ||
| + | |style="width:500px"| | ||
{{Bullet1|Upload|Uploads files to the current folder}} | {{Bullet1|Upload|Uploads files to the current folder}} | ||
{{Bullet1|New Folder|Creates a new Folder}} | {{Bullet1|New Folder|Creates a new Folder}} | ||
{{Bullet1|New File|Creates a new file in the current folder}} | {{Bullet1|New File|Creates a new file in the current folder}} | ||
| + | |style="width:500px"| | ||
{{Bullet1|[[#Baseline|Baseline]]|Creates a new baseline of the current package}} | {{Bullet1|[[#Baseline|Baseline]]|Creates a new baseline of the current package}} | ||
{{Bullet1|Save|Saves amended package details}} | {{Bullet1|Save|Saves amended package details}} | ||
| + | |} | ||
| − | |||
| − | <div class="mw-collapsible mw-collapsed" data-collapsetext="Close View" data-expandtext=" | + | ==Package Information== |
| − | + | The '''Package Info''' file is viewed and modified via a form, displayed by default when entering the editor or whenever the file is selected. The following details can be edited via the form excluding the Package ID and Name: | |
| + | <br> | ||
| + | <div class="mw-collapsible mw-collapsed" data-collapsetext="Close View" data-expandtext="XML View" style=".right {position: absolute; right: 0px; width: 300px; border: 3px solid #73AD21; padding: 10px;}"> | ||
[[File:PackagePropertiesFormFade.png|350px|right|link=https://wiki.hornbill.com/images/5/5d/PackagePropertiesForm.png]] | [[File:PackagePropertiesFormFade.png|350px|right|link=https://wiki.hornbill.com/images/5/5d/PackagePropertiesForm.png]] | ||
| + | <div class="mw-collapsible-content"> | ||
| + | [[File:PackagePropertiesXml.png|350px|right|link=https://wiki.hornbill.com/images/9/93/PackagePropertiesXml.png]] | ||
| + | </div> | ||
| + | </div> | ||
{{Bullet1|Package ID|A GUID which uniquely identifies the package) will be generated on creation}} | {{Bullet1|Package ID|A GUID which uniquely identifies the package) will be generated on creation}} | ||
| − | {{Bullet1|Package|}} | + | {{Bullet1|Package|The name of the package entered during creation}} |
{{Bullet1|Description|Description of the packages content}} | {{Bullet1|Description|Description of the packages content}} | ||
{{Bullet1|Purpose|Summary of the intended use of the package}} | {{Bullet1|Purpose|Summary of the intended use of the package}} | ||
| − | {{Bullet1|Vendor ID|Defined by the creator of the package (Hornbill packages will set to " | + | {{Bullet1|Vendor ID|Defined by the creator of the package (Hornbill packages will set to "Hornbill")}} |
| − | {{Bullet1|Target OS| | + | <div class="mw-collapsible mw-collapsed" data-collapsetext="Show Less" data-expandtext="Read More" style="width:500px"> |
| + | {{Bullet1|Target OS|Specifies the target operating system that the package is designed to run on}} | ||
| + | <div class="mw-collapsible-content"> | ||
{{Bullet2|Windows 32-bit|}} | {{Bullet2|Windows 32-bit|}} | ||
{{Bullet2|Windows 64-bit|}} | {{Bullet2|Windows 64-bit|}} | ||
{{Bullet2|Windows Universal|Package can be invoked on either Windows 32 or 64-bit}} | {{Bullet2|Windows Universal|Package can be invoked on either Windows 32 or 64-bit}} | ||
| + | {{Bullet2|Apple macOS|}} | ||
| + | {{Bullet2|Generic Linux|}} | ||
</div> | </div> | ||
</div> | </div> | ||
| + | Selecting the XML View button on the toolbar switches the form editor to a text editor where an administrator can edit the file in its native XML format. This can be useful when making changes that can be quite tedious using the form view, such as generic modifications to packaging operations. | ||
| − | + | ==Package Operations== | |
| − | + | A package must contain one or more operations; each will perform an action that can be defined using one of a number of the command types. The Comand Type selected will depend on the Operating System to target the package and the functionality required. Some operations will require files to be created or uploaded before they can be configured, executing a script. Other operations such as those that execute as a single command can be configured via the interface provided. | |
| − | + | ===Creating an Operation=== | |
| − | |||
| − | |||
| − | |||
| − | |||
| − | |||
| − | === | ||
[[File:PackageOperationsFormFade.png|right|350px|link=https://wiki.hornbill.com/images/b/ba/PackageOperationsForm.png]] | [[File:PackageOperationsFormFade.png|right|350px|link=https://wiki.hornbill.com/images/b/ba/PackageOperationsForm.png]] | ||
| − | Operations | + | # Click the '''Add Operation''' button, located on the '''Package Operations''' section |
| + | # Enter a unique '''Operation''' name | ||
| + | # Enter a '''Description''' of the operation | ||
| + | # Select the '''Command Type''' | ||
| + | # Click '''Add''' | ||
| + | {{infobox|The selected Type determines whether a command is entered or a file is selected, where a file is required, it must already have been created or uploaded to the package.}} | ||
| + | |||
| + | ===Operation Properties=== | ||
{{Bullet1|Operation|Mandatory Name used to select the package when creating a Job}} | {{Bullet1|Operation|Mandatory Name used to select the package when creating a Job}} | ||
{{Bullet1|Description|Describes the functionality provided by the operation}} | {{Bullet1|Description|Describes the functionality provided by the operation}} | ||
| − | <div class="mw-collapsible mw-collapsed" data-collapsetext="Show Less" data-expandtext="Read More" style="width: | + | <div class="mw-collapsible mw-collapsed" data-collapsetext="Show Less" data-expandtext="Read More" style="width:800px"> |
{{Bullet1|Command Type|Provides a list of supported command types}} | {{Bullet1|Command Type|Provides a list of supported command types}} | ||
<div class="mw-collapsible-content"> | <div class="mw-collapsible-content"> | ||
| − | {{Bullet2|Run Command| | + | {{Bullet2|Run Command|Used to run an executable program on the target device}} |
| − | <div class="mw-collapsible mw-collapsed" data-collapsetext="Show Less" data-expandtext="Read More" style="width: | + | {{Bullet3|Windows|Execute a program that is localy installed on the target device. If the program name is entered with no extension then .exe is assumed, for .com programs the extension must be included. If it is required to execute a cmd command then the command should be entered as follows: cmd.exe /c <command>}} |
| − | {{Bullet2|Windows Installer|Executes an | + | {{Bullet3|Linux\Unix|Commands are executed using Secure Shell (ssh)}} |
| + | <div class="mw-collapsible mw-collapsed" data-collapsetext="Show Less" data-expandtext="Read More" style="width:800px"> | ||
| + | {{Bullet2|Windows Installer|Executes an Installer(.msi) package, with one of four actions detailed below. In order to use this operation the installer package will need to be uploaded to the package}} | ||
<div class="mw-collapsible-content"> | <div class="mw-collapsible-content"> | ||
{{Bullet3|Install Software|Installs the .msi package}} | {{Bullet3|Install Software|Installs the .msi package}} | ||
| − | {{Bullet3|Run Program|Executes the | + | {{Bullet3|Run Program|Executes the .msi package}} |
| − | {{Bullet3|Uninstall Software|Uninstall an .msi package}} | + | {{Bullet3|Uninstall Software|Uninstall an .msi package }} |
| − | {{Bullet3|Update Software| | + | {{Bullet3|Update Software|Reinstalls the entire .msi package }} |
</div> | </div> | ||
</div> | </div> | ||
| − | {{Bullet2|Windows Executable|Executes | + | {{Bullet2|Windows Executable|Executes an uploaded windows executable, selected from the Run File list}} |
| − | {{Bullet2|Batch Script|Excutes | + | {{Bullet2|Batch Script|Excutes an uploaded Windows batch script (.cmd or .bat), selected from the Run File list}} |
| − | {{Bullet2|Windows PowerShell| | + | {{Bullet2|Windows PowerShell|Executes an uploaded Windows PowerShell script, selected from the Script list}} |
| − | {{Bullet2|PowerShell Core|Execute | + | {{Bullet2|PowerShell Core|Execute an uploaded PowerShell Core script, selected from the Script list}} |
| + | {{Bullet2|Linux Shell Script|Executes an uploaded Linux / Unix shell script via SSH}} | ||
</div> | </div> | ||
</div> | </div> | ||
| − | {{Bullet1|Timeout| | + | {{Bullet1|Timeout|Number of seconds before the operation times out, and setting the status of the Job to '''Timed Out'''}} |
| − | {{Bullet1|Options / Args|Specifies arguments that | + | {{Bullet1|Options / Args|Specifies arguments that are passed to the specified command at runtime. The format required is dependant on the Command Type being used, below are some typical examples:}} |
| − | {{ | + | {{Bullet2|Powershell|''parameter1 ... parameterx -Arg1 <value> -Arg2''}} |
| − | {{ | + | {{Bullet2|Windows batch file|''/O /A <value> parameter1 ... parameterx''}} |
| + | {{Bullet2|Linux Script|''-arg1 <value> -arg2 --long-arg parameter1 ... parameterx''}} | ||
| + | |||
| + | ===Input Parameters=== | ||
| + | Input parameters are only required if the operation requires data to be passed to it. They allow for values to be dynamically applied at execution for use by the operation. Each parameter can be identified as required (mandatory) and given a specific data type used for basic validation. Parameters can be manually assigned or populated via variables generated within a Runbook, BPM or Autotask process. | ||
| + | |||
| + | To create a new parameter, from the '''Add Operation''' form: | ||
| + | |||
| + | # Click the '''Add Parameter''' button | ||
| + | # Select '''Optional''' or '''Required''' from the drop-down | ||
| + | # Set the '''Data type''' from the drop-down | ||
| + | # Enter the parameter Name | ||
| + | # If required, enter a '''Default value''' | ||
| + | # Enter the '''Hint''' text | ||
| + | # Specify if the parameter is sensitive | ||
| − | |||
[[File:PackageOperationsFormInputParams.png]] | [[File:PackageOperationsFormInputParams.png]] | ||
| − | + | {{Bullet1|Requirement|Each parameter can be specified as Required or Optional}} | |
| + | {{Bullet1|Type|Specifys one of the following data types that can be entered: String, Number or Boolean. This will be used for basic validation when parameter values are entered}} | ||
| + | {{Bullet1|Parameter name|Used to identify the parameter when adding it to the arguments/options list}} | ||
| + | {{Bullet1|Default value|Each parameter can be provided with default value}} | ||
| + | {{Bullet1|Hint|Describes the parameter and is visible during data entry}} | ||
| + | {{Bullet1|Actions|Action buttons}} | ||
| + | {{Bullet2|Sensitivety|A Toggle that marks a parameter as sensitive (struck out eye) and thus will not show its value during data entry}} | ||
| + | {{Bullet2|Delete|Removes the parameter}} | ||
| − | { | + | ===Adding Parameters to Options / Arguments=== |
| − | + | For values to be passed to an operation command, a parameter will be required to pass them via the Options / Args field. The ordering and format will depend on what is required by the target of the specified Command Type. | |
| − | { | + | Input Parameters have the syntax of {param.<parameter name>} and is placed where the value is expected when the command is executed. |
| − | { | + | <br/> |
| − | { | + | [[File:PackageOperationParamSelector.png|350px|link=https://wiki.hornbill.com/images/9/9b/PackageOperationParamSelector.png]] |
| − | { | + | <br/> |
| − | {{ | + | Parameters are entered manually; however, if the letters ''pa'' are entered, a list of all of the operation's input parameters are provided, and one can be selected from the list. Entering any further characters will filter the list based on whether any entries contain the entered character. |
| − | + | ||
| + | During the execution of the operation, if the parameter value is blank, nothing is output and may not be the desired effect, as detailed in the following scenarios: | ||
| + | |||
| + | # The parameter is passed as a positional parameter and requires an empty string to be passed if blank. | ||
| + | #: To ensure an empty string is passed when the value is blank, the parameter should be encapsulated within quotes. '''"{param.ParamA}"''' | ||
| + | # The parameter value is paired with an option such as '''-option {param.ParamA}''', if the value of '''{param.ParamA}''' is blank; then the '''-option''' is not removed. | ||
| + | #: This can be remedied by encapsulating the option within the parameter definition such as: '''{-option param.ParamA}''' | ||
| + | |||
| + | |||
| + | ::{| class="wikitable" | ||
| + | |+ Possible supported combinations | ||
| + | |- | ||
| + | ! Format !! Parameter Value !! Output | ||
| + | |- | ||
| + | | <option> {param.name} || abcd || -option abcd | ||
| + | |- | ||
| + | | <option> {param.name} || <empty string> || -option | ||
| + | |- | ||
| + | | {<option> param.name} || abcd || -option abcd | ||
| + | |- | ||
| + | | {<option> param.name} || <empty string> || <blank> | ||
| + | |} | ||
| + | |||
| + | {{infobox|'''<option>''' can be any text and thus allow for all formats of options and arguments that may be required i.e. '''/O''', '''-Output''', '''--Out-file''' or even '''start'''. In order to specify this format just edit the parameter once it has been added or type itin manually.}} | ||
| + | |||
| + | ===Output Parameters=== | ||
| + | Output parameters allow output from the package operation to be accessed after an IT Automation has been executed. When executed within a BPM process or Runbook, the process can access the output parameters via self-named variables enabling the values to be used as inputs to other nodes within the process. Similar to input parameters, each can be specified as required and are provided with a data type. | ||
| − | |||
[[File:PackageOperationsFormOutputParams.png]] | [[File:PackageOperationsFormOutputParams.png]] | ||
| − | + | To create a new parameter, click the Add Parameter button on the Add Package Operation form. | |
| + | |||
| + | {{Bullet1|Requirement|Each parameter can be specified as Required or Optional. If a required parameter is not returned in the operation's output, the IT Automation will return a failure after the package has been executed.}} | ||
| + | {{Bullet1|Type|Specifys one of the following data types that parameter must be: String, Number or Boolean. This will be used for basic validation when parameter values are entered}} | ||
| + | {{Bullet1|Parameter name|Used to identify output parameters returned by the operation}} | ||
| + | {{Bullet1|Default value|Each parameter can be provided with default value}} | ||
| + | |||
| + | ===Output Parameters Syntax=== | ||
| + | Output parameters are processed after the execution of an IT Automation and are identified by the output using the following syntax: | ||
| + | |||
| + | ::{{SISJobOutputParameterStart:'''<param-name>'''}}'''<value>'''<nowiki>{{SISJobOutputParameterEnd}}</nowiki> | ||
| + | |||
| + | ::* '''<param-name>''' being the name of the configured output parameter | ||
| + | ::* '''<value>''' the actual value to store, and one entry will be required for each required parameter. | ||
| + | |||
| + | Providing the formatted output is relatively straightforward when the script or program is designed in-house; however, attempting to use a third-party script or program that is not modifiable can prove difficult. In these circumstances, there are still options available: | ||
| − | + | * Create a wrapper script and reformat the output to match the required syntax | |
| − | + | * Use the scripts/programs return code to provide feedback | |
| − | + | ||
| − | + | Utilising the return codes can be a quick, simple way to capture output parameter values that can be used logically within a process. The Options / Args field can specify input parameters for the command and contain the logic to deal with any return code. The following examples show what can be achieved for different command types: | |
| − | |||
| − | |||
| − | |||
| − | |||
| − | { | + | =====Windows Commands===== |
| − | : | + | ::{| class="wikitable" |
| − | + | |- | |
| − | : | + | |- |
| + | | style="white-space: nowrap;" | Command Type || '''Run Command''' | ||
| + | |- | ||
| + | | Command || '''cmd /c find ''' | ||
| + | |- | ||
| + | | Options / Args || "'''{param.searchstring}'''" "C:\ProgramData\Hornbill\Site Integration Server\log\EspSisService.log" && echo <nowiki>{{</nowiki>SISJobOutputParameterStart:'''outcome'''<nowiki>}}</nowiki>OK<nowiki>{{</nowiki>SISJobOutputParameterEnd<nowiki>}} || </nowiki> echo <nowiki>{{</nowiki>SISJobOutputParameterStart:'''outcome'''<nowiki>}}</nowiki>FAIL<nowiki>{{</nowiki>SISJobOutputParameterEnd<nowiki>}}</nowiki> | ||
| + | |} | ||
| − | + | =====Linux Commands===== | |
| − | { | + | ::{| class="wikitable" |
| − | { | + | |- |
| + | |- | ||
| + | | style="white-space: nowrap;" | Command Type || '''Run Command''' | ||
| + | |- | ||
| + | | Command || '''grep''' | ||
| + | |- | ||
| + | | Options / Args || /var/log/syslog -e "'''{param.searchstring}'''"; error=$?; if [ $error == 0 ]; then echo "<nowiki>{{</nowiki>SISJobOutputParameterStart:'''outcome'''<nowiki>}}</nowiki>OK<nowiki>{{</nowiki>SISJobOutputParameterEnd<nowiki>}}</nowiki>"; else echo "<nowiki>{{</nowiki>SISJobOutputParameterStart:'''outcome'''<nowiki>}}</nowiki>FAIL<nowiki>{{</nowiki>SISJobOutputParameterEnd<nowiki>}}</nowiki>"; echo "<nowiki>{{</nowiki>SISJobOutputParameterStart:'''errors'''<nowiki>}}</nowiki>$error<nowiki>{{</nowiki>SISJobOutputParameterEnd<nowiki>}}</nowiki>"; fi | ||
| + | |} | ||
| − | + | =====Powershell Commands===== | |
| + | ::{| class="wikitable" | ||
| + | |- | ||
| + | |- | ||
| + | | style="white-space: nowrap;" | Command Type || '''Run Command''' | ||
| + | |- | ||
| + | | Command || '''powershell -Command''' | ||
| + | |- | ||
| + | | Options / Args || "& { if(Select-String -Path 'C:\ProgramData\Hornbill\Site Integration Server\log\EspSisService.log' -Pattern ''''{param.searchstring}'''' -Quiet) {Write-Host '<nowiki>{{</nowiki>SISJobOutputParameterStart:'''outcome'''<nowiki>}}</nowiki>OK<nowiki>{{</nowiki>SISJobOutputParameterEnd<nowiki>}}</nowiki>'} else {Write-Host '<nowiki>{{</nowiki>SISJobOutputParameterStart:'''outcome'''<nowiki>}}</nowiki>FAIL<nowiki>{{</nowiki>SISJobOutputParameterEnd<nowiki>}}</nowiki>' }" } | ||
| + | |} | ||
| − | + | ===Managing Files=== | |
| − | + | [[File:PackageFileEditor.png|right|350px|link=https://wiki.hornbill.com/images/a/a8/PackageFileEditor.png]] | |
| − | + | As well as being able to upload files for use by operations, it is also possible to create files directly via the interface. The editor supports the following file types and also provides enhanced usability with the use of syntax highlighting. | |
| − | |||
| − | |||
| − | |||
| − | |||
:{| | :{| | ||
|- valign="top" | |- valign="top" | ||
| Line 161: | Line 270: | ||
{{Bullet1|.js|Javascript}} | {{Bullet1|.js|Javascript}} | ||
|style="width:500px"| | |style="width:500px"| | ||
| + | {{bullet1|.sh|Unix/Linux and macOS Shell script}} | ||
{{Bullet1|.txt|Text format file}} | {{Bullet1|.txt|Text format file}} | ||
{{Bullet1|.json|JavaScript Object Notation file}} | {{Bullet1|.json|JavaScript Object Notation file}} | ||
| + | |style="width:500px"| | ||
{{Bullet1|.csv|Comma Seperated Value file}} | {{Bullet1|.csv|Comma Seperated Value file}} | ||
|} | |} | ||
{{infobox| | {{infobox| | ||
| − | '''The following will affect the entire instance | + | '''The following will affect the entire instance!'''<br> |
<br> | <br> | ||
| − | Some of the above files are restricted by default | + | Some of the above files are restricted by default; and can be allowed by disabling the System Setting: '''security.fileUploadRestriction.entity.fileAttachments.enable''' or alternatevly remove the relevant extensions from the System Setting: '''security.fileUploadRestriction.entity.fileAttachments.types'''. |
| − | |||
}} | }} | ||
| − | == | + | ====Upload a File==== |
| + | [[File:PackageContentEmptyFrame.png|right|350px]] | ||
| + | # Click the Upload [[File:FileUploadButton.png|35px]] button | ||
| + | # Select the File to Upload | ||
| + | #:The file appears in the file list | ||
| + | # Select the File to View in the Editor pane | ||
| + | |||
| + | ====Create a New Folder==== | ||
| + | # Click the Add New Folder [[file:CreateNewFolder.png|35px]] button | ||
| + | # Enter the Folder Name | ||
| + | |||
| + | ====Add New File==== | ||
| + | # Click the Add New File [[File:NewFile.png|25px]] button | ||
| + | # Enter the file name | ||
| + | |||
| + | [[File:PackageFileEditorToolbar.png|350px|right]] | ||
| + | The following actions are executed on individual files and folders; ensure that the correct file or folder is selected first from the file list. The menu options are context-sensitive and will only display the options relevant to the selected item. | ||
| + | |||
| + | ====Delete a File or Folder==== | ||
| + | # Select the File or Folder to Delete | ||
| + | # Click the Delete button | ||
| + | |||
| + | ====Download a File==== | ||
| + | # Select the File to Download | ||
| + | # Click the Upload button | ||
| + | #:The file will appear in the browsers download folder | ||
| + | |||
| + | ====Save a File==== | ||
| + | The Save button is enabled when a file is loaded into the editor and its contents have changed. Clicking on the Save will save the changes and reset the buttons state. Exiting from the editor also prompts to save the file, with the option to Save, Cancel or Ignore the changes. | ||
| + | |||
| + | ==Baselining and Publishing== | ||
[[File:PackageContentBaselineVersions.png|350px|right|link=https://wiki.hornbill.com/images/f/fa/PackageContentBaselineVersions.png]] | [[File:PackageContentBaselineVersions.png|350px|right|link=https://wiki.hornbill.com/images/f/fa/PackageContentBaselineVersions.png]] | ||
| − | A Baseline is a snapshot of | + | A Baseline is a snapshot of a package's current state, only available once the package is in a state where it is ready to be published (at least one Package Operation exist). |
| − | The draft version of a package is the only version that can be updated. Once the Package is ready for release, the draft copy can be Baselined, creating a new version. This latest version is then available for packaging and installation | + | The draft version of a package is the only version that can be updated. Once the Package is ready for release, the draft copy can be Baselined, creating a new version. This latest version is then available for packaging and installation on the Installed Packages list. |
| − | + | To enable the Baseline once the initial package has been created, the user must highlight the '''Package Info''' file in the file list. Once clicked, a confirmation pop appears, and the dropdown next to the Baseline Button will display a list of Baselined versions. | |
| − | + | To publish and install or download a baselined version, select the relevant version from the list. The '''Baseline''' button will change to the '''Package and Install'''when clicked, two options are provided: | |
[[File:PackageContentDraftInstall.png|350px|right]] | [[File:PackageContentDraftInstall.png|350px|right]] | ||
{{Bullet1|Package and Install|Build the package and add to the Install Packages list, Overwriting any existing version}} | {{Bullet1|Package and Install|Build the package and add to the Install Packages list, Overwriting any existing version}} | ||
{{Bullet1|Package and Download|Build the package and Download to the local computer}} | {{Bullet1|Package and Download|Build the package and Download to the local computer}} | ||
| − | + | The package details will be read-only to change any details; The user must select the draft version by clicking the '''View Draft''' button. | |
| − | + | ===Baseline and Publish a new version of a package=== | |
# Select the ITOM <strong>Package Creator</strong> | # Select the ITOM <strong>Package Creator</strong> | ||
| Line 197: | Line 337: | ||
# Select the last version | # Select the last version | ||
# Click ''Package and Install'', and select ''Package and Install'' | # Click ''Package and Install'', and select ''Package and Install'' | ||
| − | # Use the | + | # Use the Breadcrumbs to go back to the ''Package Creator'' list |
| − | The Package should now appear in the list with the latest version shown. | + | The Package should now appear in the list with the latest version shown; all subsequent Jobs, including previously scheduled jobs, will now use the newly published version. |
[[Category:ITOM]] | [[Category:ITOM]] | ||
| + | |||
| + | <!-- | ||
| + | |||
| + | |||
| + | After the creation of the input parameters, the following format enables them to be accessed: | ||
| + | <pre> | ||
| + | {param.<parameter_name>} | ||
| + | </pre> | ||
| + | <parameter_name> should substituted for the relevant parameter name such as {param.host} | ||
| + | [[File:PackageOperationsFormOptions.png|350px|right|link=https://wiki.hornbill.com/images/3/3c/PackageOperationsFormOptions.png]] | ||
| + | The use of a parameter can supply the value for an argument used by the selected Command Type. The example in the diagram shows how a parameter provides the value to the -n argument and hostname used by the '''ping''' command. Intellisense is used to aid with the entry of parameters, start entering the prefix of the parameter. IntelliSense will display a list of params, and the user can select the relevant parameter. | ||
| + | |||
| + | {{infobox| | ||
| + | :* the parameters are ''substituted'', the character escaping needs to be handled by the developer. | ||
| + | :* It might be the substitution of n/m-dash with hyphens. | ||
| + | :* Fancy quotes might also get added to the substitution list}} | ||
| + | |||
| + | It is also possible to pass user credentials to the command line. The credentials should be added to the "Extra Credentials" section of the Job definition. To use the credentials use: <pre> | ||
| + | {creds:credential_name.credential_property_name}</pre> eg:<pre> | ||
| + | {creds:credential1.apikey}</pre> | ||
| + | |||
| + | It would be well advised to ensure clear user documentation of what Extra Credentials need setting (their exact names and their types) when creating these Packages. | ||
| + | -> | ||
Latest revision as of 17:51, 29 February 2024
| Home > Administration > ITOM > Package Creator | Index |
IntroductionThe Package Creator allows for the creation of user-defined Packages for use on an instance. A Package consists of a single Package Info file and with additional resource files where required. The info file contains all the details regarding operations and all parameters that may be necessary. Although it is possible to create a Package manually, a form-based editor is provided to simplify uploading and organising resources. These files are used to provide or support a package's operations a can be a combination of one or more scripts, executables and other supported filetypes. In addition to uploading files, an interface is also provided to create and edit various file types via a browser-based editor that supports syntax highlighting. |
|
Toolbar
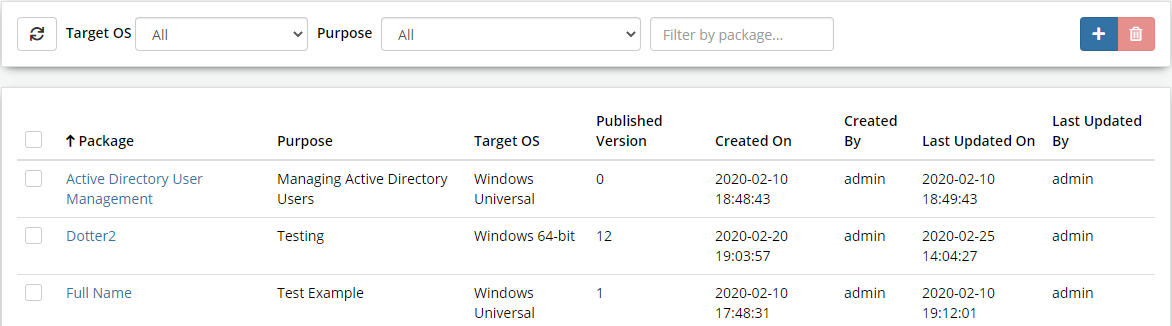
- Refresh
- Target OS
- Operating System that the package was designed for execution
- Windows 32/64-bit
- Apple macOS
- Generic Linux
- Purpose
- Dynamic list populated from the Purpose field of entriies in the list
- Filter by package
- Free text filter on Package
-
- Create an IT Automation Package
-
- Delete selected Package(s)
Package List
- Package
- Unique name given to the Package
- Purpose
- Summary of the intended use of the package
- Target OS
- Operating System that the package was designed for execution
- Published
- Late Published version of the packacge
- Created On
- Date that the package was created
- Created By
- The account used to create the package
- Last Updated On
- Date the package was last updated
- Last Updated By
- The account last used to update the package
Create a New Package
- From the Package Creator list, click the
 button
 - Enter a new Package Name
- Click Create
Open an Existing Package
- Locate the Package in the Package Creator list
- Click on the Package name
Delete a Package
- From the Package Creator list
- Click the tick box next to each package to delete
- Click the
 button
Package Editor
The package editor displays a list of resources used, one of which is the Package Info file created by the system. This file contains the configuration details that define the packages operations and how any additional resources are used. Selecting the file displays a form used to edit the details; it is also possible to edit the file in its raw XML format via the built-in editor. Additional resources such as scripts, data files can be created directly from within the interface via an editor, administrators can upload binary files such as executables and windows installer files.
Package Content Toolbar

- Upload
- Uploads files to the current folder
- New Folder
- Creates a new Folder
- New File
- Creates a new file in the current folder
-
- Creates a new baseline of the current package
- Save
- Saves amended package details
Package Information
The Package Info file is viewed and modified via a form, displayed by default when entering the editor or whenever the file is selected. The following details can be edited via the form excluding the Package ID and Name:
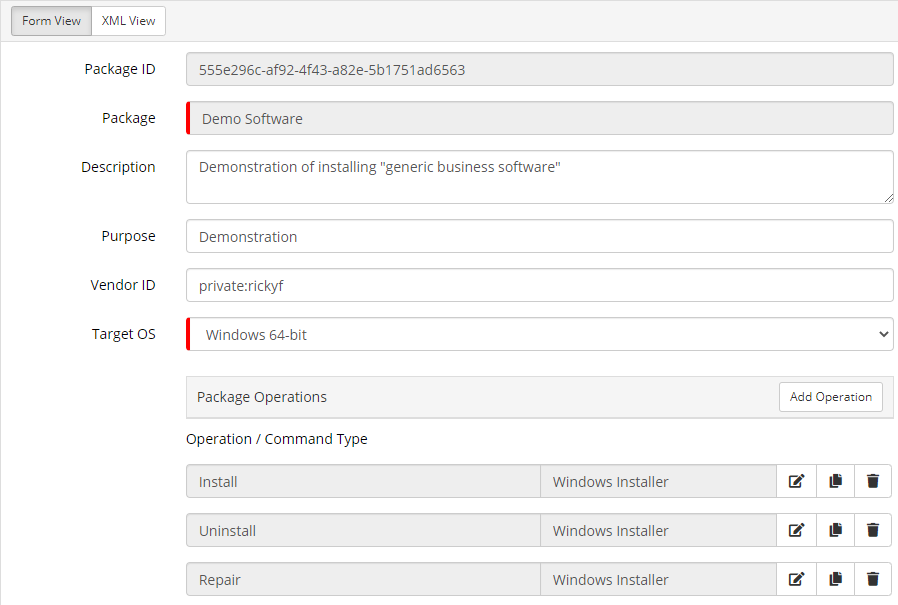
- Package ID
- A GUID which uniquely identifies the package) will be generated on creation
- Package
- The name of the package entered during creation
- Description
- Description of the packages content
- Purpose
- Summary of the intended use of the package
- Vendor ID
- Defined by the creator of the package (Hornbill packages will set to "Hornbill")
- Target OS
- Specifies the target operating system that the package is designed to run on
- Windows 32-bit
- Windows 64-bit
- Windows Universal
- Package can be invoked on either Windows 32 or 64-bit
- Apple macOS
- Generic Linux
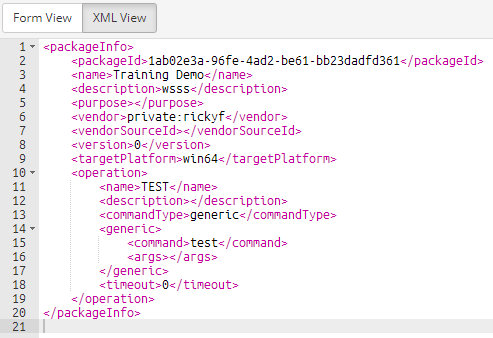
Selecting the XML View button on the toolbar switches the form editor to a text editor where an administrator can edit the file in its native XML format. This can be useful when making changes that can be quite tedious using the form view, such as generic modifications to packaging operations.
Package Operations
A package must contain one or more operations; each will perform an action that can be defined using one of a number of the command types. The Comand Type selected will depend on the Operating System to target the package and the functionality required. Some operations will require files to be created or uploaded before they can be configured, executing a script. Other operations such as those that execute as a single command can be configured via the interface provided.
Creating an Operation
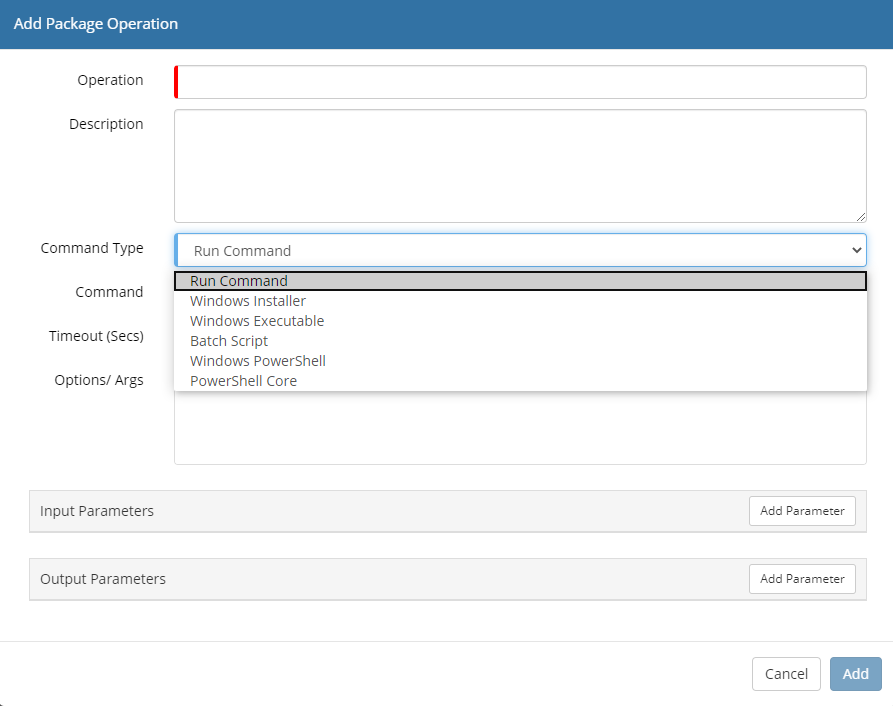
- Click the Add Operation button, located on the Package Operations section
- Enter a unique Operation name
- Enter a Description of the operation
- Select the Command Type
- Click Add
- The selected Type determines whether a command is entered or a file is selected, where a file is required, it must already have been created or uploaded to the package.
Operation Properties
- Operation
- Mandatory Name used to select the package when creating a Job
- Description
- Describes the functionality provided by the operation
- Command Type
- Provides a list of supported command types
- Run Command
- Used to run an executable program on the target device
- Windows
- Execute a program that is localy installed on the target device. If the program name is entered with no extension then .exe is assumed, for .com programs the extension must be included. If it is required to execute a cmd command then the command should be entered as follows: cmd.exe /c <command>
- Linux\Unix
- Commands are executed using Secure Shell (ssh)
- Windows Installer
- Executes an Installer(.msi) package, with one of four actions detailed below. In order to use this operation the installer package will need to be uploaded to the package
- Install Software
- Installs the .msi package
- Run Program
- Executes the .msi package
- Uninstall Software
- Uninstall an .msi package
- Update Software
- Reinstalls the entire .msi package
- Windows Executable
- Executes an uploaded windows executable, selected from the Run File list
- Batch Script
- Excutes an uploaded Windows batch script (.cmd or .bat), selected from the Run File list
- Windows PowerShell
- Executes an uploaded Windows PowerShell script, selected from the Script list
- PowerShell Core
- Execute an uploaded PowerShell Core script, selected from the Script list
- Linux Shell Script
- Executes an uploaded Linux / Unix shell script via SSH
- Timeout
- Number of seconds before the operation times out, and setting the status of the Job to Timed Out
- Options / Args
- Specifies arguments that are passed to the specified command at runtime. The format required is dependant on the Command Type being used, below are some typical examples:
- Powershell
- parameter1 ... parameterx -Arg1 <value> -Arg2
- Windows batch file
- /O /A <value> parameter1 ... parameterx
- Linux Script
- -arg1 <value> -arg2 --long-arg parameter1 ... parameterx
Input Parameters
Input parameters are only required if the operation requires data to be passed to it. They allow for values to be dynamically applied at execution for use by the operation. Each parameter can be identified as required (mandatory) and given a specific data type used for basic validation. Parameters can be manually assigned or populated via variables generated within a Runbook, BPM or Autotask process.
To create a new parameter, from the Add Operation form:
- Click the Add Parameter button
- Select Optional or Required from the drop-down
- Set the Data type from the drop-down
- Enter the parameter Name
- If required, enter a Default value
- Enter the Hint text
- Specify if the parameter is sensitive

- Requirement
- Each parameter can be specified as Required or Optional
- Type
- Specifys one of the following data types that can be entered: String, Number or Boolean. This will be used for basic validation when parameter values are entered
- Parameter name
- Used to identify the parameter when adding it to the arguments/options list
- Default value
- Each parameter can be provided with default value
- Hint
- Describes the parameter and is visible during data entry
- Actions
- Action buttons
- Sensitivety
- A Toggle that marks a parameter as sensitive (struck out eye) and thus will not show its value during data entry
- Delete
- Removes the parameter
Adding Parameters to Options / Arguments
For values to be passed to an operation command, a parameter will be required to pass them via the Options / Args field. The ordering and format will depend on what is required by the target of the specified Command Type.
Input Parameters have the syntax of {param.<parameter name>} and is placed where the value is expected when the command is executed.
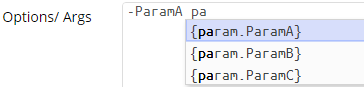
Parameters are entered manually; however, if the letters pa are entered, a list of all of the operation's input parameters are provided, and one can be selected from the list. Entering any further characters will filter the list based on whether any entries contain the entered character.
During the execution of the operation, if the parameter value is blank, nothing is output and may not be the desired effect, as detailed in the following scenarios:
- The parameter is passed as a positional parameter and requires an empty string to be passed if blank.
- To ensure an empty string is passed when the value is blank, the parameter should be encapsulated within quotes. "{param.ParamA}"
- The parameter value is paired with an option such as -option {param.ParamA}, if the value of {param.ParamA} is blank; then the -option is not removed.
- This can be remedied by encapsulating the option within the parameter definition such as: {-option param.ParamA}
Possible supported combinations Format Parameter Value Output <option> {param.name} abcd -option abcd <option> {param.name} <empty string> -option {<option> param.name} abcd -option abcd {<option> param.name} <empty string> <blank>
- <option> can be any text and thus allow for all formats of options and arguments that may be required i.e. /O, -Output, --Out-file or even start. In order to specify this format just edit the parameter once it has been added or type itin manually.
Output Parameters
Output parameters allow output from the package operation to be accessed after an IT Automation has been executed. When executed within a BPM process or Runbook, the process can access the output parameters via self-named variables enabling the values to be used as inputs to other nodes within the process. Similar to input parameters, each can be specified as required and are provided with a data type.

To create a new parameter, click the Add Parameter button on the Add Package Operation form.
- Requirement
- Each parameter can be specified as Required or Optional. If a required parameter is not returned in the operation's output, the IT Automation will return a failure after the package has been executed.
- Type
- Specifys one of the following data types that parameter must be: String, Number or Boolean. This will be used for basic validation when parameter values are entered
- Parameter name
- Used to identify output parameters returned by the operation
- Default value
- Each parameter can be provided with default value
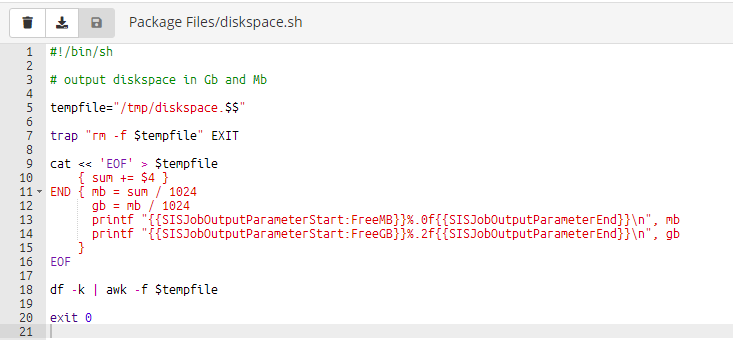
Output Parameters Syntax
Output parameters are processed after the execution of an IT Automation and are identified by the output using the following syntax:
- {{SISJobOutputParameterStart:<param-name>}}<value>{{SISJobOutputParameterEnd}}
- <param-name> being the name of the configured output parameter
- <value> the actual value to store, and one entry will be required for each required parameter.
Providing the formatted output is relatively straightforward when the script or program is designed in-house; however, attempting to use a third-party script or program that is not modifiable can prove difficult. In these circumstances, there are still options available:
- Create a wrapper script and reformat the output to match the required syntax
- Use the scripts/programs return code to provide feedback
Utilising the return codes can be a quick, simple way to capture output parameter values that can be used logically within a process. The Options / Args field can specify input parameters for the command and contain the logic to deal with any return code. The following examples show what can be achieved for different command types:
Windows Commands
Command Type Run Command Command cmd /c find Options / Args "{param.searchstring}" "C:\ProgramData\Hornbill\Site Integration Server\log\EspSisService.log" && echo {{SISJobOutputParameterStart:outcome}}OK{{SISJobOutputParameterEnd}} || echo {{SISJobOutputParameterStart:outcome}}FAIL{{SISJobOutputParameterEnd}}
Linux Commands
Command Type Run Command Command grep Options / Args /var/log/syslog -e "{param.searchstring}"; error=$?; if [ $error == 0 ]; then echo "{{SISJobOutputParameterStart:outcome}}OK{{SISJobOutputParameterEnd}}"; else echo "{{SISJobOutputParameterStart:outcome}}FAIL{{SISJobOutputParameterEnd}}"; echo "{{SISJobOutputParameterStart:errors}}$error{{SISJobOutputParameterEnd}}"; fi
Powershell Commands
Command Type Run Command Command powershell -Command Options / Args "& { if(Select-String -Path 'C:\ProgramData\Hornbill\Site Integration Server\log\EspSisService.log' -Pattern '{param.searchstring}' -Quiet) {Write-Host '{{SISJobOutputParameterStart:outcome}}OK{{SISJobOutputParameterEnd}}'} else {Write-Host '{{SISJobOutputParameterStart:outcome}}FAIL{{SISJobOutputParameterEnd}}' }" }
Managing Files
As well as being able to upload files for use by operations, it is also possible to create files directly via the interface. The editor supports the following file types and also provides enhanced usability with the use of syntax highlighting.
- .bat
- Command Prompt Batch process files
- .ps1
- Powershell and Powershell Core scripts
- .js
- Javascript
- .sh
- Unix/Linux and macOS Shell script
- .txt
- Text format file
- .json
- JavaScript Object Notation file
- .csv
- Comma Seperated Value file
The following will affect the entire instance!
Some of the above files are restricted by default; and can be allowed by disabling the System Setting: security.fileUploadRestriction.entity.fileAttachments.enable or alternatevly remove the relevant extensions from the System Setting: security.fileUploadRestriction.entity.fileAttachments.types.
Upload a File
- Click the Upload
 button
 - Select the File to Upload
- The file appears in the file list
- Select the File to View in the Editor pane
Create a New Folder
- Click the Add New Folder
 button
 - Enter the Folder Name
Add New File
- Click the Add New File
 button
 - Enter the file name
The following actions are executed on individual files and folders; ensure that the correct file or folder is selected first from the file list. The menu options are context-sensitive and will only display the options relevant to the selected item.
Delete a File or Folder
- Select the File or Folder to Delete
- Click the Delete button
Download a File
- Select the File to Download
- Click the Upload button
- The file will appear in the browsers download folder
Save a File
The Save button is enabled when a file is loaded into the editor and its contents have changed. Clicking on the Save will save the changes and reset the buttons state. Exiting from the editor also prompts to save the file, with the option to Save, Cancel or Ignore the changes.
Baselining and Publishing
A Baseline is a snapshot of a package's current state, only available once the package is in a state where it is ready to be published (at least one Package Operation exist).
The draft version of a package is the only version that can be updated. Once the Package is ready for release, the draft copy can be Baselined, creating a new version. This latest version is then available for packaging and installation on the Installed Packages list.
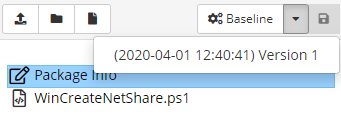
To enable the Baseline once the initial package has been created, the user must highlight the Package Info file in the file list. Once clicked, a confirmation pop appears, and the dropdown next to the Baseline Button will display a list of Baselined versions.
To publish and install or download a baselined version, select the relevant version from the list. The Baseline button will change to the Package and Installwhen clicked, two options are provided:

- Package and Install
- Build the package and add to the Install Packages list, Overwriting any existing version
- Package and Download
- Build the package and Download to the local computer
The package details will be read-only to change any details; The user must select the draft version by clicking the View Draft button.
Baseline and Publish a new version of a package
- Select the ITOM Package Creator
- From the list select a package
- Click the Baseline button
- Select the Baseline button drop-down
- Select the last version
- Click Package and Install, and select Package and Install
- Use the Breadcrumbs to go back to the Package Creator list
The Package should now appear in the list with the latest version shown; all subsequent Jobs, including previously scheduled jobs, will now use the newly published version.