Google Forms
Introduction
The Google Forms Integration allows you to interact with the Service Manager app by allowing Google forms to create new requests or update existing requests using the Google Forms questions and storing the answers back into a request's custom fields.
At a Glance
Update an Existing Request
The following steps will be used to allow for a Google Form link to be sent via email from an existing request using either the BPM Workflow or an Auto Task.
Setup an API Key
The creation of an API Key allows for secure authentication for the Google Forms to interact with Hornbill. The API Key will be used within the Integration Script
- Open the Admin Portal
- Navigate to System > Organizational Data > Users
- Select a user that you wish Google Forms to authenticate as. This user will required the rights needed to create and modify requests in Service Manager
- On the User Account, select the API Key tab
- Create a new API Key using the name Google Forms
- Keep this page available to you as you will need to copy the API Key into the Integration Script.
- Watch Me
Create Your Google Form
This part of the setup requires that you have a Google account.
- Open your Internet Browser and navigate to google.com and login into the account you wish to use to create the Form
- From the Google Apps menu, find the Forms app and select to open
- Under the Start a New Form section select Blank
- Add a title to your form
- Click on the default question that has been provided
- Change Untitled Question to Request Reference. This first question will be used to hold the Request ID that it is linked with and will be prepopulated (Create a Pre-filled Link)
- Change the question type to Short Answer
- At this point you can optionally add more questions, but it is not required. Additional questions will be covered in Map Questions to Custom Fields
- Keep this browser tab open as you need it in the next step
- Watch Me
Adding the Integration Script
This section will take you through taking the provided example script and adding it to your Google Form.
- View the Example Script that is provided on GitHub (Use CTRL key to open in new tab)
- Copy the entire contents of the script by clicking on the Copy Raw Contents button
- View the browser tab where your Google Form is located
- Click on the More Menu (vertical ellipse button next to your profile picture) and select Script
- Click on Untiled Project and give your project a name
- Delete all of the default text in the code.gs window so you have a blank space
- Paste the text that was copied from the Example Script
- Save the script
Customizing the Integration Script
Authentication
At the top of the Script there are 2 key lines that needed editing
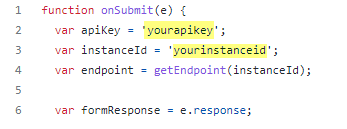
- var apiKey = 'yourapikey';
- The text yourapikey needs to be replaced with the key that we generated in the section: Setup an API Key. Be sure to keep the quotation marks.
- var instanceId = 'yourinstanceid';
- The text 'yourinstanceid' needs to be replaced with your instance ID. This can be found within the URL that connects you to your Hornbill. This should be all lowercase. Be sure to keep the quotation marks.
Request Reference
In the section Create Your Google Form you will have added your first question to your form. This question titled Request Reference is the link between this form and an existing request in Service Manager. If you wish to have a different title than Request Reference you will need to update the following line of code to match the title of the question.

- itemResponses[i].getItem().getTitle() === "Request Reference"
- Make sure that the text Request Reference matches the title of the question in the form that will hold the reference ID
Questions and Custom Fields
Each question that you add to a Google Form can be mapped to a request's custom field. The script uses a case statement to identify the Form question using its title and then maps it to custom field where the response will be stored.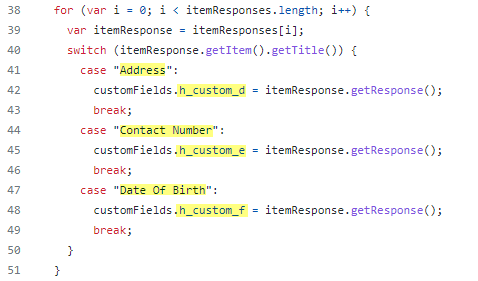
In this example there are three questions
- Address
- A question that has the title Address will be added to the custom field h_custom_d
- Contact
- A question that has the title Contact will be added to the custom field h_custom_e
- Date Of Birth
- A question that has the title Date Of Birth will be added to the custom field h_custom_f
You can add, remove, rename, each case statement and choose your custom fields to match your Form questions and where you would like the responses to be stored.
Update Status
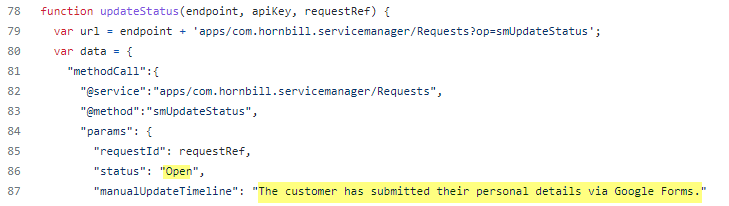
The Update Status function provide two updates that can be made to a request.
- Status
- The default in this script is set to Open. Options can include New, Open, Resolved, and Closed.
- Update Timeline
- A Timeline entry will be added to a request once the Form has been submitted. Here you can change the text that will be displayed in the Timeline of the request
Add a Trigger
Triggers are created to specify what happens when someone finishes and submits a form. The trigger will link to the functions within the newly created script.
- On the left vertical menu bar, click on the clock which will open the Triggers page
- Click on + Add Trigger (bottom right)
- Under the option Choose which function to run make sure that OnSubmit it selected
- Unser Select Event Type make sure that On form submit is selected
- Click Save.
- You may be presented with a dialog box asking you to select your google account
- You may be presented a warning message saying that Google hasn’t verified this app. Click Advanced and then at the bottom select Go to project (unsafe)
- You may be presented a dialog box saying your project wants to access your Google Account. Scroll to the bottom and select Allow
- You may receive a Security Alert email in your Google mailbox
- Click Save again.
Create a Pre-filled Link
Google Forms are generally accessed by sending a link to the person that you want to complete the form. A Pre-filled Link not only provides the link, but it also contains answers to one or more questions that automatically get populated on the form. This will be used to populate the Request Reference question in order to link the Form with an existing Service Manager Request.
- On the Form Designer page, click on the More menu (vertical ellipse button) located in the top right
- Select the menu item labled Get Pre-filled Link
- Add a random Request Reference to the Request Reference question
- Click on the Get Link button
- On the bottom left of your screen you will be presented with an option to COPY LINK
- Click on COPY LINK to copy the link to your clipboard
- Test the link by opening a new browser tab and pasting the link in the URL. This will take you to the form with the first answer pre-filled with the request reference.
- You will notice that within the link, the request reference is clearly visible. Save and store this link for later use within your BPMs or Auto Tasks.
Add the Pre-filled Link to an Automated Email
Once you have your Pre-filled Link, you are ready to send it to your users. This is typically done using a Hornbill Automation in either a BPM Workflow or an Auto Task using an email template.
- Locate the Request Reference within your Pre-filled Link
- Create or edit an email template that you wish to use to distribute the Google Form to your users
- Add the Pre-filled Link to the body of the template or as a link on some existing text
- Replace the Request Reference with the Request ID variable. For example, change ...usp=pp_url&entry.59323096=IN00000001 to ...usp=pp_url&entry.59323096={{.H_pk_reference}