Site Integration Services: Difference between revisions
| (58 intermediate revisions by 3 users not shown) | |||
| Line 1: | Line 1: | ||
{{bluebanner|[[Main_Page|Home]] > [[Administration]] > [[IT Operations Management|ITOM]] > Site Integrations Services|[[:Category:ITOM|Index]]}} | {{bluebanner|[[Main_Page|Home]] > [[Administration]] > [[IT Operations Management|ITOM]] > Site Integrations Services|[[:Category:ITOM|Index]]}} | ||
{{IntroAndLinks| | {{IntroAndLinks| | ||
Hornbill's Site Integration Service (SIS) is a | Hornbill's Site Integration Service (SIS) is a Windows NT Server service installed on a server behind an organisation's firewall. It runs as a standard Windows NT Service and, once paired with a Hornbill instance, monitors the ITOM Job Queue. The SIS connects to the instance order to retrieve jobs that have been placed on the job queue for execution.<br> | ||
<br> | <br> | ||
Should jobs be detected during a polling interval, the SIS pulls all information from the paired instance regarding the jobs required to be undertaken on specified devices on the network. There are currently two types of job available; Computer Discovery and IT Automation. Automation jobs are powered via pre-built packages provided by Hornbill or can be custom-built using the ITOM Package Creator.<br> | |||
<br> | <br> | ||
A web interface is provided, which allows for the initial pairing and display of the service's current status. The service is self-updating and will detect if a new version has been made available within the cloud and, if so, download and install it automatically. All communications with the cloud will always be initiated locally from the SIS to the cloud and never from the cloud. | |||
<br> | <br> | ||
|* [[IT Operations Management]] | |||
| | |||
* [[IT Operations Management]] | |||
}} | }} | ||
==Technical Considerations== | ==Technical Considerations== | ||
===System Requirements=== | ===System Requirements=== | ||
* OS: Windows Server '''2012, 2012 R2, 2016 or | * OS: Windows Server '''2012, 2012 R2, 2016, 2019 or 2022''' | ||
* RAM: '''4GB''' | * RAM: '''4GB''' | ||
* Free Disk: '''10GB''' | * Free Disk: '''10GB''' | ||
| Line 23: | Line 21: | ||
* The SIS communicates with a Hornbill instance using the secure HTTPS protocol. | * The SIS communicates with a Hornbill instance using the secure HTTPS protocol. | ||
* Hornbill instances will only respond to a successfully paired SIS. | * Hornbill instances will only respond to a successfully paired SIS. | ||
{{infobox|Currently support for communications via a proxy service is not available.}} | {{infobox|Currently, support for communications via a proxy service is not available.}} | ||
===Discovery and Deployment=== | ===Discovery and Package Deployment=== | ||
The SIS is capable of discovering the following devices: | The SIS is capable of discovering the following devices: | ||
* Windows 32/64bit Computers | * Windows 32/64bit Computers | ||
*: Currently supported by Microsoft | *: Currently supported by Microsoft | ||
* Linux Computers | * Unix/Linux/Mac Computers running ssh | ||
Depending on the content of the deployment package, there may be additional OS requirements | Depending on the content of the deployment package, there may be additional OS requirements. | ||
===Firewall Configuration=== | ===Firewall Configuration=== | ||
A Windows firewall rule for Inbound traffic (Local subnet) that allows all TCP traffic into the SIS service executable is created on installation and named: | |||
*: '''Hornbill SIS Server - Context Callback (TCP - In)'''. | |||
A Windows firewall rule for Inbound traffic (Local subnet) that allows all TCP traffic into the SIS service executable | |||
The following outbound ports between the SIS | The following outbound ports between the SIS server and the cloud instance are required: | ||
*: | *: HTTPS '''TCP 443''' | ||
The following ports between the SIS server and Managed Devices are required, dependant on which method is adopted to retrieve Inventory details: | The following ports between the SIS server and Managed Devices are required, dependant on which method is adopted to retrieve Inventory details: | ||
| Line 50: | Line 46: | ||
* Site Integration Service Discovery (Dependant on the discovery mode used) | * Site Integration Service Discovery (Dependant on the discovery mode used) | ||
** Active Directory | ** Active Directory / LDAP | ||
*::'''TCP Port 389''' (Between the SIS and the AD Domain Controller) | *::'''TCP Port 389''' (Between the SIS and the AD Domain Controller / LDAP Server) | ||
** | ** Secure Shell (ssh) | ||
*:: '''TCP Port | *::'''TCP Port 22''' (Between the SIS and target devices) | ||
The following is required to support the TCP Ping test used during discovery (only required if the feature is in use): | The following is required to support the TCP Ping test used during discovery (only required if the feature is in use): | ||
*ICMP Echo Reply | *ICMP Echo Reply | ||
== | == Toolbar== | ||
[[File:SISToolbar.png|centre|1000px]] | [[File:SISToolbar.png|centre|1000px]] | ||
| Line 84: | Line 64: | ||
{{Bullet1|Paired / Not Paired|Toggle button that allows the display of '''Paired''' or '''Not Paired''' SIS}} | {{Bullet1|Paired / Not Paired|Toggle button that allows the display of '''Paired''' or '''Not Paired''' SIS}} | ||
|style="width:600px"| | |style="width:600px"| | ||
{{Bullet1|Download Site Integration Server|Downloads the on premise SIS Installer}} | {{Bullet1|Download Site Integration Server|Downloads the on-premise SIS Installer}} | ||
{{Bullet1|Move Selected To...|Moves the selected SIS entries to the selected Group}} | {{Bullet1|Move Selected To...|Moves the selected SIS entries to the selected Group}} | ||
{{Bullet1|[[File:NewPackageButton.png|23x22px]]|Add a new SIS Connector}} | {{Bullet1|[[File:NewPackageButton.png|23x22px]]|Add a new SIS Connector}} | ||
| Line 90: | Line 70: | ||
|} | |} | ||
== | == List == | ||
[[File: | [[File:SISListBlur.png|right|450px|link=https://wiki.hornbill.com/images/6/69/SISList.png]] | ||
:{| | |||
The | |- valign="top" | ||
| | |||
{{bullet1|Name|The name of the Connector}} | |||
{{Bullet1|Group|The group that the Connector belongs to}} | |||
{{Bullet1|Description|The user-provided description for the connector}} | |||
{{Bullet1|Service Type|Operating system architecture of the Server hosting the SIS installation}} | |||
| | |||
{{Bullet1|Service State|Toggle to enable or disable the SIS}} | |||
{{Bullet1|Online Status|The current status of the link to the SIS service.}} | |||
{{Bullet1|Service Build|SIS Server build version. Any Service showing an older build may highlight that there is an issue with automatic updates for that service}} | |||
{{Bullet1|Last Seen On|this will display the last time there was communication between the Hornbill SIS Service and the SIS Server}} | |||
|} | |||
==Creating an SIS Service Profile on the Hornbill Instance== | |||
==Creating | |||
<ol style="list-style-type: decimal;"> | <ol style="list-style-type: decimal;"> | ||
<li>Navigate to ''' | <li>Navigate to '''Administration > Hornbill ITOM > Site Integration Services'''</li> | ||
<li>Click the [[File:NewPackageButton.png|23x22px]] button to create a new SIS Connector</li> | <li>Click the [[File:NewPackageButton.png|23x22px]] button to create a new SIS Connector</li> | ||
<li>Enter the following details: | <li>Enter the following details: | ||
| Line 119: | Line 97: | ||
<blockquote>[[File:SISAuthKey.png|350x79px|Image: 350 pixels]]</blockquote> | <blockquote>[[File:SISAuthKey.png|350x79px|Image: 350 pixels]]</blockquote> | ||
<ol start="5" style="list-style-type: decimal;"> | <ol start="5" style="list-style-type: decimal;"> | ||
<li>The Authorisation | <li>The Authorisation Code is displayed, and should be recorded for later use</li> | ||
<li>See the next section for details of how to pair your SIS with your Hornbill instance</li> | <li>See the next section for details of how to pair your SIS with your Hornbill instance</li> | ||
<li>Should you choose not to complete the pairing at this time, the connector can be found by selecting the '''Not Paired''' filter in your list of SIS Connectors</li></ol> | <li>Should you choose not to complete the pairing at this time, the connector can be found by selecting the '''Not Paired''' filter in your list of SIS Connectors</li></ol> | ||
{{infobox|The Authorisation | {{infobox|The Authorisation Code is valid for 1 hour. Should the SIS connector and SIS installation not be paired during this time, the key will expire. To generate a new Key, remove the SIS connector and recreate it.}} | ||
== Pairing | == Downloading and Installing the SIS Service == | ||
Once the ''' | [[File:InstallerPage.png|300px|thumb|right|<div align="center">'''Click "Install" to begin installing the SIS'''</div>]] | ||
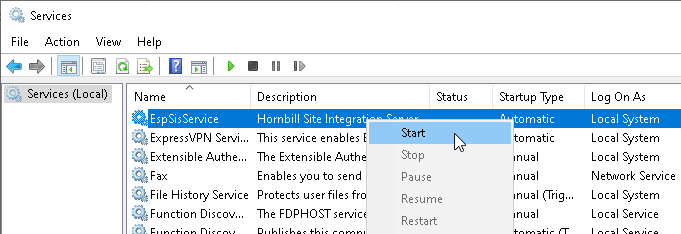
[[File:StartSisMmcService.png|300px|thumb|right|link=https://wiki.hornbill.com/images/c/ca/StartSisMmcService.png|<div align="center">'''The Site Integration Service is installed as a Windows NT Service called "ESPSisService"'''</div>]] | |||
The Hornbill SIS is installed as a Windows NT Service and will require local administration rights for installation on the target computer. | |||
<br> | |||
<br> | |||
<ol style="list-style-type: decimal;"> | |||
<li>Navigate to: '''Administration > Hornbill ITOM > Site Integration Services'''</li> | |||
<li>Click the '''Download Site Integration Server''' button on the toolbar</li> | |||
<li>Locate the downloaded executable (.exe), and double click to begin</li> | |||
<li>Click '''Install'''</li> | |||
<li>Click '''Ok''' to Confirm the Installation</li> | |||
<li>Close the Install dialog</li> | |||
<li>Open the '''Services mmc''' console</li> | |||
<li>Start the '''EspSisService''' if it isn't already running</li></ol> | |||
<br> | |||
<br> | |||
<br> | |||
<br> | |||
<br> | |||
<br> | |||
<br> | |||
<br> | |||
<br> | |||
<br> | |||
== Pairing an SIS Server with a Hornbill Instance == | |||
Once the '''EspSisService''' is running, the process of pairing the service with a Hornbill instance can begin, which will require an Authorization Code. This code will have been provided while creating an SIS connector. See the section [[Site Integration Services#Creating an SIS Service Profile on the Hornbill Instance|Creating an SIS Connector on the Hornbill Instance]]. | |||
<br> | <br> | ||
<ol style="list-style-type: decimal;"> | <ol style="list-style-type: decimal;"> | ||
| Line 133: | Line 137: | ||
<li>Enter the Instance ID and Authorization Code</li></li> | <li>Enter the Instance ID and Authorization Code</li></li> | ||
<li>Click the '''Pair with Instance''' button</li></ol> | <li>Click the '''Pair with Instance''' button</li></ol> | ||
<gallery | <gallery mode=packed heights=200px> | ||
File:ITOM_Hornbill_Site_Integration_Server_Localhost.JPG|The Instance ID and valid Authorization Code are required to pair an SIS with your Hornbill instance | File:ITOM_Hornbill_Site_Integration_Server_Localhost.JPG|The Instance ID and valid Authorization Code are required to pair an SIS with your Hornbill instance | ||
File: | File:SISNewHomePage.png|Once paired, the SIS status is reviewable via <nowiki>http://localhost:11117</nowiki> | ||
</gallery> | </gallery> | ||
== Grouping Site Integration Servers == | == Grouping Site Integration Servers == | ||
The creation of groups | The creation of groups enables SIS connectors and SIS installations to be logically grouped; each SIS entry must belong to a single group. A "Default" group is provided with the option to create additional groups as required. Generally, the network infrastructure, load balancing and failover requirements will determine the number and grouping of SIS installations. | ||
{{Bullet1|Load Balancing|When more than one server is placed within a group, Jobs sent to the group for processing will be processed by the next available SIS server spreading the load.}} | {{Bullet1|Load Balancing|When more than one server is placed within a group, Jobs sent to the group for processing will be processed by the next available SIS server spreading the load.}} | ||
{{Bullet1|Failover protection|SIS servers poll the Job queue for available jobs and thus if a server fails, any other server within the same group will pick the next available job. Any job | {{Bullet1|Failover protection|SIS servers poll the Job queue for available jobs, and thus if a server fails, any other server within the same group will pick the next available job. Any job currently being processed by the SIS server will fail, and the status set accordingly. If the job has already been pushed to a client and executed, then it will potentially be orphaned, and the status set to Timed-Out.}} | ||
{{infobox|If a standalone SIS server fails then all jobs aimed at that server will be left in the Job queue and will not be processed until the server is up and running again.}} | {{infobox|If a standalone SIS server fails then all jobs aimed at that server will be left in the Job queue and will not be processed until the server is up and running again.}} | ||
| Line 155: | Line 159: | ||
[[Category:ITOM]] | [[Category:ITOM]] | ||
== Removing an SIS Server Installation == | |||
If you want to remove the SIS server from your instance. simply navigate to the SIS servers tab in the admin tool and delete the SIS server you want to remove. | |||
The removal of the SIS server software from your server(s) requires manual steps in order to remove the service and all related files. | |||
# Open Windows Powershell console as an administrator | |||
# Enter the following: | |||
#:'''Stop-Service EspSisService''' | |||
#:'''sc.exe delete EspSisService''' | |||
#:'''Remove-Item "$env:ProgramFiles\Hornbill\Site Integration Server" -Recurse''' | |||
#:'''Remove-Item "$env:ProgramData\Hornbill\Site Integration Server" -Recurse''' | |||
{{infobox|Care should be taken with these steps as they will perform a recursive delete on the two folders specified. Once the service is removed don't forget to remove the SIS entry on the instance.}} | |||
Latest revision as of 09:06, 16 November 2023
| Home > Administration > ITOM > Site Integrations Services | Index |
IntroductionHornbill's Site Integration Service (SIS) is a Windows NT Server service installed on a server behind an organisation's firewall. It runs as a standard Windows NT Service and, once paired with a Hornbill instance, monitors the ITOM Job Queue. The SIS connects to the instance order to retrieve jobs that have been placed on the job queue for execution. |
|
Technical Considerations
System Requirements
- OS: Windows Server 2012, 2012 R2, 2016, 2019 or 2022
- RAM: 4GB
- Free Disk: 10GB
- CPU load is minimal
- Can be run on virtual as well as physical machines.
Connectivity
- The SIS communicates with a Hornbill instance using the secure HTTPS protocol.
- Hornbill instances will only respond to a successfully paired SIS.
- Currently, support for communications via a proxy service is not available.
Discovery and Package Deployment
The SIS is capable of discovering the following devices:
- Windows 32/64bit Computers
- Currently supported by Microsoft
- Unix/Linux/Mac Computers running ssh
Depending on the content of the deployment package, there may be additional OS requirements.
Firewall Configuration
A Windows firewall rule for Inbound traffic (Local subnet) that allows all TCP traffic into the SIS service executable is created on installation and named:
- Hornbill SIS Server - Context Callback (TCP - In).
The following outbound ports between the SIS server and the cloud instance are required:
- HTTPS TCP 443
The following ports between the SIS server and Managed Devices are required, dependant on which method is adopted to retrieve Inventory details:
- WinRM - TCP 5985
- DCOM - TCP 135
- DCOM - Range of dynamic ports:
- TCP 49152-65535 (RPC dynamic ports – Windows Vista, 2008 and above)
- TCP 1024-65535 (RPC dynamic ports – Windows NT4, Windows 2000, Windows 2003)
- Site Integration Service Discovery (Dependant on the discovery mode used)
- Active Directory / LDAP
- TCP Port 389 (Between the SIS and the AD Domain Controller / LDAP Server)
- Secure Shell (ssh)
- TCP Port 22 (Between the SIS and target devices)
The following is required to support the TCP Ping test used during discovery (only required if the feature is in use):
- ICMP Echo Reply
Toolbar

- Refresh
- A refresh of the list may be required to display any new devices discovered while you are viewing the list
- Show
- Displays Connectors from the selected Group
- + Create Group
- (Selectable via the drop-down) allows for the Creation of SIS Groups'
- Paired / Not Paired
- Toggle button that allows the display of Paired or Not Paired SIS
- Download Site Integration Server
- Downloads the on-premise SIS Installer
- Move Selected To...
- Moves the selected SIS entries to the selected Group
- Add a new SIS Connector
- Delete
- Deletes the selected SIS entries
List

- Name
- The name of the Connector
- Group
- The group that the Connector belongs to
- Description
- The user-provided description for the connector
- Service Type
- Operating system architecture of the Server hosting the SIS installation
- Service State
- Toggle to enable or disable the SIS
- Online Status
- The current status of the link to the SIS service.
- Service Build
- SIS Server build version. Any Service showing an older build may highlight that there is an issue with automatic updates for that service
- Last Seen On
- this will display the last time there was communication between the Hornbill SIS Service and the SIS Server
Creating an SIS Service Profile on the Hornbill Instance
- Navigate to Administration > Hornbill ITOM > Site Integration Services
- Click the
 button to create a new SIS Connector
 - Enter the following details:
- Name - name used to identify the SIS server to the Hornbill Instance
- Group - Should be a least one default group, others can be selected via drop down if created previously
- Click the Create Site Integration Service button

- The Authorisation Code is displayed, and should be recorded for later use
- See the next section for details of how to pair your SIS with your Hornbill instance
- Should you choose not to complete the pairing at this time, the connector can be found by selecting the Not Paired filter in your list of SIS Connectors
- The Authorisation Code is valid for 1 hour. Should the SIS connector and SIS installation not be paired during this time, the key will expire. To generate a new Key, remove the SIS connector and recreate it.
Downloading and Installing the SIS Service

The Hornbill SIS is installed as a Windows NT Service and will require local administration rights for installation on the target computer.
- Navigate to: Administration > Hornbill ITOM > Site Integration Services
- Click the Download Site Integration Server button on the toolbar
- Locate the downloaded executable (.exe), and double click to begin
- Click Install
- Click Ok to Confirm the Installation
- Close the Install dialog
- Open the Services mmc console
- Start the EspSisService if it isn't already running
Pairing an SIS Server with a Hornbill Instance
Once the EspSisService is running, the process of pairing the service with a Hornbill instance can begin, which will require an Authorization Code. This code will have been provided while creating an SIS connector. See the section Creating an SIS Connector on the Hornbill Instance.
- Open the Browser and navigate to http://localhost:11117. After a short pause, a prompt for the Instance Id and an Authorization Code appears
- Enter the Instance ID and Authorization Code
- Click the Pair with Instance button
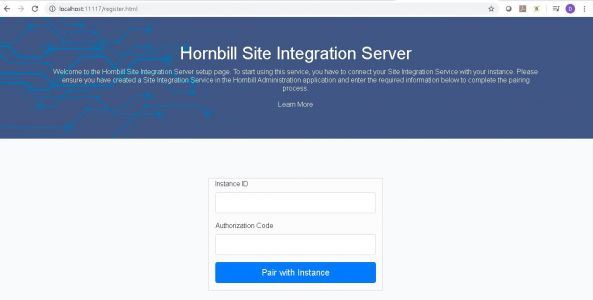
The Instance ID and valid Authorization Code are required to pair an SIS with your Hornbill instance
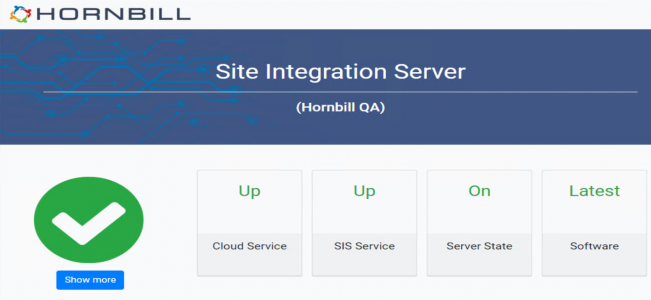
Once paired, the SIS status is reviewable via http://localhost:11117


Grouping Site Integration Servers
The creation of groups enables SIS connectors and SIS installations to be logically grouped; each SIS entry must belong to a single group. A "Default" group is provided with the option to create additional groups as required. Generally, the network infrastructure, load balancing and failover requirements will determine the number and grouping of SIS installations.
- Load Balancing
- When more than one server is placed within a group, Jobs sent to the group for processing will be processed by the next available SIS server spreading the load.
- Failover protection
- SIS servers poll the Job queue for available jobs, and thus if a server fails, any other server within the same group will pick the next available job. Any job currently being processed by the SIS server will fail, and the status set accordingly. If the job has already been pushed to a client and executed, then it will potentially be orphaned, and the status set to Timed-Out.
- If a standalone SIS server fails then all jobs aimed at that server will be left in the Job queue and will not be processed until the server is up and running again.
Creating a Group

- From the ITOM page select Site Integration Services
- Click the Show dropdown
- Click +Create Group option
- Enter the New Group Name
- Click Apply
Removing an SIS Server Installation
If you want to remove the SIS server from your instance. simply navigate to the SIS servers tab in the admin tool and delete the SIS server you want to remove.
The removal of the SIS server software from your server(s) requires manual steps in order to remove the service and all related files.
- Open Windows Powershell console as an administrator
- Enter the following:
- Stop-Service EspSisService
- sc.exe delete EspSisService
- Remove-Item "$env:ProgramFiles\Hornbill\Site Integration Server" -Recurse
- Remove-Item "$env:ProgramData\Hornbill\Site Integration Server" -Recurse
- Care should be taken with these steps as they will perform a recursive delete on the two folders specified. Once the service is removed don't forget to remove the SIS entry on the instance.