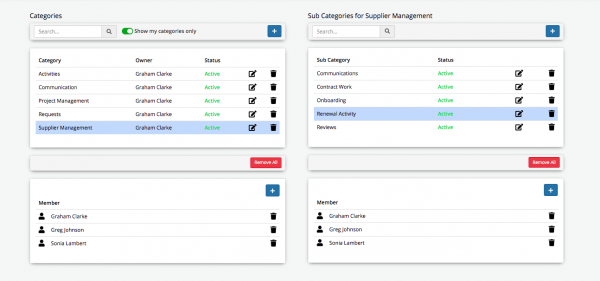
Timesheet Categories
| Home > Administration > Timesheet Manager Administration > Timesheet Categories | Index |
IntroductionConfigure and manage timesheet categories |
Related Articles |
Roles
- A user will require the Timesheet Category Manager role to view and manage Timesheet categories and subcategories
- The owner of a category or a user with the Timesheet Manager role will be able to change the ownership of a category
Categories
Users who can manage categories will be able to view all categories, but only edit and amend categories which they have created.
- Show my categories only - this toggle will filter the list of visible categories based on the one's you have created and own.
Adding Categories
To add a new category select the + icon
- Name - Give the category a name
- Description - Give the category meaningful description
- Status - If the category is available or not for use
- Active - Available for use
- Offline - Not available for use
Once a category has been added, you can click on it, in the list to add members and sub categories
Members
By default the user who created a category is added as a member.
Only users who are assigned as members to a category / sub category will be able to select the category / sub category when recording time in Timesheet Manager, or the Timesheet Manager plugin in other Hornbill apps.
With the required category selected, click the + icon in the member's box.
- Users - Manually add co-workers as members to the category
- Group - Select which group to share the category with, all members of the chosen group will then have access to the category
- Role - Select which role to share the category with, all co-workers who have the role, will then have access to the category
Sub Categories
If you have a need for more granular categorization you can add subcategories to categories you own.
With the required category selected, click the + icon in the sub-category box.
- Name - Give the subcategory a name
- Description - Give the subcategory meaningful description
- Status - If the subcategory is available or not for use
- Active - Available for use
- Offline - Not available for use
- Inherit parent membership - by default when adding a new sub-category it will inherit the membership setting of the parent category, if not desired untick the box.
Sub Category Members
In the same way as category members, it is possible to manually add members who can use the subcategory, by selecting the subcategory you want to add members too and then selecting the users, groups or roles to associate.
Manage Categories, Sub Categories & Members
- Click on the notepad next to any category or subcategory to change it's status, name or description
- You can only edit those categories/subcategories which you own
- Delete a category/subcategory or membership to a category/subcategory by selecting the trash can next to the appropriate one.
- You can only delete categories/subcategories which you own
- Use the Remove all option to delete all the memberships associated to the highlighted category or subcategory
