Teams Power Virtual Agent
| Home > Integration > Hornbill Power Virtual Agent for Microsoft Teams | Index |
- The above subscriptions will provide up to 2,000 Power Automate flow invocations per day. If your business requires more than this, or you wish to publish the bot to non-Teams channels, then you will require a full Power Virtual Agents subscription.
Installation and Deployment
1 - Create a Custom Solution
The first stage in deploying your PVA is to create an instance-specific solution package. To do this:
- Clone/download the contents of the Hornbill PVA Github repository into a local folder on your computer
- Open a PowerShell terminal from the folder that contains the downloaded files
- Run
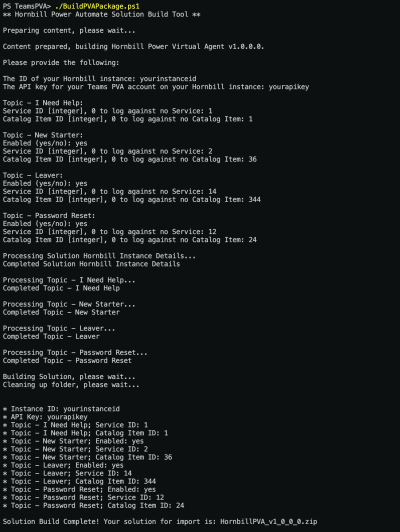
.\BuildPVAPackage.ps1
- Follow all the prompts, entering relevant values when prompted. Note, all text-type input properties below are CASE SENSITIVE.
The ID of your Hornbill instance- The ID of your Hornbill instance, example from the URL: https://live.hornbill.com/yourinstanceid
The API key for your Teams PVA account on your Hornbill instance- An API Key for the Hornbill user that will be used by the PVA to make API calls back into your Hornbill instance:
- The User should be of type User
- The User requires the following Roles:
- Collaboration Role
- Hornbill Service Manager Integrations
- Service Desk Admin
The field in your Hornbill instance user records that holds the UPN (userId / employeeId / loginId / attrib1 / ... / attrib8):- The Hornbill user field that holds the Office 365 User Principal Name (UPN) to match your Teams users with your Hornbill users.
Topic - I Need Help- Information used when raising new Incident records through the I Need Help topic:
Service ID- The ID of the Service that the Incident should be raised against. Enter 0 to raise against no ServiceCatalog Item ID- The ID of the Catalog Item that the Incident should be raised against. Enter 0 to raise against no Service
Topic - New Starter- Information used when raising new Service Request records through the New Starter topic:
Enabled (yes/no)- Whether the topic should be enabled during the import. When set to no, the topic (and its dependencies) will still be imported, but in a disabled stateService ID- The ID of the Service that the Service Request should be raised against. Enter 0 to raise against no ServiceCatalog Item ID- The ID of the Catalog Item that the Service Request should be raised against. Enter 0 to raise against no Service
Topic - Leaver- Information used when raising new Service Request records through the Leaver topic:
Enabled (yes/no)- Whether the topic should be enabled during the import. When set to no, the topic (and its dependencies) will still be imported, but in a disabled stateService ID- The ID of the Service that the Service Request should be raised against. Enter 0 to raise against no ServiceCatalog Item ID- The ID of the Catalog Item that the Service Request should be raised against. Enter 0 to raise against
Topic - Password Reset- Information used when raising new Service Request records through the Password Reset topic:
Enabled (yes/no)- Whether the topic should be enabled during the import. When set to no, the topic (and its dependencies) will still be imported, but in a disabled stateService ID- The ID of the Service that the Service Request should be raised against. Enter 0 to raise against no ServiceCatalog Item ID- The ID of the Catalog Item that the Service Request should be raised against. Enter 0 to raise against
The script will then build the custom solution ZIP file that can be imported into Power Apps.
2 - Import the Custom Solution
Once you have the ZIP file containing your custom solution:
- Log into the Power Apps environment that contains your Teams solution:
- The URL will be formatted as so: https://make.powerapps.com/environments/your-teams-environment-id/solutions
- To retrieve your Power Apps Teams environment ID, you can:
- Visit https://admin.powerplatform.microsoft.com/
- Click on the relevant environment
- Copy the environment ID from the URL
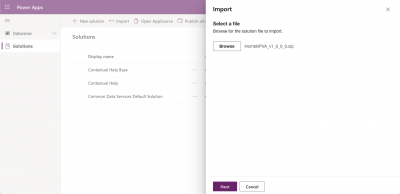
- From the Power Apps Solutions page, hit the Import button
- Click the Browse button, browse to and select your custom solution ZIP and click Next
- Choose an existing Connection for the Office 365 Users integration. This is used to pull details of the Teams session user. If none are available in the list, choose New Connection and create accordingly
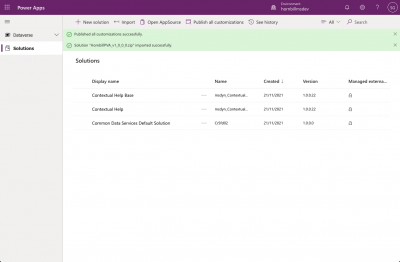
- Click Import
- As soon as the import has completed, hit the Publish all customisations button - NOTE - This is required, otherwise your bot will return errors
3 - Editing
Now that your PVA solution has been imported and published, you can now log into Teams and edit/publish/share the bot from there. To do this:
Finding the PVA
- Log in to Teams
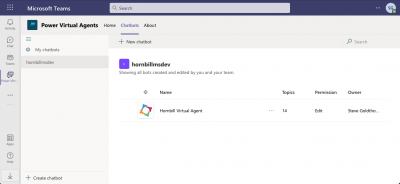
- Click the 3 dots in the sidebar, and open Power Virtual Agents from the apps menu
- Click the Chatbots tab at the top of the app window, and you should see the Hornbill Virtual Agent listed under My chatbots and/or the organisation name
Editing the PVA
PVA topics and entities can be edited as normal by selecting the relevant Topics and Entities side menu options.
IMPORTANT - Rather than directly editing the packaged topics, we recommend you make copies of these topics and edit/publish the copies ONLY. This will prevent you from losing any changes you make to the out of the box topics in the event you import new versions of the solution that we may release.
Note - We have provided the link in the Escalate topic as an example. This should be changed to either:
- A link to a Teams group conversation
- Hand-off to Omnichannel or custom engagement hub. These can be defined in the Manage > Agent Transfers side menu from the PVA
Testing
The PVA can be tested either from the Test bot pane in the PVA editor, or by publishing the PVA (as described below) and sharing to a select group of Teams users.
4 - PVA Branding & Publishing
Branding
You can give the Virtual Agent a custom name and/or Icons that will appear when your users install the Power Virtual Agent into their Teams client. There are two places this is done:
Name & Chat Icon
From the PVA, click Manage then Details from the side menu. From there you can change the Name and Icon that will appear next to messages sent from the bot.
App Icon, PVA Descriptions and Publishing
To set the App Icon and Bot Description(s), you need to first Publish the PVA. To do this, from the PVA click Publish from the side menu and click the Publish button on the page followed by the Publish button in the resulting dialog box.
Once the bot is published, click the Edit details button to set the following fields:
- App Icon - we have provided a file in the Github repository that you can use as the App Icon: Hornbill_corporate_logo_avatar_2021.png
- App Icon Color - Custom color, hex value: 224187
- Short description - A short description of your PVA
- Example: Get help, make requests and check on the status of your Hornbill tickets
- Long description - A longer description of your PVA
- Example: Hornbill Power Virtual Agent is a conversational bot that enables you to get help, see updates from your open Hornbill requests, and raise and resolve common requests all from within the Teams client.
- Developer name - Hornbill
- Website - www.hornbill.com
- Privacy statement - www.hornbill.com/privacy-policy
- Terms of use - www.hornbill.com/terms-of-service
4 - Sharing
Once your PVA is imported, published, tested and branded, you can now share the PVA with other Teams users in your organisation!
To do this, from the Publish menu click on the Make the bot available to others button, then click the Availability options button. From here, you can choose from:
- Share link - This allows you to add the bot to members of specific security groups in your Office 365 environment
- Show to my teammates and shared users - The PVA will appear under the Built by your colleagues section of the Teams Apps list
- Show to everyone in my org - The PVA will appear under the Built by your org section of the Teams Apps list. Note - this will need to be authorised by your Teams admin in the Teams Admin Portal
Hornbill Specific Topics
I Need Help
A topic to allow users to ask for help.
Triggered by phrases such as "I need help" and "I've got an issue", the topic will take a description of the issue from the user before searching Hornbill for relevant requests, known issues or FAQs.
These are returned in a structured manner, in the hope that the user can help themselves to fix the issue themselves, or mark themselves as affected by a published known issue. If the found requests, known issues and FAQs are not helpful in fixing the issue, then the option is given to log a new incident.
Get An Update
Allows users to see the status of and the latest customer-facing update of one of their requests. Returns the last few logged requests for the user to choose from in the event that they don't know the request reference.
Allows the user to add an update to the request timeline should they so wish.
Search Knowledgebase
Allows users to provide a search string, that we then use to search FAQs that available to them, returning the top 5 results.
New Starter
A topic that is provided as an example of how New Starter requests could be raised in a conversational manner.
The information requested is written into the following custom fields for automated processing by your Hornbill workflows:
- First Name - h_custom_a
- Surname - h_custom_b
- Site Name - h_custom_d
- Department - h_custom_e
- Role - h_custom_f
- Hardware - Computer - h_custom_g
- Hardware - Phone - h_custom_h
- Start Date - h_custom_21
Leaver
A topic that is provided as an example of how Leaver requests could be raised in a conversational manner.
The information requested is written into the following custom fields for automated processing by your Hornbill workflows:
- User ID (UPN) - h_custom_a
- User Display Name - h_custom_b
- Last Working Date - h_custom_21
Password Reset
A topic that is provided as an example of how Password Reset requests could be raised in a conversational manner.
The information requested is written into the following custom fields for automated processing by your Hornbill workflows:
- System - h_custom_a
Bulletins
Returns news in the form of bulletins from the users subscribed services
Cancel Request
Allows users to cancel in-flow requests
