Difference between revisions of "Site Integration Services"
| Line 32: | Line 32: | ||
| − | [[File: | + | [[File:SISToolbar.png|centre|1000px]] |
<br> | <br> | ||
<br> | <br> | ||
Revision as of 08:51, 15 June 2020
| Home > Administration > ITOM > Site Integrations Services | Index |
IntroductionHornbill's Site Integration Service (SIS) is a package that needs to be installed on a server within your organization. It runs as a standard Windows NT Service and once paired with your Hornbill instance, monitors the ITOM Job Queue for any jobs that it needs to execute. The SIS polls the paired Hornbill instance every 5 seconds, acting as the heartbeat to the cloud.
|
|
Technical Considerations
System Requirements
- OS: Windows Server 2012, 2012 R2, 2016 or 2019
- RAM: 4GB
- Free Disk: 10GB
- CPU load is minimal
- Can be run on virtual as well as physical machines.
Connectivity
- The SIS communicates with your Hornbill instance using HTTPS.
- Your Hornbill instance will only respond to pings from a paired SIS.
- Proxies are not yet supported by the SIS.
Discovery and Deployment
The SIS is capable of discovering all Windows machines and deploying ITOM Packages on those 32 and 64 bit Windows operating systems currently supported by Microsoft. Depending on the content of the package, there may be additional OS requirements}}
Download the Hornbill SIS
The Hornbill SIS package can be downloaded from Hornbill Administration via Home > ITOM > Site Integration Services and clicking the button labelled "Download Site Integration Server". The SIS package is downloaded as an executible (.exe).

Description of the options found in the SIS Toolbar (beginning from the left):
- Refresh - A refresh of the list may be required to display any new devices discovered while you are viewing the list
- Show - Displays Connectors from the selected Group
- + Create Group - (Selectable via the drop-down) allows for the Creation of SIS Groups'
- Paired / Not Paired - Toggle button that allows the display of Paired or Not Paired SIS
- Download Site Integration Server - Downloads the on premise SIS Installer
- Move Selected To... - Moves the selected SIS entries to the selected Group
 - Add a new SIS Connector
- Delete - Deletes the selected SIS entries
Install the Hornbill SIS

Once downloaded, the Hornbill SIS is installed as a Windows NT Service. Local administration rights will be required on the computer where the SIS is to be installed.
- Locate the downloaded executable and double click to begin
- Click Install
- Click Ok to Confirm the Installation
- Close the Install dialog
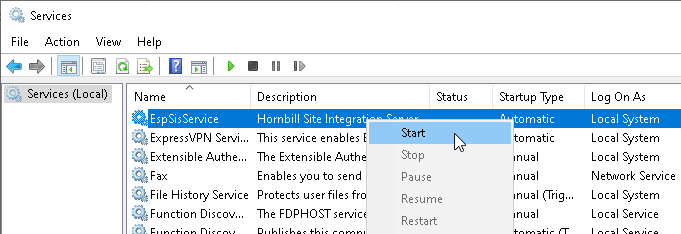
- Open the Services MMC Console
- Start the EspSisService
Creating a SIS Connector in your Hornbill Instance
- Navigate to Hornbill Administration > Home > ITOM > Site Integration Services
- Click the button to add a new SIS Connector
- Enter the following details:
- Name - name used to identify the SIS server to the Hornbill Instance
- Group - Should be a least one default group, others can be selected via drop down if created previously
- Click the Create Site Integration Service button

- The Authorisation Key is displayed, and should be recorded for later use
- See the next section for details of how to pair your SIS with your Hornbill instance
- Should you choose not to complete the pairing at this time, the connector can be found by selecting the Not Paired filter in your list of SIS Connectors
- The Authorisation Key is valid for 1 hour. Should the SIS connector and SIS installation not be paired during this time, the key will expire and the unpaired SIS connector will be removed
Pairing a SIS with your Hornbill instance
Once the ESPSisService is running, you can begin the process of pairing it to your Hornbill instance.
- Open the Browser and navigate to http://localhost:11117. If you're already there, refresh the page
- After several seconds, you will be prompted for your instance id and an authorization code
- If you already have an authorization code, skip to step 10, otherwise continue with the next step.
- To obtain an Authorization code, a new SIS connector must be added to the SIS list in Hornbill Administration > Home > ITOM > Site Integration Services
- At the top right of the list in Hornbill Administration, click the "+" button to add a new SIS connector
- Add an appropriate name and description and click "Add Site Integration Service Connector"
- Details of the new SIS entry will appear, including an Authorization code.
- Copy the Authorization code
- Return to the SIS pairing page page http://localhost:11117
- Enter the instance ID and authorization code
- Click the Pair with Instance button

Your Instance ID and a valid authorization code are required to pair a SIS with your Hornbill instance
- SISHomePage.png
Once paired, the status of the SIS can be viewed at http://localhost:11117

Managing the List of Site Integration Services
Any Site Integration Service connectors you have created can be viewed and managed in the SIS list found in Hornbill Administration > Home > ITOM > Site Integration Services. The list displays the following information:
- Name - the name of the Connector (provided when first created)
- Group - displays the group that the Connector belongs to
- Description - displays any further detail you've provided about the connector
- Service Type - shows the operating system architecture of the Server hosting the SIS installation (64 or 32-bit)}}
- Service State - lets you enable or disable the SIS
- Online Status - displays the current status.
- Service Build - displays the SIS Server version. Any Service showing an older build may highlight that there is an issue with automatic updates for that service
- Last Seen On- this will display the last time there was communication between the Hornbill SIS Service and the SIS Server
Grouping Site Integration Servers
The creation of groups enable SIS connectors, and thus SIS installations, to be logically grouped together. A group can consist of a single SIS. Multiple SIS installations may be necessary depending on the environment and potential load and also allows for the provision of failover protection. The number of SIS installations will be dependant on the environment and your needs.
- Load Balancing
- When more than one server is placed within a group, Jobs sent to the group for processing will be processed by the next available SIS server spreading the load.
- Failover protection
- SIS servers all poll the Job queue for jobs and thus if a server fails one of the other servers its group will pick the next available job. Any job that is currently being processed by the SIS server will fail and the status will be set to accordingly. If the job has already been pushed to a client and executed then it will potentially be orphaned and the status in the Job queue will be set to Timed-Out.
- If a standalone SIS server fails then all jobs aimed at that server will be left in the Job queue and will not be processed until the server is up and running again.
Creating a Group

- From the ITOM page select Site Integration Services
- Click the Show dropdown
- Click +Create Group option
- Enter the New Group Name
- Click Apply