Difference between revisions of "ServiceNow"
(→Config) |
|||
| Line 23: | Line 23: | ||
|} | |} | ||
==Config== | ==Config== | ||
| − | [[File: | + | [[File:ServiceNow Configuration.png|300px|right]] |
| − | In order to integrate with | + | In order to integrate with ServiceNow, you will first need to configure, and securely store the authentication credentials for the ServiceNow instance and Accounts you want to use with the Hornbill App. |
| − | Configure your ''' | + | Configure your '''ServiceNow''' account authentication in '''[[Hornbill_KeySafe|KeySafe]]''' in order to use the ServiceNow options. |
In the admin console > System > Security > KeySafe | In the admin console > System > Security > KeySafe | ||
| − | * Select on '''+''' and select ''' | + | * Select on '''+''' and select '''ServiceNow Authentication''' |
| − | * Give the | + | * Give the ServiceNow KeySafe a Title (this is the name / identifier for the ServiceNow account as you will see it when using the Integration Call node in your business process) |
* Optionally add a description | * Optionally add a description | ||
| + | * '''Instance Name''' - Define the ServiceNow Instance you wish to connect to (not the full URL) | ||
| + | * '''Username''' - Define the username (from ServiceNow) against which all the actions will be performed (ensure this user has the appropriate rights in ServiceNow to perform the required actions) | ||
| + | * '''Password''' - Store the password for the user | ||
* Select '''Create Key''' to save | * Select '''Create Key''' to save | ||
| − | |||
| − | |||
| − | |||
| − | |||
| − | |||
| − | |||
Right your all set........ | Right your all set........ | ||
| Line 46: | Line 43: | ||
* Use KeySafe to create, store and enable integrations with multiple ServiceNow accounts for use in your business processes | * Use KeySafe to create, store and enable integrations with multiple ServiceNow accounts for use in your business processes | ||
| − | * | + | * From the Keysafe List, select a ServiceNow account, and use the '''Trash Can''' to delete it |
| − | :* Note, this will | + | :* Note, this will remove the rights of any existing ServiceNow Integration Calls in your business processes, which are using the now deleted ServiceNow Account, so you will need to edit your business processes accordingly. |
==Options(Methods)== | ==Options(Methods)== | ||
Revision as of 10:01, 7 August 2017
Home > Integration > Business Process Automation & Orchestration > Hornbill iBridge > ServiceNow
IntroductionServiceNow is a Service Management Platform Create, Update, get information about, and Close Tickets in ServiceNow |
Related Articles |
Config
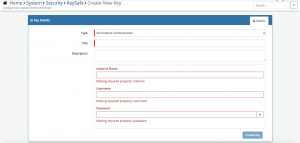
In order to integrate with ServiceNow, you will first need to configure, and securely store the authentication credentials for the ServiceNow instance and Accounts you want to use with the Hornbill App.
Configure your ServiceNow account authentication in KeySafe in order to use the ServiceNow options.
In the admin console > System > Security > KeySafe
- Select on + and select ServiceNow Authentication
- Give the ServiceNow KeySafe a Title (this is the name / identifier for the ServiceNow account as you will see it when using the Integration Call node in your business process)
- Optionally add a description
- Instance Name - Define the ServiceNow Instance you wish to connect to (not the full URL)
- Username - Define the username (from ServiceNow) against which all the actions will be performed (ensure this user has the appropriate rights in ServiceNow to perform the required actions)
- Password - Store the password for the user
- Select Create Key to save
Right your all set........
Managing ServiceNow Configurations
- Use KeySafe to create, store and enable integrations with multiple ServiceNow accounts for use in your business processes
- From the Keysafe List, select a ServiceNow account, and use the Trash Can to delete it
- Note, this will remove the rights of any existing ServiceNow Integration Calls in your business processes, which are using the now deleted ServiceNow Account, so you will need to edit your business processes accordingly.
Options(Methods)
Once you have your ServiceNow Account Authorised, your all set to use it with the Integration Call in your business processes. The following options are now available for you to use with ServiceNow:
Read more about using the Integration Call from the Related Articles section, and learn how to work with input and out parameters for each of the ServiceNow options.
Example
In this example, we will choose and configure the ServiceNow instance and account to which we will then use to create a new Incident in ServiceNow. We'll need to specify using KeySafe the ServiceNow Instance, and authentication details for the ServiceNow account which has the appropriate rights which will allow the logging of an Incident or other actions you may wish to automate.
Through the business process designer we can then use the Integration Call node to decide where and how often we want to utilize the ServiceNow integration, and which actions we want to perform. Configuring the input parameters on each occasion, to pass the relevant variables to ServiceNow.
In this simple example we will use the Create Incident option, to raise a new Incident in ServiceNow at a specific point in our business process.
Finally we'll use the output parameters and some wiki markup to write the URL of the new ServiceNow Incident to the timeline of the request, this is not a required step but is useful for demonstration purposes or even to act as an audit trail, this could of course be written to a custom field or the external ref number field if required.

