Difference between revisions of "Organisation"
| Line 12: | Line 12: | ||
== Organization List== | == Organization List== | ||
| − | [[file: | + | [[file:Organisation_breadcrumb.PNG|350px|right]] |
The Organization List contains the groups that make up your organization. The list forms a hierarchical structure where you can create and browser through the different levels of your organization. The ''Breadcrumb'' displayed at the top of the list highlights where you are within each level of your organization and lets you navigate back up to the higher levels. | The Organization List contains the groups that make up your organization. The list forms a hierarchical structure where you can create and browser through the different levels of your organization. The ''Breadcrumb'' displayed at the top of the list highlights where you are within each level of your organization and lets you navigate back up to the higher levels. | ||
| Line 39: | Line 39: | ||
===Creating a New Group=== | ===Creating a New Group=== | ||
| − | [[File: | + | [[File:Creating_a_new_group.PNG|350px|right|link=https://wiki.hornbill.com/images/9/96/New_Organisation_Form.png|New Group Form]] |
| − | Your Organizational Structure is created and managed via Hornbill | + | Your Organizational Structure is created and managed via Hornbill Configuration. Select "Platform Configuration" and then "Organization". Using the ''Create New Group'' button located to the top right you can begin to add the groups which make up your organization structure. |
:* '''Organization Id''' | :* '''Organization Id''' | ||
| Line 67: | Line 67: | ||
To edit an existing group: | To edit an existing group: | ||
<ol> | <ol> | ||
| − | <li> | + | <li> Go to ''Hornbill Configuration > Platform Configuration > Organizations''</li> |
<li> Click the group that requires editing</li> | <li> Click the group that requires editing</li> | ||
<li> The following options are available to edit:</li> | <li> The following options are available to edit:</li> | ||
a. Name<br> | a. Name<br> | ||
| − | b. Type<br> | + | b. Type <br> |
| − | c. Allow Task Assignment<br> | + | c. Allow Task Assignment (only applicable if the group is of type team)<br> |
| − | d. Attributes and Notes<br> | + | d. Show in Organization Structure<br> |
| + | e. Attributes and Notes<br> | ||
| − | + | It is not possible to edit the ID or the Parent of the group. | |
<li> Click the “Save Changes” button to confirm any amendments</li> | <li> Click the “Save Changes” button to confirm any amendments</li> | ||
</ol> | </ol> | ||
| Line 81: | Line 82: | ||
===Deleting a Group=== | ===Deleting a Group=== | ||
| − | [[File: | + | [[File:Deleting_a_Group_in_Hornbill.PNG|350px|right|link=https://wiki.hornbill.com/images/9/94/Deleting_a_Group.png|Deleting a Group]] |
| − | To delete an existing group, | + | To delete an existing group, go to ''Hornbill Configuration > Platform Configuration > Organizations'' and do the following: |
<br> | <br> | ||
<ol> | <ol> | ||
<li> Ensure that there are no users assigned to that group (this can be checked by clicking the "Assigned Users" tab available when viewing the Group details). If there are, remove them by following the process described in the section ''Removing Users from a Group''. '''If the Group is of type "Team", it is also prudent to check that there are no Service Manager requests currently assigned to that team and take action to re-assign those requests before the Group is deleted.''' </li> | <li> Ensure that there are no users assigned to that group (this can be checked by clicking the "Assigned Users" tab available when viewing the Group details). If there are, remove them by following the process described in the section ''Removing Users from a Group''. '''If the Group is of type "Team", it is also prudent to check that there are no Service Manager requests currently assigned to that team and take action to re-assign those requests before the Group is deleted.''' </li> | ||
<li> From the Organization Structure list, select the group to be removed by ticking the checkbox on the left hand side of its name</li> | <li> From the Organization Structure list, select the group to be removed by ticking the checkbox on the left hand side of its name</li> | ||
| − | <li> Click the | + | <li> Click the trash can icon</li> |
<li> Click OK when presented with the “Are you sure" prompt</li> | <li> Click OK when presented with the “Are you sure" prompt</li> | ||
| Line 95: | Line 96: | ||
===Group Membership - Associating Users to a Group=== | ===Group Membership - Associating Users to a Group=== | ||
| − | [[File: | + | [[File:Associating_users_to_a_group.PNG|350px|right|link=https://wiki.hornbill.com/images/8/81/Search_and_Associate_Users.png|Associating Users to a Group]] |
| − | Once you have created | + | Once you have created a group, users can be given Group Membership by assigning them to the desired group. Go to ''Hornbill Configuration > Platform Configuration > Organizations'' and do the following: |
<br> | <br> | ||
<ol> | <ol> | ||
<li>Click the group in which user(s) need to be assigned</li> | <li>Click the group in which user(s) need to be assigned</li> | ||
<li>Click the “Assigned Users” Tab</li> | <li>Click the “Assigned Users” Tab</li> | ||
| − | <li>Click the | + | <li>Click the “Associate User” button. A form is displayed with the following options:</li> |
:* '''Search Users''' | :* '''Search Users''' | ||
| − | :: Begin typing the name of | + | :: Begin typing the name of an individual user to assign to the group, click the name to select them |
| + | :* '''By Organization''' | ||
| + | :: If the members of the group need to be the same as another existing group, use this field to search and select the group. This will add all the members of that existing group to your new group. | ||
| + | :* '''By Role''' | ||
| + | :: If the members of the group can be selected based on a common Hornbill Security Role, use this field to search and select the role. Any user who possess that role will be added to your new group. | ||
:* '''Membership''' | :* '''Membership''' | ||
:: Select whether the user is a Member, Team Leader, or Manager of the group. | :: Select whether the user is a Member, Team Leader, or Manager of the group. | ||
:* '''Allow Viewing Tasks''' | :* '''Allow Viewing Tasks''' | ||
| − | :: Allows the User to view tasks that are assigned to the Group | + | :: Allows the User to view tasks that are assigned to the Group (viewing of tasks is only relevant to groups of type Team) |
:* '''Allow Actioning Tasks''' | :* '''Allow Actioning Tasks''' | ||
| − | :: Allows the User to action tasks that are assigned to the Group | + | :: Allows the User to action tasks that are assigned to the Group (actioning of tasks is only relevant to groups of type team) |
| − | <li>Once complete, click the '' | + | <li>Once complete, click the ''Save''button”.</li> |
</ol> | </ol> | ||
<br> | <br> | ||
===Removing Users from a Group=== | ===Removing Users from a Group=== | ||
| − | [[File: | + | [[File:Managing_assigned_users.PNG|350px|right|link=https://wiki.hornbill.com/images/f/f7/Removing_Users_from_a_Group.png|Associating Users to a Group]] |
| − | If a user(s) no longer needs to reside in a group, | + | If a user(s) no longer needs to reside in a group, go to ''Hornbill Configuration > Platform Configuration > Organizations'' and do the following: |
<br> | <br> | ||
<ol> | <ol> | ||
| Line 123: | Line 128: | ||
<li>Click the “Assigned Users” Tab</li> | <li>Click the “Assigned Users” Tab</li> | ||
<li>Select the users to be removed by ticking the checkbox on the left hand side of their name</li> | <li>Select the users to be removed by ticking the checkbox on the left hand side of their name</li> | ||
| − | <li>Click the | + | <li>Click the trash can icon located at the top right of the list</li> |
<li>Click OK when presented with the “Are you sure" prompt</li> | <li>Click OK when presented with the “Are you sure" prompt</li> | ||
<li>The user(s) is now removed from the group.</li> | <li>The user(s) is now removed from the group.</li> | ||
Revision as of 10:53, 30 June 2022
| Home > Administration > System > User and Guest Access > Organization | Index |
IntroductionThe Hornbill platform allows a hierarchical Organizational Structure to be defined within your instance which, when members are added to each of the business units, can greatly assist in providing a solid foundation on which current and future Hornbill Application functionality operates.
|
|
Organization List
The Organization List contains the groups that make up your organization. The list forms a hierarchical structure where you can create and browser through the different levels of your organization. The Breadcrumb displayed at the top of the list highlights where you are within each level of your organization and lets you navigate back up to the higher levels.
Types of Groups
Groups are available to define different business units. When creating a Group you will be required to specify a Type against that Group.
There are six Group Types available, the default being "General".
- Company
- Logically, this will be the Type set against the Group that sits at the top of your hierarchy, and which all other Groups sit beneath. It's entirely possible that you have more than one Group of Type "Company", where they sit in the hierarchy will be dependent on a "Parent" Group being specified upon creation.
- Division
- This is a section of a large company that can be divided into an organizational function – often by product or geography. Each Division can contain the necessary resources to support that product line or geography (i.e. its own Departments)
- Department
- This is a specialized functional area within a Company (or Division) – this is often based on functions, products, customers, geographies or processes.
- Costcenter
- This is a defined area or person to which direct and indirect costs are allocated.
- General
- This is a generic container that can be used for any area that has not been defined above. For example, a team that should not be assigned requests may fall under this group type.
- Reporting Hint
- Groups are stored in the table h_sys_groups and the types described above are represented by an integer value between 0 and 5 in a column called h_type. These are as follows: 0=general, 1=team, 2=department, 3=costcenter, 4=division, 5=company. The group type may be useful when creating measures, widgets, and reports.
Creating a New Group
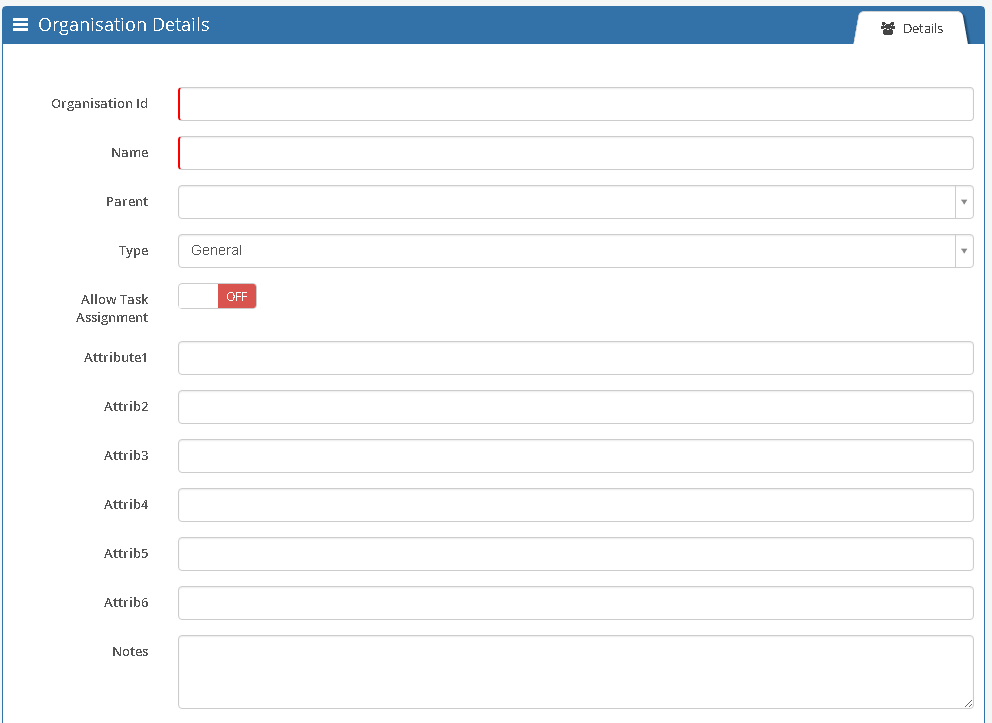
Your Organizational Structure is created and managed via Hornbill Configuration. Select "Platform Configuration" and then "Organization". Using the Create New Group button located to the top right you can begin to add the groups which make up your organization structure.
- Organization Id
- This is the unique identification of the group. This value should not contain any spaces or special characters. Organisation ID's cannot begin with a numeric digit, must be at least two characters long and are limited to a maximum of 160 characters and can only contain: Letters, Numbers and Underscores. Please be aware, that once the ID has been saved, it cannot be amended. If this new Group has a parent, then the ID will be constructed using the ID that you specify as well as being prefixed (upon clicking create) with the ID(s) of any parent groups.
- Name
- This is the user friendly name for the group. This can be amended at any time after the Group has been created.
- Parent
- This is how the hierarchy is defined. Here, the direct parent of the group should be specified. For example, if creating a division, the organisation may be selected as a parent. Be aware, that once the Parent has been saved, it cannot be amended.
- Type
- This is a drop-down list, specifying the type of group that is being created (Company, Division, Department, Costcenter, Team or General)
- Allow Task Assignment
- This flag indicates whether activities can be assigned to the Group as a whole. It is possible to configure the Business Process Workflow to assign tasks to a group.
- Attributes 1 to 9
- These fields are currently not used.
- Notes
- A free text field to record any additional information regarding the group.
Editing an Existing Group
To edit an existing group:
- Go to Hornbill Configuration > Platform Configuration > Organizations
- Click the group that requires editing
- The following options are available to edit: a. Name
- Click the “Save Changes” button to confirm any amendments
b. Type
c. Allow Task Assignment (only applicable if the group is of type team)
d. Show in Organization Structure
e. Attributes and Notes
It is not possible to edit the ID or the Parent of the group.
Deleting a Group
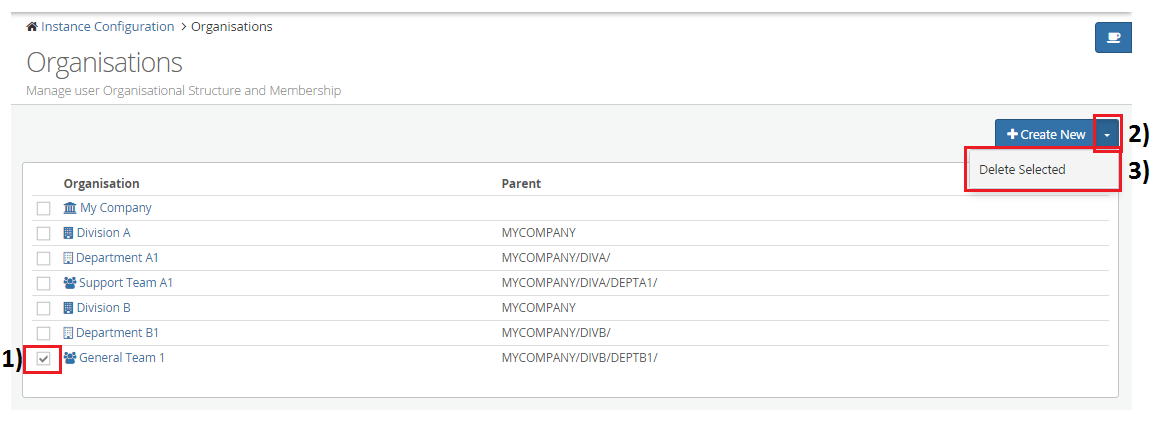
To delete an existing group, go to Hornbill Configuration > Platform Configuration > Organizations and do the following:
- Ensure that there are no users assigned to that group (this can be checked by clicking the "Assigned Users" tab available when viewing the Group details). If there are, remove them by following the process described in the section Removing Users from a Group. If the Group is of type "Team", it is also prudent to check that there are no Service Manager requests currently assigned to that team and take action to re-assign those requests before the Group is deleted.
- From the Organization Structure list, select the group to be removed by ticking the checkbox on the left hand side of its name
- Click the trash can icon
- Click OK when presented with the “Are you sure" prompt
- The group has now been removed from your Organizational Structure
Group Membership - Associating Users to a Group
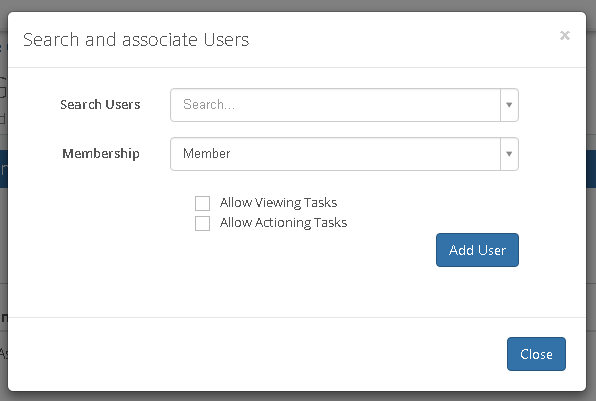
Once you have created a group, users can be given Group Membership by assigning them to the desired group. Go to Hornbill Configuration > Platform Configuration > Organizations and do the following:
- Click the group in which user(s) need to be assigned
- Click the “Assigned Users” Tab
- Click the “Associate User” button. A form is displayed with the following options:
- Search Users
- Begin typing the name of an individual user to assign to the group, click the name to select them
- By Organization
- If the members of the group need to be the same as another existing group, use this field to search and select the group. This will add all the members of that existing group to your new group.
- By Role
- If the members of the group can be selected based on a common Hornbill Security Role, use this field to search and select the role. Any user who possess that role will be added to your new group.
- Membership
- Select whether the user is a Member, Team Leader, or Manager of the group.
- Allow Viewing Tasks
- Allows the User to view tasks that are assigned to the Group (viewing of tasks is only relevant to groups of type Team)
- Allow Actioning Tasks
- Allows the User to action tasks that are assigned to the Group (actioning of tasks is only relevant to groups of type team)
- Once complete, click the Savebutton”.
Removing Users from a Group
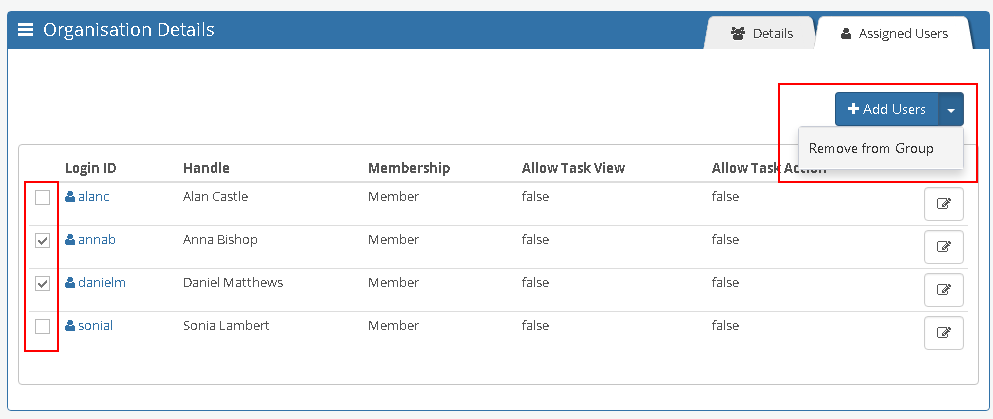
If a user(s) no longer needs to reside in a group, go to Hornbill Configuration > Platform Configuration > Organizations and do the following:
- Click the group from which user(s) need to be removed
- Click the “Assigned Users” Tab
- Select the users to be removed by ticking the checkbox on the left hand side of their name
- Click the trash can icon located at the top right of the list
- Click OK when presented with the “Are you sure" prompt
- The user(s) is now removed from the group.
Team List
A team is a group of users with a set of complimentary skills, organized to work together to complete a task job or project. In Hornbill, a team is a group to which requests can be assigned. Team members can only consist of users that have a subscription to Hornbill.