Migrating to the Employee Portal
| Home > Applications > Collaboration > Employee Portal > Migrating to the Employee Portal | Index |
If you are currently using the Service Portal or the My Services Portal, and looking to migrate to the Employee Portal please follow the steps detailed here.
Migration Steps at a Glance
These are the main steps that you will be taking to migrate to the Employee Portal
Step 1 - Enable the Employee Portal
The Employee Portal is Off by default. The first step to getting your Employee Portal ready is to give access to those that will be helping to create and test the new Employee Portal and turning it on. In the admin console, under System > Customize > Employee Portal, select the Settings tab.
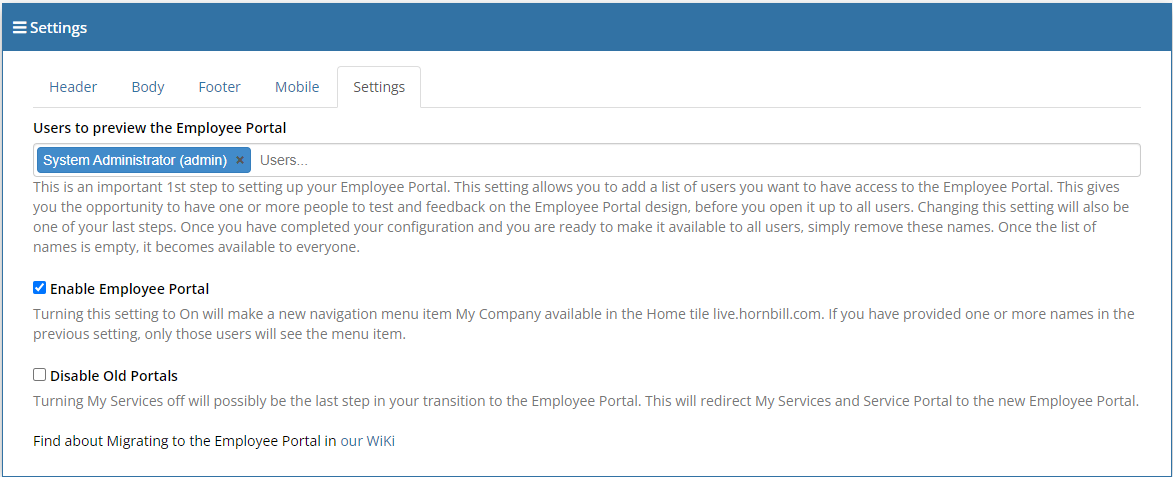
- Users to preview the Employee Portal
- This is an important 1st step to setting up your Employee Portal. This setting allows you to add a list of users you want to have access to the Employee Portal. This gives you the opportunity to have one or more people to test and feedback on the Employee Portal design, before you open it up to all users. Changing this setting will also be one of your last steps. Once you have completed your configuration and you are ready to make it available to all users, simply remove these names. Once the list of names is empty, it becomes available to everyone.
- Enable Employee Portal
- If you are ready to configure the employee portal, enable this setting, and the users defined above will now have a Company Home menu option visible to them under the Home Tile in the navigation menu in the live.hornbill.com/yourcompany domain
Roles
- Collaboration
- Any user who will need to manage pages on the Employee Portal will need this role (This role alone will not allow them to configure the Home Page or Domain Pages)
- Home Page Manager
- Any user who needs to manage the landing page on the Employee Portal will need this role
Step 2 - Configure The Employee Portal
This step covers some of the basic configuration to the look and feel of the Employee Portal. These settings are located in the Admin Console under System->Customize->Employee Portal. Configure the following for the structure / theme of the pages on the Employee Portal
- Header
- Configure the top banner of the Employee Portal, including logo, background image, and colours.
- Body
- Set the background image and the main colours for the body of the Employee Portal. The colour settings are used as default for the page widgets.
- Footer
- Add contact information to the bottom section of the Employee Portal page. By default this contains Hornbill information, so you will want to change this to match your organisation.
- Mobile
- Customize the Employee Portal Mobile App name and setup links to logo images.
Step 3 - Add Widgets to the Home Page
The majority of the contents displayed in the Employee Portal is provided by application widgets. The Employee Portal could consist of as little as a single widget or a collection of widgets from different applications.
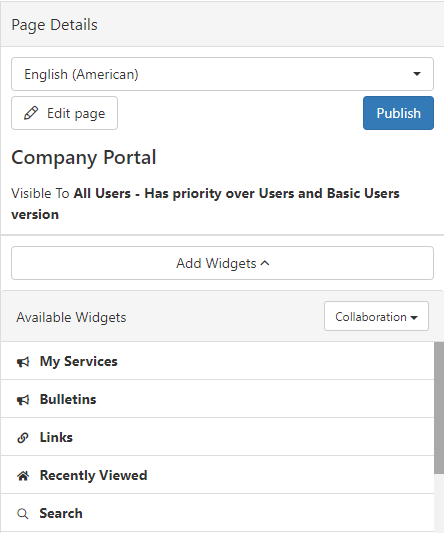
Page Versions
Page Versions relate to the type of users and the access that they have to different application widgets. By Default, the Home Page, provides two out of the box versions. It is possible to configure different Home Page versions for your users based on their type and to include different widgets on these pages if desired.
- Users
- A page version which will be displayed to users who are of type User. Additional widgets will be available to the user page version, based on user subscription.
- Basic Users
- A version which will be displayed to users who are of type Basic. Widgets are limited to those that can be accessed by basic users.
- All Users
- You may prefer to have one version of the Home Page which is used by all users, irrespective of their type, and to achieve this, you can add an All Users version of the Home Page, and it will have priority over any other page versions and will be displayed to all users. Widgets are limited to those that can be accessed by basic users.
Add Widgets
Add the widgets you would like to appear to the users on the Home Page.
Customize
Customize the Widgets in terms of content and style, using the options in each widget's configuration settings.
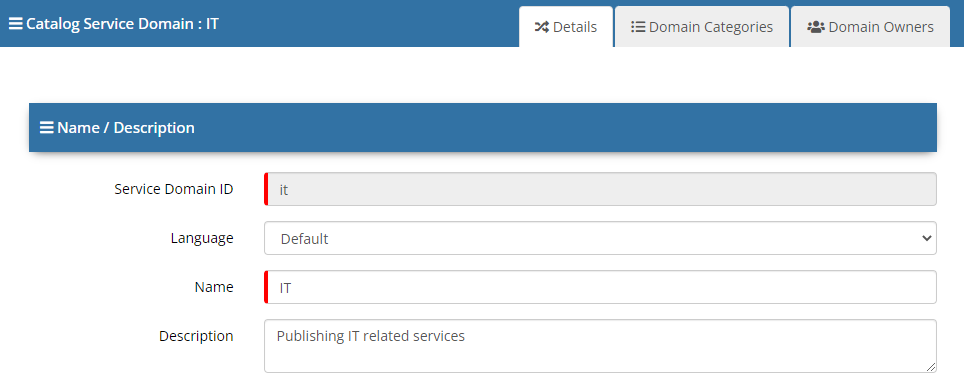
Step 4 - Configure Service Domains
Service Domains are provided to allow you to create unique areas within the Employee Portal for different areas of your business, such as IT, HR, and Facilities. The Domain Configuration is located within the Admin Console under Home > Service Catalog > Service Domains.
Role
A User will need the Service Domain Administrator role to be able to manage Service Domains
Settings
Service Domain Configuration options
- Default
- Enabled
- Public
- Language
Domain Categories
Can be used to provide more granular grouping of services linked to the Service Domain, and to filter widgets on Doman Pages on the Employee Portal
Domain Owners
Users who will be able to manage the linked Domain Page on the Employee Portal
Step 5 - Enable Domain Pages
Using the Page Designer, and being a Domain Owner, will enable the option to create a Domain Page on the Employee Portal
Here you will be able to consider the following:
- Page or Redirect
- Page Widgets
- Versions
- Domain Filters
- Language / Translations
Step 6 - Map Service Manager Services
Link To Service Domains & Domain Categories
- In Service Manager > Service Portfolio > Service record > Service Details two new settings are enabled which allow for the mapping of each service in Service Manager to a Service Domain and Optionally a Service Domain Category.
- Mapping a Service to a Service Domain, will allow you on domain pages on the Employee Portal to create widgets, which display Domain-specific data (pulled from the services linked to that domain).
Utilize Your Existing Data
The Employee Portal will present all of your existing Service Manager data.
- Catalog Items
- FAQ’s
- Bulletins
- Subscriptions & Visibility Configurations are Carried Forward
The Home Page of the Employee Portal will display data on the configured widgets based on the users subscription to services (without the need to associate the Service Manager Services to Service Domains)
Domain Pages on the Employee Portal, will only display data related to Services mapped to that Domain, if the widgets on the Domain Page have applied the Domain Filter
Step 7 - Customize
Customize your Home Page, and Domain Pages
Widget Layouts
- Options - Decide on Row and Column layouts
- Inherited on Employee Mobile - The Pages, and Ordering will be mirrored on the Employee Mobile
Widgets Configuration
- Domain filters inherited - Apply Domain Filters to widgets on Pages to filter the displayed data
- Configuration Specific to each widget - Each widget will have unique specific configuration options
Widget Styling
- Title / Icons - Change the titles, icons and colors
- Override employee portal general theme if desired - By default all widgets will inherit the styling from the Section configuration on the Body Section of the pages (as set in the admin console > Manage Employee Portal Settings, however, if desired you can change the style of individual widgets.
Step 8 - Switch
When the Employee Portal configuration is complete, and you are ready for users to start using the Employee Portal some final steps are quired.
Re-directs
You may have employees who will follow links to take them to the Service or My Services Portals, and you may have links in email templates which employees will click on and these will take them to the Service of My Services Portals. To ensure all employees are directed to the Employee Portal, you can enable re-directs. These will automatically pass employees to the corresponding Employee Portal URL when they try to go to a Service Portal or My Services URL.
Under Applications > Collaboration > Settings make these setting changes at the point you are ready to switch (they will take effect immediately)
- guest.anonymous.portal.redirectServicePortalTarget
- Redirect URLs from the old Service Portal page to the new Employee Portal - Ensure the is set to Employee Portal
- guest.anonymous.portal.redirectServicePortalToEmployeePortal
- Redirect URLs from the old Service Portal page to the new Employee Portal - Ensure this is set to On
Enable for users
In Step 1, you may have selected individuals that would take part in the setup and preview of the Employee Portal. When you are ready to give access to everyone, in the Admin Console navigate to the System > Custumize > Employee Portal and select the Settings tab
- Users To Preview the Employee Portal
- Clear all users from this field in order to provide access to all users.
Turn off the My Services Option
This step will remove the My Services Option from the Collaboration menu in Hornbill. It will also move the Employee Portal menu item Company Home to the top of the Menu options, and therefore will be the default view all basic users see when they login.
- In the Admin Console navigate to System > Customize > Employee Portal and select the Settings tab
- Tick the Disable Old Portals option
Turn off the Link to the Service Portal from the Menu in the User App
- In the Admin Console navigate to Applications > Collaboration > Settings
- Search for the setting webapp.ui.showServicePortalLink
- Turn this setting to Off to remove a link from the menu in the user app.