Mailbox Rights and Roles
Jump to navigation
Jump to search
Email is used by the Service Manager application in various processes. For example, in Incident management it can be used to both receive requests to create a call or to communicate progress or resolution of a request.
By default you will have a temporary mailbox set up as part of your instance. You will have received an email with details of this when your new instance was set up.
Using the Pre-configured Mailbox
Your new Hornbill instance is equipped with a pre-configured mailbox which will allow you to get up and running more quickly. To make use of this you must complete 3 steps :-
- Enable the email client - Go to the Admin Tool, and then to your list of Installed Applications. Click on Service Manager and then view the Settings Tab. In the filter type webapp.ui.emailclient.enabled, set the parameter to true.
- Create a Mailbox Role - Go to the Admin Tool, and then Users and Groups then Roles. Click 'Create New Role' and populate the fields as follows:-
- Role ID: Mailbox – Helpdesk
- Privilege Level: User
- Application: Hornbill Service Manager
- Description: Role to manage Mailbox Access
- Applications: Hornbill Service Manager
- Groups: Leave Blank
- Shared Mailboxes: helpdesk
- Click 'create role'
- Click the “Shared Mailbox rights” Tab
- Then set the following rights...
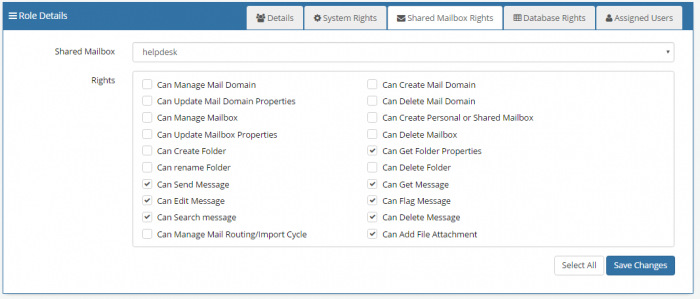
- 'Save changes'
- 3. Associate the Role to a User who will require access to this mailbox

Using your own Mailbox
If you wish to configure your own mailbox then please contact your Hornbill Product Specialist (HPS) at collaboration@hornbill.com who will assist you to complete this.