Difference between revisions of "Mailbox Rights and Roles"
| (31 intermediate revisions by 4 users not shown) | |||
| Line 1: | Line 1: | ||
| − | Email | + | <div style="border:1px solid #90C0FF; background:#D0E0FF; width:99%; padding:4px; margin-bottom:10px;"> |
| + | __NOTOC__ | ||
| + | {| style="width:100%" | ||
| + | |[[Main Page|Home]] > [[Administration]] > [[Email Administration]] > Mailbox Rights and Roles | ||
| + | |style="text-align:right;"|[[:Category:Service Manager Administration|Index]] | ||
| + | |} | ||
| + | </div> | ||
| + | {|style="width: 100%" | ||
| + | |- valign="top" | ||
| + | |style="width:73%"| | ||
| + | == Introduction == | ||
| + | Email is used by the Hornbill applications in various processes. For example, Service Manager within Incident management it can be used to both receive [[What_are_Requests? |requests]] to create a call or to communicate progress or resolution of a request. | ||
| − | # [[ | + | Your new Hornbill instance is equipped with a default mailbox (helpdesk) which has an inbound service and email address already configured. This can be used to get up and running more quickly. To begin using the default mailbox a new Security Role must be created. Before creating a new role for use with your shared mailbox, we recommend reading general information on the Hornbill Roles, please see the [[Roles|'''Roles''']] wiki page. |
| − | + | ||
| + | |style="width:5%"| | ||
| + | | | ||
| + | |style="width:22%; border-style: solid; border-width: 1px; border-color:#e6e6e6; background-color:#f2f2f2;"| | ||
| + | |||
| + | == Related Articles == | ||
| + | :* [[Email_Administration|Email Administration]] | ||
| + | :* [[Shared_Mailboxes|Configuring Shared Mailboxes]] | ||
| + | :* [[Mailboxes|Working With Shared Mailboxes]] | ||
| + | |} | ||
| + | |||
| + | == Creating a Shared Mailbox Role == | ||
| + | ::[[File:New_Mailbox_Role.PNG|700px|right|thumb|<div align="center">'''Create a new Security Role'''</div>]] | ||
| + | === Create a New Security Role === | ||
| + | Navigate to '''''Home > System > Organisational Data > Roles''''' in Hornbill Administration | ||
| + | |||
| + | :Click 'Create New Role'(located to the top right of the list) and populate the fields as follows:- | ||
| + | :::* '''Role ID''': Mailbox – ''mySharedMailboxname'' | ||
| + | :::* '''Privilege Level''': User | ||
| + | :::* '''Type''': Security | ||
| + | :::* '''Description''': This Role will be used to grant access to the ''mySharedMailboxname'' Shared Mailbox | ||
| + | |||
| + | :At this stage the "Applications" and "Shared Mailboxes" fields aren't active so simply click 'Create Role' | ||
| + | <br> | ||
| + | <br> | ||
| + | === Associate a Shared Mailbox to the New Role === | ||
| + | ::[[File:Mailbox_Role_Select_Mailbox.PNG|700px|right|thumb|<div align="center">'''Associate a Mailbox to the new role'''</div>]] | ||
| + | :Now complete the remaining fields. A role purely governing access to a Shared Mailbox does not need application context so the "Applications" field can be left blank. | ||
| + | :::* '''Shared Mailboxes''': select the relevant shared mailbox | ||
| + | :::* Click 'Save' | ||
| + | A further tab will now be exposed at the top of the form labelled "Shared Mailbox Rights". | ||
| + | <br> | ||
| + | <br> | ||
| + | === Select the desired rights === | ||
| + | ::[[File:Mailbox_Role_Mailbox_Saved.PNG|700px|right|thumb|<div align="center">'''When a Mailbox is associated, a new tab appears called "Shared Mailbox Rights"'''</div>]] | ||
| + | :::* Click the “Shared Mailbox rights” Tab | ||
| + | :::* Then set the desired rights | ||
| + | |||
| + | ==== Suggested Rights for a Typical User==== | ||
| + | This set of rights allows a user to perform all the common actions required to process messages that are received by the Shared Mailbox. It allows a user to view and manage the contents of the shared mailbox. | ||
| + | :::* Can send message | ||
| + | :::* Can Edit Message | ||
| + | :::* Can Search Message | ||
| + | :::* Can Get Folder Properties | ||
| + | :::* Can Get message | ||
| + | :::* Can Flag Message | ||
| + | :::* Can Delete Message | ||
| + | :::* Can Add File Attachment | ||
| + | |||
| + | ==== Minimum Rights for Sending An Email ==== | ||
| + | This set of rights only allows an agent to send a message from the Hornbill Platform. It does not allow the user to view or process the contents of the shared mailbox. | ||
| + | :::* Can Send Message | ||
| + | :::* Can Add File Attachment | ||
| + | ::[[File:Email_rights.png|700px|right|thumb|<div align="center">'''Check the desired rights and save. The image shows a suggested set of Mailbox rights'''</div>]] | ||
| + | Once you're happy with your chosen rights, click "Save" and proceed to [[Roles|'''Associate the Role to the Users''']] who will require access to this mailbox. | ||
| + | <br> | ||
| + | <br> | ||
| + | == Integrate with your own Email == | ||
| + | |||
| + | Hornbill includes some powerful email integration capabilities. This is performed in Hornbill Administration via '''''Home > System > Email'''''. | ||
| + | |||
| + | See [[Email_Administration|Email Administration]] for links to all email-related configuration or click one of the following to find out more: | ||
| + | :::*[[Outbound Mail Routing|Configure an Outbound Mail Route]] | ||
| + | :::*[[Shared_Mailboxes|Configure an Inbound Mail Service]] | ||
| + | :::*[[Email_Routing_Rules|Configure Email Routing Rules]] | ||
| + | |||
| + | [[Category: Email_Administration]][[Category: Administration]] | ||
Revision as of 14:47, 25 April 2019
| Home > Administration > Email Administration > Mailbox Rights and Roles | Index |
IntroductionEmail is used by the Hornbill applications in various processes. For example, Service Manager within Incident management it can be used to both receive requests to create a call or to communicate progress or resolution of a request. Your new Hornbill instance is equipped with a default mailbox (helpdesk) which has an inbound service and email address already configured. This can be used to get up and running more quickly. To begin using the default mailbox a new Security Role must be created. Before creating a new role for use with your shared mailbox, we recommend reading general information on the Hornbill Roles, please see the Roles wiki page. |
Related Articles |
Create a New Security Role
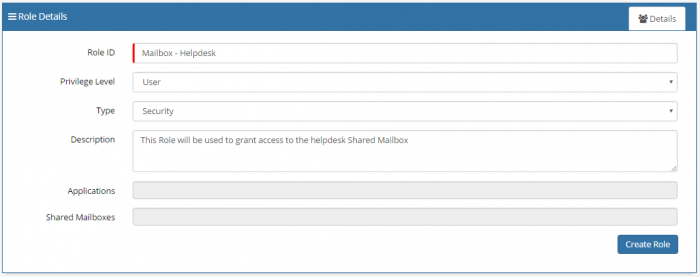
Navigate to Home > System > Organisational Data > Roles in Hornbill Administration
- Click 'Create New Role'(located to the top right of the list) and populate the fields as follows:-
- Role ID: Mailbox – mySharedMailboxname
- Privilege Level: User
- Type: Security
- Description: This Role will be used to grant access to the mySharedMailboxname Shared Mailbox
- At this stage the "Applications" and "Shared Mailboxes" fields aren't active so simply click 'Create Role'
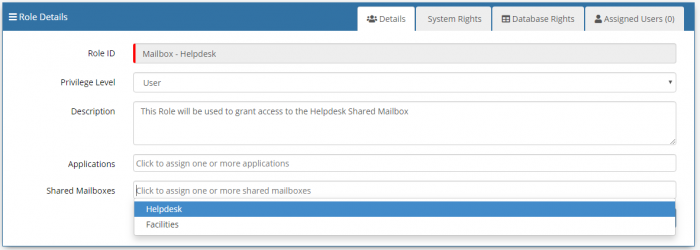
- Now complete the remaining fields. A role purely governing access to a Shared Mailbox does not need application context so the "Applications" field can be left blank.
- Shared Mailboxes: select the relevant shared mailbox
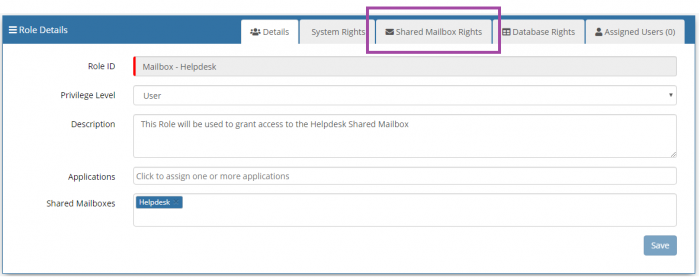
- Click 'Save'
A further tab will now be exposed at the top of the form labelled "Shared Mailbox Rights".
Select the desired rights
-
- Click the “Shared Mailbox rights” Tab
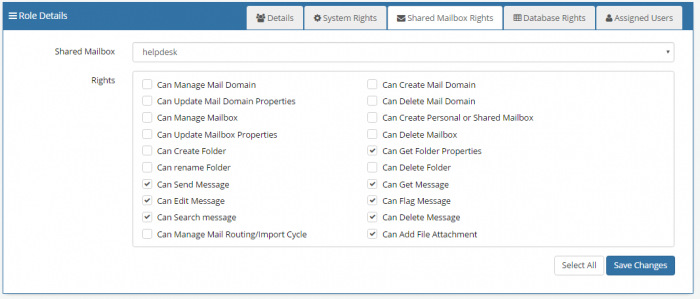
- Then set the desired rights
-
Suggested Rights for a Typical User
This set of rights allows a user to perform all the common actions required to process messages that are received by the Shared Mailbox. It allows a user to view and manage the contents of the shared mailbox.
- Can send message
- Can Edit Message
- Can Search Message
- Can Get Folder Properties
- Can Get message
- Can Flag Message
- Can Delete Message
- Can Add File Attachment
Minimum Rights for Sending An Email
This set of rights only allows an agent to send a message from the Hornbill Platform. It does not allow the user to view or process the contents of the shared mailbox.
- Can Send Message
- Can Add File Attachment
Once you're happy with your chosen rights, click "Save" and proceed to Associate the Role to the Users who will require access to this mailbox.
Integrate with your own Email
Hornbill includes some powerful email integration capabilities. This is performed in Hornbill Administration via Home > System > Email.
See Email Administration for links to all email-related configuration or click one of the following to find out more:


