Difference between revisions of "Libraries"
| (36 intermediate revisions by 4 users not shown) | |||
| Line 1: | Line 1: | ||
| − | Libraries represent an important way of | + | {{bluebanner|[[Main Page| Home]] > [[Document Manager ]] > Libraries|[[:Category:Document Manager]]}} |
| + | {{IntroAndLinks|Libraries represent an important way of sharing documents within your business. You can define multiple libraries, and document owners can publish their documents to those libraries. Libraries can then be made accessible to all or selected groups of users.| | ||
| + | :* [[Document Tags]] | ||
| + | :* [[My Documents]] | ||
| + | :* [[Service Portal]] | ||
| + | }} | ||
| − | + | ||
| − | + | ==Creating Libraries== | |
| − | + | {{#ev:youtube|hz8VyGRqyxU|400|right|<div align="center">'''Hornbill: Document Manager – Managing Libraries '''</div>}} | |
| − | + | Users with the '''MyLibraryManager''' role can create libraries, and can then assign user, groups and roles to each library to allow them to view documents in the library, add documents to the library or edit the details of the library. | |
| − | :* | + | * From the '''Libraries''' menu option use the '''+ Add Library''' option, provide a name for the library and optionally a description to define the libraries purpose. |
| − | + | ||
| − | + | ===Adding Users, Groups and Roles=== | |
| − | + | ||
| − | + | A Library owner can select individual users, groups or users, or users who have a particular role. For each user, group or role they are giving access to the library they can decide what level of rights and access each has: | |
| − | + | {{bullet1|Can View|This will allow users to only view the documents in the library}} | |
| + | {{bullet1|Can Upload|This will allow users to add documents to the library}} | ||
| + | {{bullet1|Can Edit Metadata|This will allow users to edit the libraries metadata (attributes)}} | ||
| + | |||
| + | Once Users have been added to a library, the library owner can manage their rights from within the '''Sharing''' list, by simply selecting or unselecting the rights for individual users, groups and roles. | ||
| + | |||
| + | ===Adding Documents to a Library=== | ||
| + | |||
| + | Any user who has the rights to add documents to a library will be able to open a document and as long as the document is in an '''Active''' status, they will be able to view and use a '''Publish''' icon in the Document Action Bar. From here they can simply choose the library they wish to publish the document and click '''Publish'''. | ||
| + | * Users can repeat this should they wish to add the same document to more than one library | ||
| + | * Users can see which libraries a document has been published too, under the '''Libraries''' section on the document properties | ||
| + | |||
| + | ===Library Properties=== | ||
| + | |||
| + | Each Libraries properties will show you: | ||
| + | * Who the Library Owner is | ||
| + | * which Users, Groups and Roles the Library has been shared with, and their individual rights to the library | ||
| + | * If the Library has documents added to it, a Tag cloud will show you the '''Tags''' attributed to the documents in the library - clicking on a '''Tag''' will return the documents which carry that Tag. | ||
| + | * A Link to view all the documents which have been added to the Library | ||
| + | |||
| + | ===Deleting a Library=== | ||
| + | |||
| + | Deleting a Library will permanently remove it from the system. | ||
| + | * Please note that this operation is not reversible. | ||
| + | * Deleting a library does not delete the documents that have been published to the library. | ||
| + | |||
| + | [[Category:Document Manager]][[Category:Videos]] | ||
| + | |||
| + | ==Libraries in the Hornbill Portals== | ||
| + | [[File:Libraries_in_the_Portal.PNG|400px|thumb|<div align="center">'''Libraries available in the Portal'''</div>]] | ||
| + | [[File:Share_Library_with_Role.PNG|400px|thumb|<div align="center">'''Sharing the Library with the "My Library portal" role '''</div>]] | ||
| + | |||
| + | Like the other Hornbill Applications, Document Manager offers the ability to present content in the Hornbill Portals. It is possible to make Libraries available in the Hornbill Portal by using the "My Library Portal" role. The simplest way to do this is as follows: | ||
| + | |||
| + | :# Create a Library that you want to expose to the Portal. <p>Choose a suitable name to reflect the content of that Library. Remember, any individual documents that are ultimately published to this library are going to be available in the Portal.</p> | ||
| + | :# Share this new Library with the My "Library Portal" Role. | ||
| + | :# For Basic Users to see this in the Service Portal, the "My Library Portal" role must be associated to each Basic User who should view this Library. | ||
| + | :# For Contacts to see this in the Customer Portal, the "My Library Portal" role must be associated directly to the Customer Portal Account <p>The Customer Portal account can be accessed via Hornbill Administration Home > System > Manage Portals > Portal Accounts. Select "customer" and scroll down to the security settings section. In the Authorized roles section, add the "My Library Portal" role. Click "Save Changes".</p> | ||
Revision as of 10:30, 6 October 2020
| Home > Document Manager > Libraries | Category:Document Manager |
IntroductionLibraries represent an important way of sharing documents within your business. You can define multiple libraries, and document owners can publish their documents to those libraries. Libraries can then be made accessible to all or selected groups of users. |
|
Creating Libraries
Users with the MyLibraryManager role can create libraries, and can then assign user, groups and roles to each library to allow them to view documents in the library, add documents to the library or edit the details of the library.
- From the Libraries menu option use the + Add Library option, provide a name for the library and optionally a description to define the libraries purpose.
Adding Users, Groups and Roles
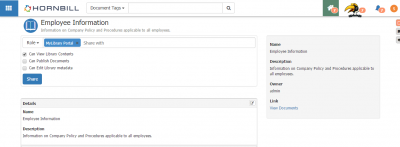
A Library owner can select individual users, groups or users, or users who have a particular role. For each user, group or role they are giving access to the library they can decide what level of rights and access each has:
- Can View
- This will allow users to only view the documents in the library
- Can Upload
- This will allow users to add documents to the library
- Can Edit Metadata
- This will allow users to edit the libraries metadata (attributes)
Once Users have been added to a library, the library owner can manage their rights from within the Sharing list, by simply selecting or unselecting the rights for individual users, groups and roles.
Adding Documents to a Library
Any user who has the rights to add documents to a library will be able to open a document and as long as the document is in an Active status, they will be able to view and use a Publish icon in the Document Action Bar. From here they can simply choose the library they wish to publish the document and click Publish.
- Users can repeat this should they wish to add the same document to more than one library
- Users can see which libraries a document has been published too, under the Libraries section on the document properties
Library Properties
Each Libraries properties will show you:
- Who the Library Owner is
- which Users, Groups and Roles the Library has been shared with, and their individual rights to the library
- If the Library has documents added to it, a Tag cloud will show you the Tags attributed to the documents in the library - clicking on a Tag will return the documents which carry that Tag.
- A Link to view all the documents which have been added to the Library
Deleting a Library
Deleting a Library will permanently remove it from the system.
- Please note that this operation is not reversible.
- Deleting a library does not delete the documents that have been published to the library.
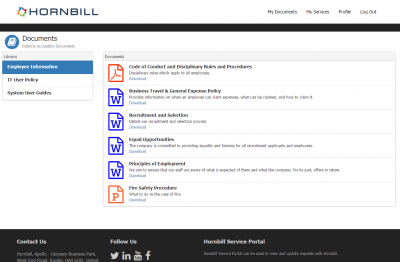
Libraries in the Hornbill Portals
Like the other Hornbill Applications, Document Manager offers the ability to present content in the Hornbill Portals. It is possible to make Libraries available in the Hornbill Portal by using the "My Library Portal" role. The simplest way to do this is as follows:
- Create a Library that you want to expose to the Portal.
Choose a suitable name to reflect the content of that Library. Remember, any individual documents that are ultimately published to this library are going to be available in the Portal.
- Share this new Library with the My "Library Portal" Role.
- For Basic Users to see this in the Service Portal, the "My Library Portal" role must be associated to each Basic User who should view this Library.
- For Contacts to see this in the Customer Portal, the "My Library Portal" role must be associated directly to the Customer Portal Account
The Customer Portal account can be accessed via Hornbill Administration Home > System > Manage Portals > Portal Accounts. Select "customer" and scroll down to the security settings section. In the Authorized roles section, add the "My Library Portal" role. Click "Save Changes".
- Create a Library that you want to expose to the Portal.

