Difference between revisions of "Job Scheduling"
m |
|||
| (42 intermediate revisions by 2 users not shown) | |||
| Line 1: | Line 1: | ||
{{bluebanner|[[Main_Page|Home]] > [[Administration]] > [[IT Operations Management|ITOM]] > Job Scheduling|[[:Category:ITOM|Index]]}} | {{bluebanner|[[Main_Page|Home]] > [[Administration]] > [[IT Operations Management|ITOM]] > Job Scheduling|[[:Category:ITOM|Index]]}} | ||
{{IntroAndLinks | {{IntroAndLinks | ||
| − | |These are | + | |These are Discovery or Automation jobs that can be scheduled to execute at some point in the future, this could be once only or on a regular occurrence. A Log is produced detailing information relating to job being scheduled to execute at the allotted time. Detailed information for each execution can be obtained via the Job History, containing an entry for each time the specific Job is run. Drilling down into the Job History allows the Monitor, Console Output and Debug Log to be viewed as per Ad-Hoc Jobs discussed earlier. |
| | | | ||
* [[ITOM Package Library]] | * [[ITOM Package Library]] | ||
| Line 10: | Line 10: | ||
| − | == | + | ==Toolbar== |
The Scheduled Jobs view provides a list of all past and future scheduled jobs from here you can Refresh, Filter, Delete and Create new scheduled jobs. | The Scheduled Jobs view provides a list of all past and future scheduled jobs from here you can Refresh, Filter, Delete and Create new scheduled jobs. | ||
| − | [[Image: | + | [[Image:JobScheduleListFade.png|right|350px|link=https://wiki.hornbill.com/images/a/ad/JobScheduleList.png]] |
| − | |||
| − | |||
| − | |||
| − | |||
| − | |||
| − | |||
| − | |||
| − | |||
| − | |||
| − | |||
| − | |||
| − | + | {{Bullet1|Refresh|Refresh the list of Scheduled jobs}} | |
| + | {{Bullet1|Type|Filter the list by: Discovery, Runbook, and IT Automation Jobs}} | ||
| + | {{Bullet1|Status|Filter the list by the available statuses including ''All, Disabled, Scheduled, Failed,'' and ''Completed''}} | ||
| + | {{Bullet1|Filter|Free text Search that filters the list based on ''Name'' and ''Tag''}} | ||
| + | {{Bullet1|Delete Selected|This will delete any Scheduled Job that has been selected in the list using the check boxes}} | ||
| + | {{Bullet1|Create New|Create a new Discovery, Runbook, or IT Automation job}} | ||
| − | == | + | {{Infobox|The view is generally refreshed when the state of Job changes, and can also be refreshed using the Refresh button at the top of the view. Where there are a large number of entries, paging is available.}} |
| + | |||
| + | ==Job Types== | ||
There are three types of scheduled Jobs:<br> | There are three types of scheduled Jobs:<br> | ||
| − | [[Image: | + | [[Image:JobScheduleCreate.png|right|link=]] |
| − | + | {{Bullet1|Discovery Schedule|Schedule a discovery, to locate devices and retrieve inventory details}} | |
| − | + | {{Bullet1|Runbook Schedule|Schedule a Runbook process, to orchestrate IT Automations}} | |
| − | + | {{Bullet1|IT Automation Schedule|Schedule an automation job to execute a single operation}} | |
| − | |||
| − | |||
| − | |||
| − | |||
| − | |||
| − | |||
| − | |||
| − | |||
| − | |||
| − | |||
| − | |||
| − | |||
| − | |||
| − | |||
| − | |||
| − | |||
| − | |||
| − | |||
| − | |||
| − | |||
| − | === | + | For each job, the following sections will need to be completed, and depending on the type of job one of the following group of settings will appear and also required completion: Discovery, IT Automation or Runbook. |
| − | A Job | + | === Scheduled Job === |
| + | {{Bullet1|Name|A Scheduled Job must be given a name, which does not have to be unique}} | ||
| + | {{Bullet1|Tag|An optional Tag can be added which can help when filtering the Scheduled Job list}} | ||
| − | [[ | + | ===Schedule=== |
| + | [[File:ITOMJobSchedule.png|right|350px|link=https://wiki.hornbill.com/images/a/a4/ITOMJobSchedule.png]] | ||
| + | For each schedule, a Time Zone (Default is GMT) can be specified and the given start date and time. The following options are available: | ||
| − | + | {{Bullet1|Run Once|These Jobs are executed once at the scheduled time and will stay in the Job scheduling list with the status "Waiting" and once finished either "Completed" or "Failed". The scheduled date can be selected via the calendar control and the time from the drop-down buttons.}} | |
| − | Monthly jobs can are scheduled to run on a particular date and then on the same day and time every month or particular months in the year. | + | {{Bullet1|Run Daily|A Job can be run every day of the week at a particular time or for particular days in the week. It is also possible to specify that the schedule be executed x number of times (10 by default). Setting the option to "-1" enables the schedule never to expire.}} |
| + | {{Bullet1|Run Monthly|Monthly jobs can are scheduled to run on a particular date and then on the same day and time every month or particular months in the year.}} | ||
| + | {{Bullet1|Run Every Period|This schedule allows for jobs to be executed every (n) minute(s) on specific weekdays in specific months}} | ||
| − | + | {{Infobox|Except for ''Run Once'', each Job will be run a configurable number of times after which the scheduled Job will stop. If you want to run the Job indefinitely, you will need to change the default value of 10 to -1}} | |
| − | ==== | + | ===Discovery Settings=== |
| − | + | {{Template:ITOM Discovery Job Properties}} | |
| − | + | ===IT Automation Settings=== | |
| + | {{Template:IT Automation Job Properties}} | ||
| + | ===Runbook Settings=== | ||
| + | {{Bullet1|Runbook|Name of the Runbook to execute}} | ||
| + | {{Bullet1|Input Parameters|Parameters appear once a Runbook has been selected, mandatory fields are highlighted and hints may be provided in the field box}} | ||
==Log== | ==Log== | ||
This view provides a list of logs for the selected job, including the Run ID, Log creation Timestamp and Status. This view is only available once the first scheduled job has been executed. | This view provides a list of logs for the selected job, including the Run ID, Log creation Timestamp and Status. This view is only available once the first scheduled job has been executed. | ||
| − | [[Image:schJobLogList.png]] | + | <!--[[Image:schJobLogList.png]]--> |
A log entry will be created for each time the scheduled job is triggered and placed on the job queue. Clicking on the '''Run ID''' button i.e. [View Log 123] will reveal the log entry details. The details shown will differ dependant on the type of job that is scheduled and whether it succeeded or failed. All entries will contain a <jobId> tag which includes the ID of the Job placed on the queue. The ID can is used to identify a listing on the Job History list or the Job Queue, providing access to the Job Details, Monitoring, Console and Logs. | A log entry will be created for each time the scheduled job is triggered and placed on the job queue. Clicking on the '''Run ID''' button i.e. [View Log 123] will reveal the log entry details. The details shown will differ dependant on the type of job that is scheduled and whether it succeeded or failed. All entries will contain a <jobId> tag which includes the ID of the Job placed on the queue. The ID can is used to identify a listing on the Job History list or the Job Queue, providing access to the Job Details, Monitoring, Console and Logs. | ||
| Line 122: | Line 108: | ||
The Job History provides a similar list to that used for the '''Job Queue''', minus details of the existence of Child Jobs. Like the Log, it contains an entry for each execution of the scheduled job. Here it is possible to access the Job execution in the same way as can be achieved via the Job Queue where these jobs will also be visible. | The Job History provides a similar list to that used for the '''Job Queue''', minus details of the existence of Child Jobs. Like the Log, it contains an entry for each execution of the scheduled job. Here it is possible to access the Job execution in the same way as can be achieved via the Job Queue where these jobs will also be visible. | ||
| − | [[Image:SchJobQueueList.png|1200px]]<br> | + | <!--[[Image:SchJobQueueList.png|1200px]]<br> --> |
It is not possible to Delete a Job while the status is in a "Running" state and or Run if in a "Deferred" state. Clicking on the job name will display the details of the Job identically to that seen via the Job Queue. | It is not possible to Delete a Job while the status is in a "Running" state and or Run if in a "Deferred" state. Clicking on the job name will display the details of the Job identically to that seen via the Job Queue. | ||
Latest revision as of 18:06, 26 November 2020
| Home > Administration > ITOM > Job Scheduling | Index |
IntroductionThese are Discovery or Automation jobs that can be scheduled to execute at some point in the future, this could be once only or on a regular occurrence. A Log is produced detailing information relating to job being scheduled to execute at the allotted time. Detailed information for each execution can be obtained via the Job History, containing an entry for each time the specific Job is run. Drilling down into the Job History allows the Monitor, Console Output and Debug Log to be viewed as per Ad-Hoc Jobs discussed earlier. |
|
Toolbar
The Scheduled Jobs view provides a list of all past and future scheduled jobs from here you can Refresh, Filter, Delete and Create new scheduled jobs.
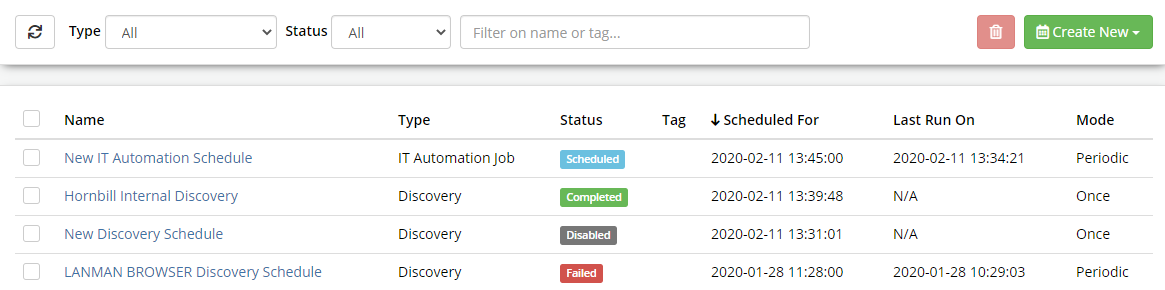
- Refresh
- Refresh the list of Scheduled jobs
- Type
- Filter the list by: Discovery, Runbook, and IT Automation Jobs
- Status
- Filter the list by the available statuses including All, Disabled, Scheduled, Failed, and Completed
- Filter
- Free text Search that filters the list based on Name and Tag
- Delete Selected
- This will delete any Scheduled Job that has been selected in the list using the check boxes
- Create New
- Create a new Discovery, Runbook, or IT Automation job
- The view is generally refreshed when the state of Job changes, and can also be refreshed using the Refresh button at the top of the view. Where there are a large number of entries, paging is available.
Job Types
There are three types of scheduled Jobs:
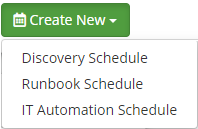
- Discovery Schedule
- Schedule a discovery, to locate devices and retrieve inventory details
- Runbook Schedule
- Schedule a Runbook process, to orchestrate IT Automations
- IT Automation Schedule
- Schedule an automation job to execute a single operation
For each job, the following sections will need to be completed, and depending on the type of job one of the following group of settings will appear and also required completion: Discovery, IT Automation or Runbook.
Scheduled Job
- Name
- A Scheduled Job must be given a name, which does not have to be unique
- Tag
- An optional Tag can be added which can help when filtering the Scheduled Job list
Schedule
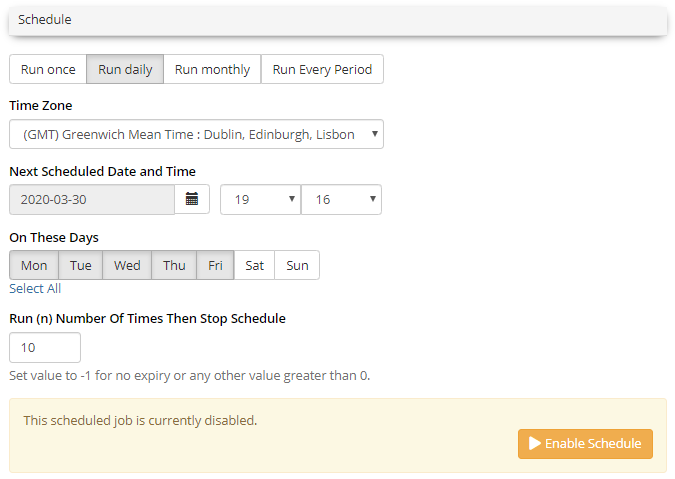
For each schedule, a Time Zone (Default is GMT) can be specified and the given start date and time. The following options are available:
- Run Once
- These Jobs are executed once at the scheduled time and will stay in the Job scheduling list with the status "Waiting" and once finished either "Completed" or "Failed". The scheduled date can be selected via the calendar control and the time from the drop-down buttons.
- Run Daily
- A Job can be run every day of the week at a particular time or for particular days in the week. It is also possible to specify that the schedule be executed x number of times (10 by default). Setting the option to "-1" enables the schedule never to expire.
- Run Monthly
- Monthly jobs can are scheduled to run on a particular date and then on the same day and time every month or particular months in the year.
- Run Every Period
- This schedule allows for jobs to be executed every (n) minute(s) on specific weekdays in specific months
- Except for Run Once, each Job will be run a configurable number of times after which the scheduled Job will stop. If you want to run the Job indefinitely, you will need to change the default value of 10 to -1
Discovery Settings
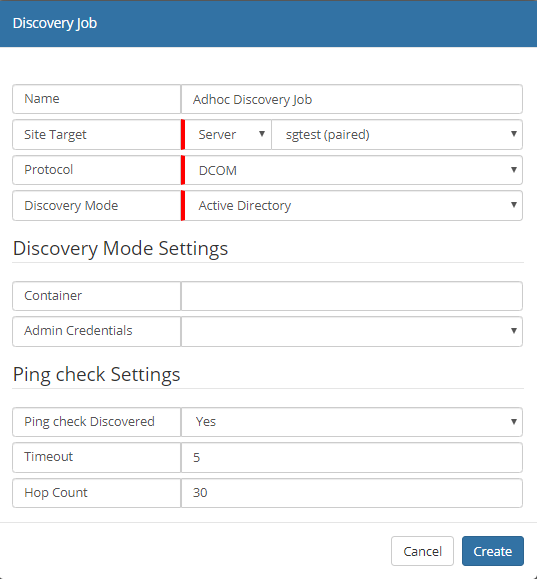
- Site Target [Group / Server ]
- whether the job needs to run on an SIS Group or on a single SIS/Managed CI
- Protocol
- A device is identified as discovered once it can be accessed and its inventory retrieved. This is achieved by probing its Operating System (OS) using various methods dependant on the devices Operating System. The probe will be initiated from the SIS server and does not require any software to be uploaded to the device. In order to achieve this, a protocol will be required in order for the SIS to access the device. Which protocol will depend on the OS and what is supported, in general for Windows devices WMI is used along with DCOM or WinRM, and for Linux / Unix (inc Apple Mac) Secure Shell (SSH) is used.
- Auto
- Will attempt to access the device using all of the provided protocols, in the following order; WinRM, DCOM and SSH, using the first successful one.
- WinRm
- Provides secure and firewall-friendly communications, in order to access WMI. This feature is supported on Windows 2008R2 and later and Windows 7 and later.
- DCOM
- Communication relies on Remote Procedure Calls and can be tricky to configure over firewalls. Widely supported on the Windows platform, this protocol is mainly used to access legacy devices.
- SSH
- Secure Shell is a network communication protocol that allows for remote connection between two computers to communicate and share data, commonly used but not exclusively by Linux / Unix (inc Apple Mac) devices. The protocol can be used on Windows devices, but may require additional software to be installed and configured.
- Discovery Mode
- The Discover Mode dictates the method that identifies devices on the Network. Each mode will have specific settings; these will be visible in the Discover Mode Settings section. It is only possible to have a single mode per Job, use of multiple modes will require the creation of multiple Jobs.
- Ping Check Settings
- Ping check Discovered
- [Yes / No] Check that the discovered machine is pinged - if ICMP is disabled or firewalled, then select "No"
- Timeout
- Hop Count
IT Automation Settings

- Package
- Package used to provide the IT Automation payload

- Run Operation
- Operation to perform using the package
- Site Target
- Specify the SIS Server or Group that will facilitate the Automation Job
- Target Device
- Select the Device(s) that the Operation will target
- List
- Target Devivces are sourced from a pre-created Inventory List
- Inventory
- Select a Device from the ITOM Inventory
- Manual
- Manually entered device name, that must already exist in the ITOM Inventory and is marked as a Managed device
- Credentials
- Sourced from the KeySafe, provides the security context to be used for package deployment and execution
- Admin Credentials
- Security Context used to deploy the package onto the target device(s)
- Run As Credentials
- Security Context used to execute the package on the target device(s) (if not provided then Admin Credentials are used)
- Extra Credentials
- Optional credentials used as part of the functionality within the package
- Operation Parameters
- Once a package and a Run Operation has been selected, any related parameters will be displayed; mandatory fields are highlighted and hints may be provided in the input box.
Runbook Settings
- Runbook
- Name of the Runbook to execute
- Input Parameters
- Parameters appear once a Runbook has been selected, mandatory fields are highlighted and hints may be provided in the field box
Log
This view provides a list of logs for the selected job, including the Run ID, Log creation Timestamp and Status. This view is only available once the first scheduled job has been executed.
A log entry will be created for each time the scheduled job is triggered and placed on the job queue. Clicking on the Run ID button i.e. [View Log 123] will reveal the log entry details. The details shown will differ dependant on the type of job that is scheduled and whether it succeeded or failed. All entries will contain a <jobId> tag which includes the ID of the Job placed on the queue. The ID can is used to identify a listing on the Job History list or the Job Queue, providing access to the Job Details, Monitoring, Console and Logs.
The following are some examples of successful and error log entries.
IT Automation
Scheduled XMLMC call success:
<?xml version="1.0" encoding="utf-8" ?>
<methodCallResult status="ok">
	<params>
		<job>
			<jobId>447</jobId>
			<computer>computer:EXCH2K16</computer>
			<sisTarget>sis:TEST</sisTarget>
			<childJobCount>0</childJobCount>
		</job>
	</params>
</methodCallResult>
Successful Discovery
Scheduled XMLMC call success:
<?xml version="1.0" encoding="utf-8" ?>
<methodCallResult status="ok">
	<params>
		<jobId>349</jobId>
	</params>
</methodCallResult>
Failed Discovery
Scheduled XMLMC call failed:
<?xml version="1.0" encoding="utf-8" ?>
<methodCallResult status="fail">
	<state>
		<code>0203</code>
		<service>automation</service>
		<operation>sisRunDiscoveryJob</operation>
		<error>Non-digit characters found in the element <ldapCredentials>, the expected data type is 'unsignedInt'. The value was [] at location '/methodCall/params/options/ldapCredentials'</error>
	</state>
</methodCallResult>
Job History
The Job History provides a similar list to that used for the Job Queue, minus details of the existence of Child Jobs. Like the Log, it contains an entry for each execution of the scheduled job. Here it is possible to access the Job execution in the same way as can be achieved via the Job Queue where these jobs will also be visible.
It is not possible to Delete a Job while the status is in a "Running" state and or Run if in a "Deferred" state. Clicking on the job name will display the details of the Job identically to that seen via the Job Queue.