Difference between revisions of "Job Queue"
| (31 intermediate revisions by 2 users not shown) | |||
| Line 5: | Line 5: | ||
When a Job completes successfully or fails a Debug Log will be available, which provides information that can be of use when troubleshooting issues. The output provided will depend on the package/discovery job that has been executed. | When a Job completes successfully or fails a Debug Log will be available, which provides information that can be of use when troubleshooting issues. The output provided will depend on the package/discovery job that has been executed. | ||
| | | | ||
| + | * [[Discovery Job]] | ||
| + | * [[IT Automation Job]] | ||
* [[ITOM Package Library]] | * [[ITOM Package Library]] | ||
}} | }} | ||
== Job Queue List == | == Job Queue List == | ||
| + | [[Category:ITOM]] | ||
[[Image:JobQueueListFade.png|350px|right|link=https://wiki.hornbill.com/images/9/93/JobQueueList.png]] | [[Image:JobQueueListFade.png|350px|right|link=https://wiki.hornbill.com/images/9/93/JobQueueList.png]] | ||
| − | The Job | + | :{| |
| + | |- valign="top" | ||
| + | |style="width:500px"| | ||
| + | {{Bullet1|Job Id|Job identification number}} | ||
| + | {{Bullet1|Name|Name provided for the job when created}} | ||
| + | {{Bullet1|Type|The type of Job, can be either Discovery or IT Automation}} | ||
| + | {{Bullet1|Status|Shows the current status of the Job}} | ||
| + | {{Bullet1|Target|Shows the name of the computer on which the job will run}} | ||
| + | |style="width:500px"| | ||
| + | {{Bullet1|Child Jobs|Shows if the Job has spawned any children}} | ||
| + | {{Bullet1|Created On|Shows the creation date/time for the Job}} | ||
| + | {{Bullet1|Started On|Displays the date/time the Job started execution}} | ||
| + | {{Bullet1|Completed On|Displays the date/time the Job completed execution}} | ||
| + | |} | ||
| + | ==Job Queue Toolbar== | ||
| + | :{| | ||
| + | |- valign="top" | ||
| + | |style="width:300px"| | ||
| + | {{Bullet1|Refresh|A refresh of the list may be required to update Job status or any new Jobs that have been executed}} | ||
| + | {{Bullet1|Type|Filter the list by Job Type}} | ||
| + | {{Bullet2|All|Lists all jobs}} | ||
| + | {{Bullet2|Discovery|List all Dicscovery jobs}} | ||
| + | {{Bullet2|Package|List all Packaged IT Automation jobs}} | ||
| + | |style="width:300px"| | ||
| + | {{Bullet1|Run State|Filter the the list on Status using Status Groups}} | ||
| + | {{Bullet2|Ready|Defered, Waiting}} | ||
| + | {{Bullet2|Active|Processing Output, Starting}} | ||
| + | {{Bullet2|Cancelling|Cancelled, Cancel Request}} | ||
| + | {{Bullet2|Succeeded|Success}} | ||
| + | {{Bullet2|Failed|AWOL, Failed}} | ||
| + | {{Bullet2|Timed Out|Timed Out, Expired}} | ||
| + | {{Bullet2|Halted|Aborted, Cancelled}} | ||
| + | |style="width:300px"| | ||
| + | {{Bullet1|Filter|Free Text filter to search by Name, Operation or Target}} | ||
| + | {{Bullet1|[[#Activate Selected Jobs|Activate]]|Activate Selected Jobs}} | ||
| + | {{Bullet1|[[#Cancel Selected Jobs|Cancel]]|Cancel Selected Jobs}} | ||
| + | {{Bullet1|[[#Delete Selected Jobs|Delete]]|Delete Selected Jobs}} | ||
| + | {{Bullet1|[[Create New Job|Create New]]|Creates a new Discover or IT Automation Job}} | ||
| + | |} | ||
| − | + | ==Activate Selected Jobs== | |
| + | [[image:ActivateSelectedJobsButton.png|right]] | ||
| + | Enables all selected Deferred Jobs to be Activated for processing | ||
| − | + | ==Cancel Selected Jobs== | |
| − | + | [[image:jobInfoCancelButton.png|right]] | |
| − | + | Where it is required for a Job to be Cancelled, for example; maybe the job has stalled or is taking a large amount of time and resources. Cancelling a Job will gracefully terminate all initial process(es) spawned by the job, on the target machine. | |
| − | |||
| − | |||
| − | |||
| − | |||
| − | |||
| − | |||
| − | |||
| − | |||
| − | |||
| − | |||
| − | |||
| − | |||
| − | |||
| − | |||
| − | |||
| − | |||
| − | |||
| − | |||
| − | |||
| − | |||
| − | == | ||
| − | [[ | ||
| − | |||
| − | |||
| − | |||
| − | |||
| − | |||
| − | |||
| − | |||
| − | |||
| − | |||
| − | |||
| − | |||
| − | |||
| − | |||
| − | |||
| − | |||
| − | |||
| − | |||
| − | |||
| − | |||
| − | |||
| − | |||
| − | |||
| − | |||
| − | |||
| − | |||
| − | |||
| − | |||
| − | |||
| − | |||
| − | |||
| − | |||
| − | |||
| − | |||
| − | |||
| − | |||
| − | |||
| − | |||
| − | |||
| − | |||
| − | |||
| − | |||
| − | |||
| − | |||
| − | |||
| − | |||
| − | |||
| − | |||
| − | |||
| − | |||
| − | |||
| − | |||
| − | |||
| − | |||
| − | |||
| − | |||
| − | |||
| − | |||
| − | |||
| − | |||
| − | |||
| − | |||
| − | |||
| − | |||
| − | |||
| − | |||
| − | |||
| − | |||
| − | |||
| − | |||
| − | |||
| − | |||
| − | |||
| − | |||
| − | |||
| − | |||
| − | |||
| − | |||
| − | |||
| − | |||
| − | |||
| − | |||
| − | |||
| − | |||
| − | |||
| − | |||
| − | |||
| − | |||
| − | |||
| − | |||
| − | |||
| − | |||
| − | |||
| − | |||
| − | |||
| − | |||
| − | |||
| − | |||
| − | |||
| − | |||
| − | |||
| − | |||
| − | |||
| − | |||
| − | |||
| − | |||
| − | |||
| − | |||
| − | |||
| − | |||
| − | + | Once a Job has been started all process Id's are visible within the Job's Monitor. The following shows that a job was started using the "Run As" feature, and thus created three process IDs, The Package Execution process (EspSisExec.exe), The Elevated "Run As" Package Execution Process (EspSisExecRunAs.exe) and finally the package payload (in this example Dotter.exe).<br><br> | |
| − | + | [[Image:jobCancelMonitor-a.png|middle]]<br><br> | |
| + | The running process can also be identified using the above PIDs, on the target device by listing the device process list. On a Windows device, this can be achieved via the Task Manager or via the command line using tasklist.exe as shown below:<br><br> | ||
| + | [[Image:jobCancelTaskList.png|middle]]<br><br> | ||
| + | Clicking the Cancel button will be acknowledged, and the status set to "Cancelling" and once the processes are terminated the Jobs status will be set to Cancelled.<br><br> | ||
| + | [[Image:jobCancelMonitor-b.png]]<br><br> | ||
| − | + | {{infobox|In most cases just Cancelling a job should suffice, however in cases where this option fails, an Abort option is available to force the termination, accessed via the Job's Details [[IT_Automation_Job#Action Buttons|Action Buttons]].}} | |
| − | == | + | ==Delete Selected Jobs== |
[[image:jobInfoDeleteButton.png|right]] | [[image:jobInfoDeleteButton.png|right]] | ||
A Job can only be deleted while its status is not one of the "Active" group, by the use of the delete button, after which the Job will be removed from the Job Queue list and will no longer be accessible. | A Job can only be deleted while its status is not one of the "Active" group, by the use of the delete button, after which the Job will be removed from the Job Queue list and will no longer be accessible. | ||
| − | |||
| − | |||
| − | |||
| − | |||
| − | |||
| − | |||
| − | |||
| − | |||
| − | |||
| − | |||
| − | |||
| − | |||
| − | |||
| − | |||
| − | |||
| − | |||
| − | |||
| − | |||
| − | |||
| − | |||
| − | |||
| − | |||
| − | |||
| − | |||
| − | |||
| − | |||
| − | |||
| − | |||
| − | |||
| − | |||
| − | |||
| − | |||
| − | |||
| − | |||
| − | |||
| − | |||
| − | |||
| − | |||
| − | |||
| − | |||
| − | |||
| − | |||
| − | |||
| − | |||
| − | |||
| − | |||
| − | |||
| − | |||
| − | |||
| − | |||
Latest revision as of 08:04, 20 November 2020
| Home > Administration > ITOM > Job Queue | Index |
IntroductionThe Job Queue provides a mechanism to create, view, and manage active and completed jobs. The current status and progress of a job can be monitored via the Monitor console. Once a Job has completed, The Console Output provides the sanitized output produced by the package or discover process. It is possible to Cancel a Job if required, and once a job has been cancelled the status will be marked cancelled. When a Job completes successfully or fails a Debug Log will be available, which provides information that can be of use when troubleshooting issues. The output provided will depend on the package/discovery job that has been executed. |
|
Job Queue List
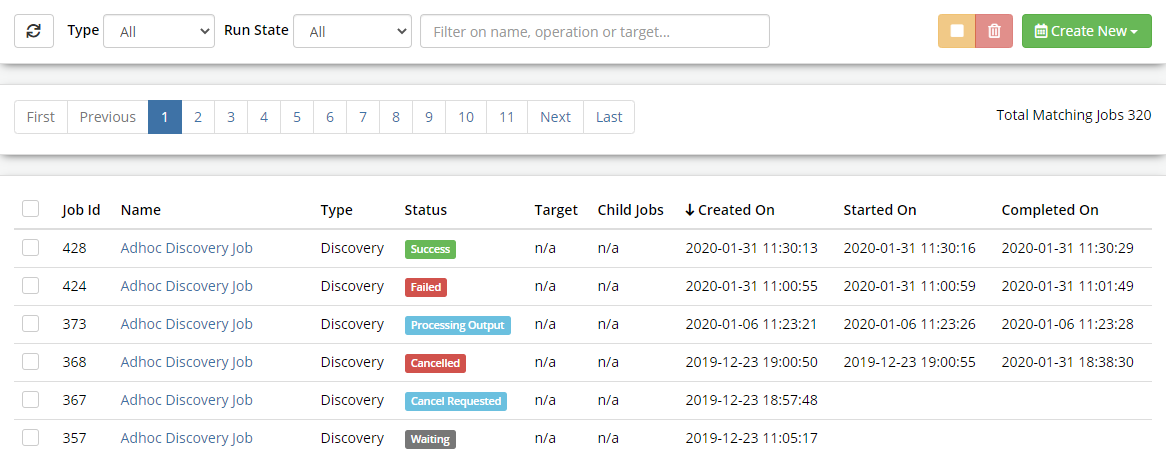
- Job Id
- Job identification number
- Name
- Name provided for the job when created
- Type
- The type of Job, can be either Discovery or IT Automation
- Status
- Shows the current status of the Job
- Target
- Shows the name of the computer on which the job will run
- Child Jobs
- Shows if the Job has spawned any children
- Created On
- Shows the creation date/time for the Job
- Started On
- Displays the date/time the Job started execution
- Completed On
- Displays the date/time the Job completed execution
Job Queue Toolbar
- Refresh
- A refresh of the list may be required to update Job status or any new Jobs that have been executed
- Type
- Filter the list by Job Type
- All
- Lists all jobs
- Discovery
- List all Dicscovery jobs
- Package
- List all Packaged IT Automation jobs
- Run State
- Filter the the list on Status using Status Groups
- Ready
- Defered, Waiting
- Active
- Processing Output, Starting
- Cancelling
- Cancelled, Cancel Request
- Succeeded
- Success
- Failed
- AWOL, Failed
- Timed Out
- Timed Out, Expired
- Halted
- Aborted, Cancelled
- Filter
- Free Text filter to search by Name, Operation or Target
-
- Activate Selected Jobs
-
- Cancel Selected Jobs
-
- Delete Selected Jobs
-
- Creates a new Discover or IT Automation Job
Activate Selected Jobs
Enables all selected Deferred Jobs to be Activated for processing
Cancel Selected Jobs
Where it is required for a Job to be Cancelled, for example; maybe the job has stalled or is taking a large amount of time and resources. Cancelling a Job will gracefully terminate all initial process(es) spawned by the job, on the target machine.
Once a Job has been started all process Id's are visible within the Job's Monitor. The following shows that a job was started using the "Run As" feature, and thus created three process IDs, The Package Execution process (EspSisExec.exe), The Elevated "Run As" Package Execution Process (EspSisExecRunAs.exe) and finally the package payload (in this example Dotter.exe).

The running process can also be identified using the above PIDs, on the target device by listing the device process list. On a Windows device, this can be achieved via the Task Manager or via the command line using tasklist.exe as shown below:

Clicking the Cancel button will be acknowledged, and the status set to "Cancelling" and once the processes are terminated the Jobs status will be set to Cancelled.

- In most cases just Cancelling a job should suffice, however in cases where this option fails, an Abort option is available to force the termination, accessed via the Job's Details Action Buttons.
Delete Selected Jobs
A Job can only be deleted while its status is not one of the "Active" group, by the use of the delete button, after which the Job will be removed from the Job Queue list and will no longer be accessible.