Difference between revisions of "Job Queue"
| Line 9: | Line 9: | ||
== Job Queue List == | == Job Queue List == | ||
| − | [[Image: | + | [[Image:JobQueueListFade.png|600px|right|link=https://wiki.hornbill.com/images/9/93/JobQueueList.png]] |
The Job Queue List provides a view of All Jobs that have completed processing, currently being processed and queued Jobs awaiting processing. The properties of a Job provides access to the configured details, review its progress via the Monitor and access debug and console information once a job has been completed or failed. One or more selected Jobs can be Cancelled or Deleted, if deleted access to the Jobs details will no longer be possible. | The Job Queue List provides a view of All Jobs that have completed processing, currently being processed and queued Jobs awaiting processing. The properties of a Job provides access to the configured details, review its progress via the Monitor and access debug and console information once a job has been completed or failed. One or more selected Jobs can be Cancelled or Deleted, if deleted access to the Jobs details will no longer be possible. | ||
Revision as of 21:57, 23 March 2020
| Home > Administration > ITOM > Job Queue | Index |
IntroductionThe Job Queue provides a mechanism to create, view, and manage active and completed jobs. The current status and progress of a job can be monitored via the Monitor console. Once a Job has completed, The Console Output provides the sanitized output produced by the package or discover process. It is possible to Cancel a Job if required, and once a job has been cancelled the status will be marked cancelled. When a Job completes successfully or fails a Debug Log will be available, which provides information that can be of use when troubleshooting issues. The output provided will depend on the package/discovery job that has been executed. |
|
Job Queue List
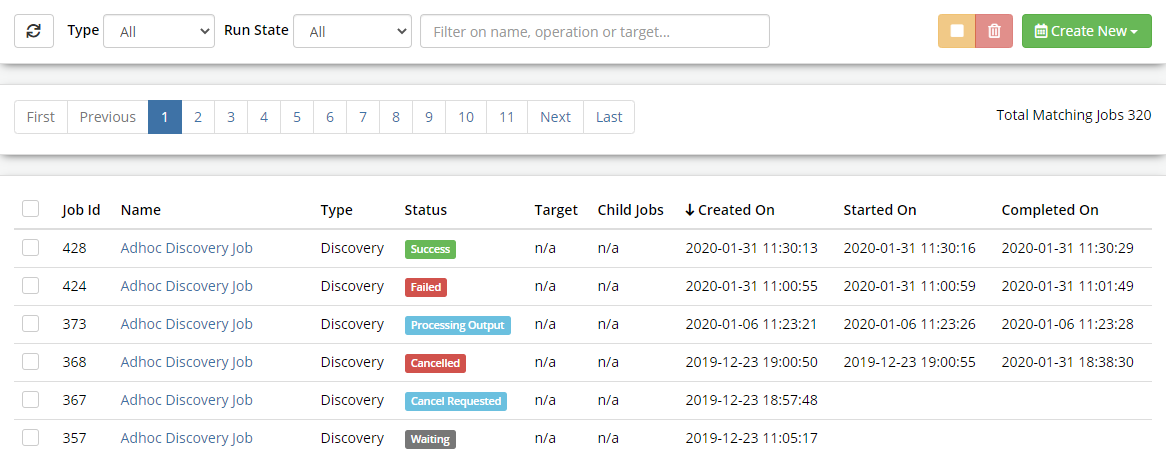
The Job Queue List provides a view of All Jobs that have completed processing, currently being processed and queued Jobs awaiting processing. The properties of a Job provides access to the configured details, review its progress via the Monitor and access debug and console information once a job has been completed or failed. One or more selected Jobs can be Cancelled or Deleted, if deleted access to the Jobs details will no longer be possible.
Cancelling a Job will terminate the running EspSisExec and child processes. Aborting the Job just changes the status and ignores all updates it might still send across.
A Job can either be a Discovery or a Package operation (IT Automation). These jobs can either be run ad-hoc or on a schedule.
Discovery Jobs utilise one of a selection of standard network discovery methods. Successful results of a Discovery Job are stored in the Inventory. Within the Inventory, a user can designate a limited (by Device entitlements) amount of "Managed CIs" (on which jobs can run). The creation of Lists allows for the efficient management of discovered devices. The Discovery is done from the locally installed SIS Server.
IT Automation Jobs are run on the designated computer(s).
The Job Queue allows one to view and manage any existing/pending jobs.
The view is generally refreshed when the state of Job changes, and can also be refreshed using the Refresh button at the top of the view. Where there are a large number of entries, paging is available using the standard list control feature and the list can be filtered on:
- Ready (Deferred / Waiting)
- Active (Processing Output, Starting)
- Cancelling (Cancelled, Cancel Requested)
- Succeeded (Success)
- Failed (AWOL, Failed)
- Timed Out (Timed Out, Expired)
- Halted (Aborted, Cancelled)
The list view can also be filtered by entering a string into the text box, entries in the list will be dynamically filtered on Name, Operation or Target as each character is typed.
Creating an Ad-Hoc Job

Within the Job Queue view it is possible to create Ad-Hoc Discovery and Automation Jobs. These jobs will be added to the Queue and will executed once an SIS server downloads the Job from the cloud for processing.
Select the Create New button
Type of Job
- Discover Job
- IT Automation Job
Add a Discovery Job
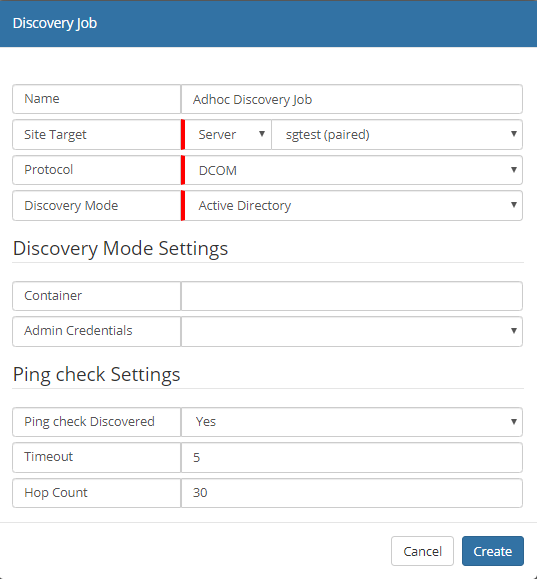
A discovery is run on a designated SIS. The account given within the Admin Credentials will then perform a Discovery based on the method selected. Once a machine is found, the machine will be pinged and then the credentials are further used (using WMI (DCOM/WinRM)) to confirm access to the machine and obtain extra information (e.g. hardware, operating system, installed programs; using EspSisDiscovery)
Site Integration Server(s) <----> CI
                           <----> CI
                           <----> CI
                           <----> AD/LDAP/NTBrowse
- Name - name given to identify this Discovery Job
- Site Target [Group / Server ] - whether the job needs to run on a SIS Group or on a single SIS/Managed CI
- Protocol [DCOM]
- Discovery Mode [Active Directory / LDAP Server / Manual List / Network Enumeration / Browser Server List]
- Discovery Mode Settings
- Based on Discovery Mode:
- Container
- LDAP Credentials
- Domain
- Machine / IP / CIDR List (separate by spaces)
- Admin Credentials - Hornbill Keystore entries of type "Username + Password" (userpass)
- Based on Discovery Mode:
- Ping Check Settings
- Ping check Discovered [Yes / No] - check that the discovered machine is pinged - if ICMP is disabled or firewalled, then select "No"
- Timeout - ping setting
- Hop Count - ping setting
The discovery is done using AD, LDAP & NTBrowse protocols - SNMP is on our roadmap
It is also possible to provide a (manual) list of machines
Discovery Mode - Machine / IP / CIDR List : One can limit/direct the search to various IP Ranges. We accept the following formats:
	FQDN
	x.x.x.x/x
	x.x.x.x-x
	x.x.x.x-x.x
It is unlikely that Mobile Devices can be found in this way
Add an IT Automation Job
In order to run an Operation on a machine in a discovered network, creating a new IT Automation Job.
ITOM Add IT Automation Ad Hoc Job
- Name - name given to identify this IT Automation Job
- Package - the package in which the operation is stored
- Run Operation - which operation to perform using the package
- Site Target [Group / Server ] - whether the Job needs to run on all the machines in the SIS Group or on a single SIS/Managed CI
- Target Machine [List / Inventory / Manual] -
- Credentials
- Admin Credentials - Keystore entry
- Run As Credentials - Keystore entry
- Extra Credentials - one is able to add other credentials which might be used as part of the functionality within the package
- Package Parameters - INPUT parameters of the selected package; mandatory fields are highlighted; hints might be given in the field box.

Job Information
Once the job has been created, the details will be displayed, showing information relating to the job, from here it is also able to view the status of the job and monitor its progress within the Monitor frame.
- Summary
- Shows the current status of the job and its name along with who created it and when.
- Target Information
- Provides details of the SIS server that will facilitate the job, target machine and the security keys used.
S server where the is executed
- Execution Details
- The execution details show when the job was started and completed along with any result code.
Dependent on which type of job was executed there will be:
- Package Details (IT Automation)
- Displays details of the deployment package, configured operation along with any arguments that were specified and job timeout limit.
or:
- Discovery Options (Discovery)
- Displays details of the options used by the discovery process, this will differ depending on the discovery mode that is being used.
Monitor
The Monitor frame provides information relating to the execution of the job, the details shown will be dependant on the type of discovery or package that is being been executed.

The above example shows that the process has started and provides an id, which can be used to identify the task executing the package on the target machine. Depending on the package configuration, the monitor will specify more than the process ID. In the above case, the package is configured to execute an executable program as a specific user, using the "Run As Credentials". The first ID is for the process that triggers the package execution, which triggers another process to run an executable using the provided credentials.
All console output from the process will be displayed after this and will dependant on the package contents and configuration. Once the job has completed if there are any output parameters they are processed and displayed, and confirmation of the job successful completion or failure will be output.
Once the job has completed the Console Output and Debug Log frames will become enabled. The Console Output provides a view of only the console output, including any error messages.

In cases where the package may have failed any error messages that are displayed to the console will be visible here, however, this is may not always be the case and is dependant on the package. In these cases and where further details are required the Debug Log can be used to review more technical details.

The Debug Log frame provides two levels of output "Standard" and "Full". Standard logging provides basic output such as the package details, argument, and command details. Full logging provides further details such as the location of log files, the target computer, encoded parameters, and credentials. The exact content will depend on the package being deployed and its configuration.
Cancel / Aborting this Job
Where it is required for a Job to be Cancelled, for example; maybe the job has stalled or is taking a large amount of time and resources. Two options are available via the Cancel and Abort buttons, although their purpose of the two is to kill a process running on a target computer, their methods are different. In most cases just Cancelling a job should suffice, however in cases where this option fails, Abort can be used to force the termination of the Job.
When a job is cancelled its process will be sent a close message, therefore, allowing the process to close itself and all child processes in an orderly fashion. Aborting a Job causes the Job to be forcefully terminated immediately possibly causing child processes to be orphaned, and should only be used as a last resort.
Deleting Jobs
A Job can only be deleted while its status is not one of the "Active" group, by the use of the delete button, after which the Job will be removed from the Job Queue list and will no longer be accessible.
Canceling Jobs
Cancelling a Job will gracefully terminate all initial process(es) spawned by the job, on the target machine. Confirmed by noting Job process IDs provided in the Monitor, and listing the process on the target machine.


Clicking the Cancel button will be acknowledged, and the status set to "Cancelling" and once the processes are terminated the Jobs status will be set to Cancelled.

Abort
Aborting the Job changes the status of a job to "Aborted", and sever all links to any processes that were started on the target. All running processes will still be active and can only be managed directly on the target machine.
Technical Details
For technical reasons (a WMI operation cannot be pointed to the local machine), if one wishes to run a package operation on the SIS server itself, one can only do so using the SIS Server's context credentials - and thus no credentials should be given via the interface.
Running with credentials
In order to run an Operation on a machine, the SIS server will use the "Admin Credentials" context to use WMI (DCOM/WinRM) to run the given Operation (Job) as the account set up under "RunAs Credentials".
Hornbill ITOM <---- Site Integration Server (Local System)
				|-- WMI ---> Managed CI
						|----> EspSisExec (Administrator))
								|----> EspSisExec pkg (Run As)
				<----- returning data (http) ----|
If the RunAs Credentials are not given, then the Admin Credentials will be used.
If the Admin Credentials are not given, then the EspSisService Credentials will be used (typically Local System).
Credentials will be transmitted in encrypted form, but will be available to the scripts contained within the package as parameters passed over the command line.
Once the SIS knows there is an operation to be run on a managed CI, the SIS Service checks it has the most recent package (stored locally) and copies EspSisExec and the relevant package to a temporary folder (as determined via a WMI call of the user's settings) on the relevant managed CI. It then uses WMI (DCOM/WinRM) with the Administrator credentials to run that package (using EspSisExec, the pkg and any variables) with RunAs credentials.
There is a continuous output/heartbeat from the Managed CI back through the SIS to Hornbill ITOM.
Hornbill Hint: network packets can be dropped here, so the instant feedback can NOT be relied upon. The log post execution should be complete.
Once the package has run, the results (the console output from the script(s), the standard error and a debug log) are packaged and sent back to Hornbill ITOM (via the SIS) and the temporary files (and folder) are deleted from the Managed CI
The console output from a package can be parsed for variables of the form:
{{SISJobOutputParameterStart:variable_name}}variable_data{{SISJobOutputParameterEnd}}
to be used in a Runbook or Service Manager Business Process (which can be used to progress a Runbook or a package)
The maximum concurrent jobs is 5 (this is configurable via the experimental.itom.concurrentJobs System Setting)
We are working on proxy support for within the executable.