Difference between revisions of "IT Automation"
Jump to navigation
Jump to search

| (30 intermediate revisions by the same user not shown) | |||
| Line 1: | Line 1: | ||
| − | {{bluebanner|[[Main_Page|Home]] > [[Administration]] > [[IT Operations Management|ITOM]] > [[ | + | |
| + | {{bluebanner|[[Main_Page|Home]] > [[Administration]] > [[IT Operations Management|ITOM]] > [[{{{1}}}]] > IT Automation |[[:Category:ITOM|Index]]}} | ||
{|style="width: 100%" | {|style="width: 100%" | ||
|- valign="top" | |- valign="top" | ||
| Line 18: | Line 19: | ||
==Adding the IT Automation Node== | ==Adding the IT Automation Node== | ||
| − | [[File:BPMITAutomationNode.png|right]] | + | [[File:BPMITAutomationNode.png|right|350px|link=https://wiki.hornbill.com/images/9/94/BPMITAutomationNode.png]] |
* From an existing Node within a Business Process | * From an existing Node within a Business Process | ||
:# Place the mouse pointer over the node to expose the connection arrows. | :# Place the mouse pointer over the node to expose the connection arrows. | ||
| Line 28: | Line 29: | ||
:# Select ''IT Automation'' | :# Select ''IT Automation'' | ||
| − | {{infobox|IT Automation | + | {{infobox|IT Automation nodes are displayed in Tan; to help differentiate from other node types.}} |
<br> | <br> | ||
==Configuration == | ==Configuration == | ||
| − | [[File: | + | <!-- [[File:ITAutomationPropertiesBlur.png|right|350px|link=https://wiki.hornbill.com/images/b/bc/ITAutomationProperties.png]] --> |
| − | Two options are available to expose the properties of the | + | Two options are available to expose the properties of the IT Automation process node, place the mouse pointer over the node to expose the '''Cog''' icon and click on this icon or double click anywhere on the node. |
| − | |||
| − | |||
| − | |||
| − | |||
| − | |||
| − | |||
| − | |||
| − | |||
| − | |||
| − | |||
| − | |||
| − | |||
| − | |||
| − | |||
| − | |||
| − | |||
| − | |||
| − | |||
| − | |||
| − | + | === IT Automation === | |
| − | + | {{Bullet1|Language|Select the language to work in, this defaults to the language set in the user's profile. If other users require viewing the workflow in a different language, translations can be provided by selecting the language and entering the appropriate translations.}} | |
| − | + | {{Bullet1|Display|Provide the node with a display name that will appear on the business process design canvas}} | |
| − | + | {{Bullet1|Description|Optional text area that can be used to provide a description detailing the node's function}} | |
| − | |||
| − | |||
| − | |||
| − | |||
| − | |||
| − | |||
| − | |||
| − | |||
| − | |||
| − | |||
<br> | <br> | ||
| − | == | + | === Job Request === |
| − | + | {{Template:IT Automation Job Properties}} | |
| − | + | {{Bullet1|Result Reference|A variable that refers to an object that enables access to the output parameters returned by a node anywhere within a process. Each node can be given a unique variable name allowing for the output of multiple nodes to be accessed. Where a unique name is not given, the output from the current node will overwrite all output from a previously executed node with the same result reference variable.}} | |
| + | {{Bullet1|Continue on Error|When this option set to ''No'' (default), the business process will not continue if the IT Automation fails. Setting the option to ''Yes'' enables the business process to continue execution after the failed IT Automation node.}} | ||
| − | |||
[[Category:Integration]] | [[Category:Integration]] | ||
Latest revision as of 14:43, 15 December 2020
| Home > Administration > ITOM > [[{{{1}}}]] > IT Automation | Index |
IntroductionThe IT Automation node is used to execute an ITOM package operation in a similar way to that of creating an IT Automation Job. Each time the node is used, a new Job will appear in the Job queue where it can be monitored/managed in the same manner as other ITOM jobs. |
Related Articles |
Adding the IT Automation Node
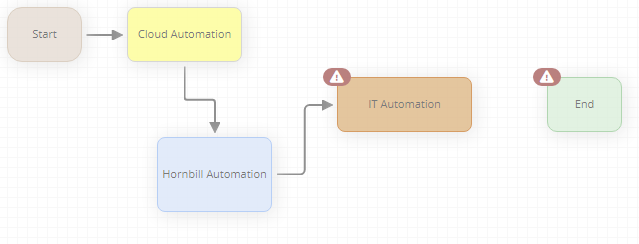
- From an existing Node within a Business Process
- Place the mouse pointer over the node to expose the connection arrows.
- From a connection arrow, drag out a new connection line
- Select IT Automation
- From a Connection Line between to nodes
- Select the Connection Line and Right Click
- Select Add node between connected nodes from the context menu
- Select IT Automation
- IT Automation nodes are displayed in Tan; to help differentiate from other node types.
Configuration
Two options are available to expose the properties of the IT Automation process node, place the mouse pointer over the node to expose the Cog icon and click on this icon or double click anywhere on the node.
IT Automation
- Language
- Select the language to work in, this defaults to the language set in the user's profile. If other users require viewing the workflow in a different language, translations can be provided by selecting the language and entering the appropriate translations.
- Display
- Provide the node with a display name that will appear on the business process design canvas
- Description
- Optional text area that can be used to provide a description detailing the node's function
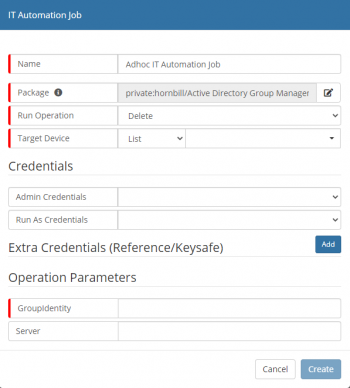
Job Request

- Package
- Package used to provide the IT Automation payload

- Run Operation
- Operation to perform using the package
- Site Target
- Specify the SIS Server or Group that will facilitate the Automation Job
- Target Device
- Select the Device(s) that the Operation will target
- List
- Target Devivces are sourced from a pre-created Inventory List
- Inventory
- Select a Device from the ITOM Inventory
- Manual
- Manually entered device name, that must already exist in the ITOM Inventory and is marked as a Managed device
- Credentials
- Sourced from the KeySafe, provides the security context to be used for package deployment and execution
- Admin Credentials
- Security Context used to deploy the package onto the target device(s)
- Run As Credentials
- Security Context used to execute the package on the target device(s) (if not provided then Admin Credentials are used)
- Extra Credentials
- Optional credentials used as part of the functionality within the package
- Operation Parameters
- Once a package and a Run Operation has been selected, any related parameters will be displayed; mandatory fields are highlighted and hints may be provided in the input box.
- Result Reference
- A variable that refers to an object that enables access to the output parameters returned by a node anywhere within a process. Each node can be given a unique variable name allowing for the output of multiple nodes to be accessed. Where a unique name is not given, the output from the current node will overwrite all output from a previously executed node with the same result reference variable.
- Continue on Error
- When this option set to No (default), the business process will not continue if the IT Automation fails. Setting the option to Yes enables the business process to continue execution after the failed IT Automation node.