Difference between revisions of "IT Automation"
Jump to navigation
Jump to search

| Line 41: | Line 41: | ||
{{Bullet1|Description|Optional text area that can be used to provide a description detailing the node's function}} | {{Bullet1|Description|Optional text area that can be used to provide a description detailing the node's function}} | ||
<br> | <br> | ||
| + | |||
| + | === Job Request === | ||
| + | {{Bullet1|Run Package|This drop-down list displays the list of available connectors. By default, the ''Hornbill Integration Bridge'' connector will be available. If you have configured any Business Process Connectors using ''Microsoft Orchestrator'' or ''HP Operations Orchestration'', these will also be available.}} | ||
| + | {{Bullet1|Run Operation| }} | ||
| + | {{Bullet1|Target Machine| }} | ||
| + | {{Bullet1|Site Target| }} | ||
| + | {{Bullet1|Result Reference|A variable that refers to an object that enables access to the output parameters returned by a node anywhere within a process. Each node can be given a unique variable name allowing for the output of multiple nodes to be accessed. Where a unique name is not given, the output from the current node will overwrite all output from a previously executed node with the same result reference variable.}} | ||
| + | {{Bullet1|Continue on Error|When this option set to ''No'' (default), the business process will not continue if the IT Automation fails. Setting the option to ''Yes'' enables the business process to continue execution after the failed IT Automation node.}} | ||
<!-- | <!-- | ||
| − | |||
| − | |||
| − | |||
| − | |||
| − | |||
| − | |||
| − | |||
| − | |||
===Request Credentials=== | ===Request Credentials=== | ||
[[File:Integration-Call-4.png|right|350px|link=https://wiki.hornbill.com/images/2/27/Integration-Call-4.png]] | [[File:Integration-Call-4.png|right|350px|link=https://wiki.hornbill.com/images/2/27/Integration-Call-4.png]] | ||
If using the ''Hornbill Integration Bridge'', once a method has been selected you will need to select a credential from the Request Credentials list. | If using the ''Hornbill Integration Bridge'', once a method has been selected you will need to select a credential from the Request Credentials list. | ||
| − | :* The available credentials are populated via [[Hornbill KeySafe | KeySafe]] , the list is filtered based on the Authentication '''Type''' required by the Integration method. | + | :* The available credentials are populated via [[Hornbill KeySafe | KeySafe]], the list is filtered based on the Authentication '''Type''' required by the Integration method. |
| − | :* If the list is empty the '''type''' of credential is shown by hovering the mouse over the '''i''' against the credential. You can go to '''[[Hornbill_KeySafe|KeySafe]]''' and create a set of credentials for the '''type''' of method you are trying to use. | + | :* If the list is empty the '''type''' of credential is shown by hovering the mouse over the '''i''' against the credential. You can go to '''[[Hornbill_KeySafe|KeySafe]]''' and create a set of credentials for the '''type''' of the method you are trying to use. |
:'''Examples''' | :'''Examples''' | ||
:* You would need to define in '''[[Hornbill_KeySafe|KeySafe]]''' the Twitter account credentials you want to tweet from, or the ServiceNow instance you want to create an Incident on, and which user account you want to create the Incident in the context of. | :* You would need to define in '''[[Hornbill_KeySafe|KeySafe]]''' the Twitter account credentials you want to tweet from, or the ServiceNow instance you want to create an Incident on, and which user account you want to create the Incident in the context of. | ||
| − | :* You can create multiple set's of credentials for the same Methods, for example if you wanted to tweet from different Twitter Accounts, you can create different request credentials for each Twitter account in '''KeySafe''' and then select which one to use from the '''Request Credentials''' for the Twitter Methods in each Cloud Automation node you configure. | + | :* You can create multiple set's of credentials for the same Methods, for example, if you wanted to tweet from different Twitter Accounts, you can create different request credentials for each Twitter account in '''KeySafe''' and then select which one to use from the '''Request Credentials''' for the Twitter Methods in each Cloud Automation node you configure. |
===Parameters=== | ===Parameters=== | ||
| Line 68: | Line 68: | ||
===Response Parameters=== | ===Response Parameters=== | ||
| − | Most methods will return Response Parameters (Outputs) once they complete. You may wish to use these later or further down your business process. For example if you chose to create a new '''Board''' using the '''Trello''' '''CreateBoard''' method, one of the response parameters will be the newly created boards id. This id can then be used as a request(input) parameter for another Cloud Automation, or example if you wanted to add a '''List''' or '''Card''' to the '''Trello''' Board. | + | Most methods will return Response Parameters (Outputs) once they complete. You may wish to use these later or further down your business process. For example, if you chose to create a new '''Board''' using the '''Trello''' '''CreateBoard''' method, one of the response parameters will be the newly created boards id. This id can then be used as a request(input) parameter for another Cloud Automation, or example if you wanted to add a ''' List''' or '''Card''' to the '''Trello''' Board. |
:* The Response Parameters will be available to use from the '''Variable Picker''' and will be listed under each '''Result Reference''' name. | :* The Response Parameters will be available to use from the '''Variable Picker''' and will be listed under each '''Result Reference''' name. | ||
<br> | <br> | ||
Revision as of 09:07, 14 December 2020
| Home > Administration > ITOM > Runbooks > IT Automation | Index |
IntroductionThe IT Automation node is used to execute an ITOM package operation in a similar way to that of creating an IT Automation Job. Each time the node is used, a new Job will appear in the Job queue where it can be monitored/managed in the same manner as other ITOM jobs. |
Related Articles |
Adding the IT Automation Node
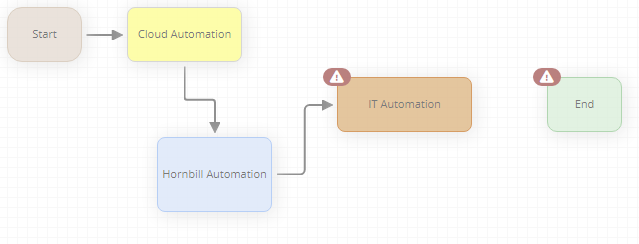
- From an existing Node within a Business Process
- Place the mouse pointer over the node to expose the connection arrows.
- From a connection arrow, drag out a new connection line
- Select IT Automation
- From a Connection Line between to nodes
- Select the Connection Line and Right Click
- Select Add node between connected nodes from the context menu
- Select IT Automation
- IT Automation Nodes are displayed in Tan; to help differentiate from other node types.
Configuration
Two options are available to expose the properties of the Hornbill Cloud Automation Node. You can either place your mouse pointer over the Cloud Automation node to expose the Cog icon and click on this icon or double click anywhere on the Could Automation Node.
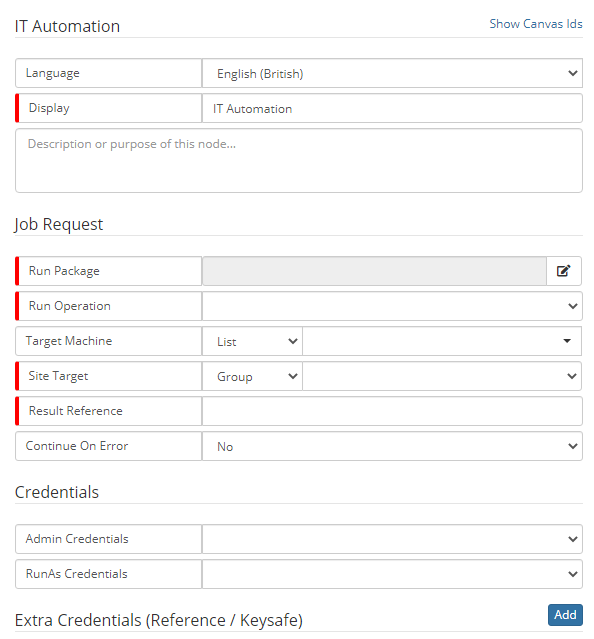
IT Automation
- Language
- Select the language that you want to work in. This will default to the language set in your profile. If you have other users that will be viewing the workflow that operate in a different language, you may want to provide translations for them by selecting their language and providing the appropriate translations.
- Display
- Give the Cloud Automation node a display name for how it will appear on the business process design canvas
- Description
- Optional text area that can be used to provide a description detailing the node's function
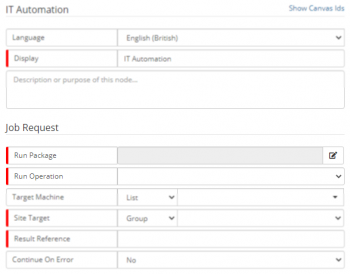
Job Request
- Run Package
- This drop-down list displays the list of available connectors. By default, the Hornbill Integration Bridge connector will be available. If you have configured any Business Process Connectors using Microsoft Orchestrator or HP Operations Orchestration, these will also be available.
- Run Operation
- Target Machine
- Site Target
- Result Reference
- A variable that refers to an object that enables access to the output parameters returned by a node anywhere within a process. Each node can be given a unique variable name allowing for the output of multiple nodes to be accessed. Where a unique name is not given, the output from the current node will overwrite all output from a previously executed node with the same result reference variable.
- Continue on Error
- When this option set to No (default), the business process will not continue if the IT Automation fails. Setting the option to Yes enables the business process to continue execution after the failed IT Automation node.