Email Templates
Home > Administration > System > Email > Templates
Introduction
Email templates can be used to pre-populate emails with information to create a standard format for outbound emails. Emails may be sent automatically from Business Process Workflows or manually from within an app.
Template List
The list of templates is controlled by the selection of the application that will be using the template along with the entity or business object within that application for which the template will use variables to include information from the entity when an email is sent using that template.
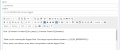
Template Editor
- Name
- The Name provides a reference within the list of Templates.
- Subject
- Contents of the Subject of the email. Both text and variables can be used within this section.
- Message
- The main body of the email. When creating or modifying an email template, the Message area includes a full editor to provide options for fonts and styling within your email.
Variables
Template Variables can be used within the Subject or Message of a template in order to have information that is stored within the related entity, used in the email.
- Format
- Each variable starts with a double opening curly brace ( {{ ) and finishes with a double closing curly brace ( }} ). Within the curly braces, the contents can be either just a data field specified by a dot (.) followed by the field name (.H_Firstname) or the data field can be preceded by an available related entity (Contact.H_firstname). The complete variable will have the format {{.H_firstname}}
- Letter Case
- The letter case of the variables will determine the letter case that is used in the email. For example
- {{.H_firstname}} = John
- {{.h_firstname}} = john
- {{.H_FIRSTNAME}} = JOHN
- Global Variables
- The variables are always available for use in an Email Template no matter the entity. For example
- {{DATE}} = The current date in the format 2016-11-23
- {{TIME}} = The current time in the format 23:53
Using ESP Conditions with a Variable
There are occasions when the variable you have chosen to include in your email template does not have any data to resolve. In this situation, you will be left with the raw variable displayed in the email and of course this doesn't look good to the recipient.
It is possible to avoid this through the use of an ESP Expression. This is an expression that controls whether the variable specified should be visible in the email being sent.
i.e. If the expression evaluates to “True” then display the variable. If the expression evaluates to “False” then hide the variable completely.
Ultimately, the visibility of the variable is dependent purely on the condition set against it. It is not dependent on whether any data exists in the database for the variable to resolve.
The Co-Worker Vs Contact Example
One common situation where the ESP expression is essential is when you want to begin your emails with “Dear [Customer]”.
As you will know by now, the customer set against a request could either be a “Co-Worker” (someone internal to your Organisation) or a “Contact” (an individual external to your organisation) and each of these types of user have a range of associated variables.
To configure an email template to cater for the possibility of the customer being a Co-worker or a Contact it should be set up as follows:
- Select the desired Co-worker and Contact name variables. In this example we will be addressing the customer by first name only so we will select {{Customer Coworker.H_first_name}} and {{Customer Contact.H_firstname}}
- Highlight the Co-Worker variable and click the ESP Expression button
- You will see that the “Value” field is automatically populated with the highlighted variable.
- In the “Expression” field, define the condition that you wish to control the visibility of this variable. Remember, the variable will only be displayed if your expression is found to be true. For the Co-worker variable, we only want this to display if the customer against the request is in fact a Co-worker. This information is stored in the main request table and can be obtained using the variable {{.h_customer_type}}. The value will be zero for a Co-worker, and one for a contact, hence the expression controlling a Co-worker variable should be: {{.h_customer_type}} = 0
- Click OK
- Highlight the Contact variable and click the ESP Expression button.
- The controlling expression defined here needs to ensure the Contact variable only displays if the customer against a request is indeed a contact. So using the same variable as before we can set the expression as {{.h_customer_type}} = 1
- Click OK
When viewing your email template, any variable currently under the control of an ESP expression is highlighted in Grey.
To edit an ESP Expression, highlight the variable and click the ESP Expression button.
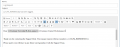
1) Choose your variables and place them in the template.
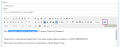
2) Highlight a variable and click the ESP Expression button.
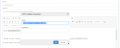
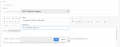
3) Review the ESP Expression Properties.
4) Adding your Customer is Co-worker expression.
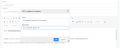
5) Now highlight the next variable.
6) Adding your Customer is Contact expression.
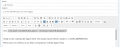
7) The Grey highlighting indicates both variables now have ESP conditions controlling their visibility.
