Difference between revisions of "Document Manager Lifecycle Processes"
| (25 intermediate revisions by 2 users not shown) | |||
| Line 1: | Line 1: | ||
<div style="border:1px solid #90C0FF; background:#D0E0FF; width:99%; padding:4px; margin-bottom:10px;"> | <div style="border:1px solid #90C0FF; background:#D0E0FF; width:99%; padding:4px; margin-bottom:10px;"> | ||
| − | __NOTOC__[[Main Page|Home]] > [[Administration]] > [[Document Manager Administration|Document Manager]] > Lifecycle | + | __NOTOC__[[Main Page|Home]] > [[Administration]] > [[Document Manager Administration|Document Manager]] > Lifecycle Processes |
</div> | </div> | ||
{|style="width: 100%" | {|style="width: 100%" | ||
| Line 6: | Line 6: | ||
|style="width:73%"| | |style="width:73%"| | ||
== Introduction == | == Introduction == | ||
| − | The Document Manager lifecycle | + | The Document Manager lifecycle Processes are used to automate and manage lifecycle events of a document. This page contains information on the Document Manager specific automated tasks that can be used in the [[Business Process Designer]] to build unique and powerful lifecycle processes for your documents |
| + | |||
|style="width:5%"| | |style="width:5%"| | ||
| | | | ||
| Line 13: | Line 14: | ||
== Related Articles == | == Related Articles == | ||
:* [[Business Process Designer]] | :* [[Business Process Designer]] | ||
| − | :* [[ | + | :* [[Documents]] |
| + | |} | ||
| + | |||
| + | ==Document-Specific Process Operations== | ||
| + | The available process operations most useful when building document lifecycle processes are outlined below. These include nodes to automatically get information about a document, change it's status, set a review date, publish to a library, and post to it's timeline. | ||
| + | <!-- ******************************************************************************************* --> | ||
| + | ===Email Notifications=== | ||
| + | Use these options to send email communications relating to documents | ||
| + | <div class="mw-collapsible mw-collapsed" data-collapsetext="Show Less" data-expandtext="Read More" style="width:700px"> | ||
| + | <div id="Email coworker"></div> | ||
| + | * Email Coworker | ||
| + | <div class="mw-collapsible-content"> | ||
| + | <div style="border:1px solid #e6e6e6; background:#f2f2f2; width:99%; padding:4px; margin-bottom:10px;"> | ||
| + | ::{| | ||
| + | |- valign="top" | ||
| + | |style="width:700px"| | ||
| + | [[File:Document_Manager_Lifecycle_Email_Coworker.png|thumb|Email Coworker]] | ||
| + | ==== Email Coworker ==== | ||
| + | Use this node to send an email to a named or variable coworker | ||
| + | ==== Options ==== | ||
| + | :* '''Document ID''' | ||
| + | :: This is the ID of the document the lifecycle process is running against and can be left as '''Auto''' | ||
| + | :* '''co-worker''' | ||
| + | :: This is the ID of the co-worker who the email will be sent to | ||
| + | :* '''co-worker (from variable) | ||
| + | :: This option should be used with the variable picker to inject the co-worker id for whom the email it going to be send to - this should be the id not display for the co-worker | ||
| + | :: This option should only be used if the '''co-worker''' field is not set | ||
| + | :* '''Mailbox Name''' | ||
| + | :: Select the Hornbill Mailbox from which you want this sent. | ||
| + | :* '''Email From''' | ||
| + | :: Select the email address that you want listed as the sender. | ||
| + | :* '''Email Template''' | ||
| + | :: Select the email template that you want to use for this email - in the admin console > system > email > templates you can create your own email templates under the '''Document Manager''' and '''Document''' entity options, as well as using either of the default '''DocumentNotification''' or '''DocumentReviewDue''' templates which are provided. | ||
| + | :* '''System Timeline Update''' | ||
| + | :: Select if the default system text will be added to the timeline for this action | ||
| + | :* '''Manual Timeline Update''' | ||
| + | :: Select Manual to override the default System timeline Text, and add your own text which will appear in the timeline update for this action | ||
|} | |} | ||
| + | </div> | ||
| + | </div> | ||
| + | </div> | ||
| + | <!-- **************************************END OF OPERATION DOCUMENTATION***************************************************** —> | ||
| − | == | + | <!-- ******************************************************************************************* --> |
| − | Use the | + | <div class="mw-collapsible mw-collapsed" data-collapsetext="Show Less" data-expandtext="Read More" style="width:700px"> |
| + | <div id="Email Document Owner"></div> | ||
| + | * Email Document Owner | ||
| + | <div class="mw-collapsible-content"> | ||
| + | <div style="border:1px solid #e6e6e6; background:#f2f2f2; width:99%; padding:4px; margin-bottom:10px;"> | ||
| + | ::{| | ||
| + | |- valign="top" | ||
| + | |style="width:700px"| | ||
| + | [[File:Document_Manager_Lifecycle_Document_Owner_Email.png|thumb|Email Document Owner]] | ||
| + | ==== Email Document Owner ==== | ||
| + | Use this node to send an email to owner of the document | ||
| + | ==== Options ==== | ||
| + | :* '''Document ID''' | ||
| + | :: This is the ID of the document the lifecycle process is running against and can be left as '''Auto''' | ||
| + | :* '''Mailbox Name''' | ||
| + | :: Select the Hornbill Mailbox from which you want this sent. | ||
| + | :* '''Email From''' | ||
| + | :: Select the email address that you want listed as the sender. | ||
| + | :* '''Email Template''' | ||
| + | :: Select the email template that you want to use for this email - in the admin console > system > email > templates you can create your own email templates under the '''Document Manager''' and '''Document''' entity options, as well as using either of the default '''DocumentNotification''' or '''DocumentReviewDue''' templates which are provided. | ||
| + | :* '''System Timeline Update''' | ||
| + | :: Select if the default system text will be added to the timeline for this action | ||
| + | :* '''Manual Timeline Update''' | ||
| + | :: Select Manual to override the default System timeline Text, and add your own text which will appear in the timeline update for this action | ||
| + | |} | ||
| + | </div> | ||
| + | </div> | ||
| + | </div> | ||
| + | <!-- **************************************END OF OPERATION DOCUMENTATION***************************************************** —> | ||
<!-- ******************************************************************************************* --> | <!-- ******************************************************************************************* --> | ||
| + | <div class="mw-collapsible mw-collapsed" data-collapsetext="Show Less" data-expandtext="Read More" style="width:700px"> | ||
| + | <div id="Email External Email Address"></div> | ||
| + | * Email External Email Address | ||
| + | <div class="mw-collapsible-content"> | ||
| + | <div style="border:1px solid #e6e6e6; background:#f2f2f2; width:99%; padding:4px; margin-bottom:10px;"> | ||
| + | ::{| | ||
| + | |- valign="top" | ||
| + | |style="width:700px"| | ||
| + | [[File:Document_Manager_lifecyle_email_external.png|thumb|Email External Email Address]] | ||
| + | ==== Email Document Owner ==== | ||
| + | Use this node to send an email to specific external email address | ||
| + | ==== Options ==== | ||
| + | :* '''Document ID''' | ||
| + | :: This is the ID of the document the lifecycle process is running against and can be left as '''Auto''' | ||
| + | :* '''Email Address''' | ||
| + | :: Use a comma to email multiple | ||
| + | :* '''Mailbox Name''' | ||
| + | :: Select the Hornbill Mailbox from which you want this sent. | ||
| + | :* '''Email From''' | ||
| + | :: Select the email address that you want listed as the sender. | ||
| + | :* '''Email Template''' | ||
| + | :: Select the email template that you want to use for this email - in the admin console > system > email > templates you can create your own email templates under the '''Document Manager''' and '''Document''' entity options, as well as using either of the default '''DocumentNotification''' or '''DocumentReviewDue''' templates which are provided. | ||
| + | :* '''System Timeline Update''' | ||
| + | :: Select if the default system text will be added to the timeline for this action | ||
| + | :* '''Manual Timeline Update''' | ||
| + | :: Select Manual to override the default System timeline Text, and add your own text which will appear in the timeline update for this action | ||
| + | |} | ||
| + | </div> | ||
| + | </div> | ||
| + | </div> | ||
| + | <!-- **************************************END OF OPERATION DOCUMENTATION***************************************************** —> | ||
| + | <!-- ******************************************************************************************* --> | ||
| + | ===Get Document Information=== | ||
| + | Use these options to get information about documents or document owner, which in turn can be used in other nodes - i.e task / approval assignees, or to inject variables into email templates | ||
<div class="mw-collapsible mw-collapsed" data-collapsetext="Show Less" data-expandtext="Read More" style="width:700px"> | <div class="mw-collapsible mw-collapsed" data-collapsetext="Show Less" data-expandtext="Read More" style="width:700px"> | ||
<div id="GetDocumentRecord"></div> | <div id="GetDocumentRecord"></div> | ||
| Line 32: | Line 135: | ||
Use this node to get information about a document (owner, status etc) | Use this node to get information about a document (owner, status etc) | ||
==== Options ==== | ==== Options ==== | ||
| − | :* ''' | + | :* '''Document ID''' |
| − | :: This is the ID of the document the lifecycle process is running | + | :: This is the ID of the document the lifecycle process is running against and can be left as '''Auto'' |
| + | |} | ||
</div> | </div> | ||
</div> | </div> | ||
</div> | </div> | ||
| − | <!-- **************************************END OF OPERATION DOCUMENTATION***************************************************** | + | <!-- **************************************END OF OPERATION DOCUMENTATION***************************************************** —> |
<!-- ******************************************************************************************* --> | <!-- ******************************************************************************************* --> | ||
| Line 52: | Line 156: | ||
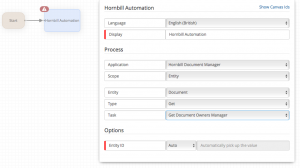
Use this node to get information about a document owner's manager | Use this node to get information about a document owner's manager | ||
==== Options ==== | ==== Options ==== | ||
| − | :* ''' | + | :* '''Document ID''' |
| − | :: This is the ID of the document the lifecycle process is running | + | :: This is the ID of the document the lifecycle process is running against and can be left as '''Auto''' |
| + | |} | ||
| + | </div> | ||
| + | </div> | ||
| + | </div> | ||
| + | <!-- **************************************END OF OPERATION DOCUMENTATION***************************************************** --> | ||
| + | === Library === | ||
| + | Use these options to get information about or publish documents to libraries | ||
| + | <!-- ******************************************************************************************* --> | ||
| + | <div class="mw-collapsible mw-collapsed" data-collapsetext="Show Less" data-expandtext="Read More" style="width:700px"> | ||
| + | <div id="GetLibraryInfo"></div> | ||
| + | * Get Library Info | ||
| + | <div class="mw-collapsible-content"> | ||
| + | <div style="border:1px solid #e6e6e6; background:#f2f2f2; width:99%; padding:4px; margin-bottom:10px;"> | ||
| + | ::{| | ||
| + | |- valign="top" | ||
| + | |style="width:700px"| | ||
| + | [[File:Get_Library_Info.png|thumb|Get Library Info]] | ||
| + | ==== Get Library Info ==== | ||
| + | Use this node to get information about a specific library (Owner etc) | ||
| + | ==== Options ==== | ||
| + | :* '''Document ID''' | ||
| + | :: This is the ID of the document the lifecycle process is running against and can be left as '''Auto''' | ||
| + | :* '''Library''' | ||
| + | :: This is the name of the library which for which the information is required | ||
| + | |} | ||
</div> | </div> | ||
</div> | </div> | ||
| Line 59: | Line 188: | ||
<!-- **************************************END OF OPERATION DOCUMENTATION***************************************************** --> | <!-- **************************************END OF OPERATION DOCUMENTATION***************************************************** --> | ||
| − | |||
| − | |||
| − | |||
<!-- ******************************************************************************************* --> | <!-- ******************************************************************************************* --> | ||
<div class="mw-collapsible mw-collapsed" data-collapsetext="Show Less" data-expandtext="Read More" style="width:700px"> | <div class="mw-collapsible mw-collapsed" data-collapsetext="Show Less" data-expandtext="Read More" style="width:700px"> | ||
| − | <div id=" | + | <div id="PublishToLibrary"></div> |
| − | * | + | * Publish to Library |
| + | <div class="mw-collapsible-content"> | ||
| + | <div style="border:1px solid #e6e6e6; background:#f2f2f2; width:99%; padding:4px; margin-bottom:10px;"> | ||
| + | ::{| | ||
| + | |- valign="top" | ||
| + | |style="width:700px"| | ||
| + | [[File:Publish_To_Library.png|thumb|Publish to Library]] | ||
| + | ==== Publish to Library ==== | ||
| + | Use this node to publish a document to a library | ||
| + | ==== Options ==== | ||
| + | :* '''Document ID''' | ||
| + | :: This is the ID of the document the lifecycle process is running against and can be left as '''Auto''' | ||
| + | :* '''Library''' | ||
| + | :: This is the name of the library you wish to publish too | ||
| + | :* '''Can Read Document''' | ||
| + | :: Allow members of the library to view the document | ||
| + | :* '''Can Edit Content''' | ||
| + | :: Allow members of the library to edit the document content | ||
| + | :* '''Can Edit Metadata''' | ||
| + | :: Allow members of the library to edit the documents metadata | ||
| + | |} | ||
| + | </div> | ||
| + | </div> | ||
| + | </div> | ||
| + | <!-- **************************************END OF OPERATION DOCUMENTATION***************************************************** --> | ||
| + | === Update === | ||
| + | Use these options to update attributes of documents | ||
| + | <!-- ******************************************************************************************* --> | ||
| + | <div class="mw-collapsible mw-collapsed" data-collapsetext="Show Less" data-expandtext="Read More" style="width:700px"> | ||
| + | <div id="PostToTimeline"></div> | ||
| + | * Post to Timeline | ||
<div class="mw-collapsible-content"> | <div class="mw-collapsible-content"> | ||
<div style="border:1px solid #e6e6e6; background:#f2f2f2; width:99%; padding:4px; margin-bottom:10px;"> | <div style="border:1px solid #e6e6e6; background:#f2f2f2; width:99%; padding:4px; margin-bottom:10px;"> | ||
| Line 71: | Line 227: | ||
|- valign="top" | |- valign="top" | ||
|style="width:700px"| | |style="width:700px"| | ||
| − | [[File: | + | [[File:DM_Post_To_Timeline.png|thumb|Post to Timeline]] |
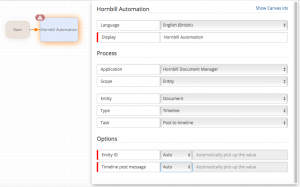
| − | ==== | + | ==== Post to Timeline ==== |
| − | Use this node to | + | Use this node to post to a documents timeline |
==== Options ==== | ==== Options ==== | ||
| − | :* ''' | + | :* '''Document ID''' |
| − | :: | + | :: This is the ID of the document the lifecycle process is running against and can be left as '''Auto''' |
| − | + | :* '''Timeline post content''' | |
| − | + | :: add the content to be posted to the documents timeline | |
| − | :* ''' | ||
| − | :: | ||
|} | |} | ||
</div> | </div> | ||
| Line 87: | Line 241: | ||
<!-- **************************************END OF OPERATION DOCUMENTATION***************************************************** --> | <!-- **************************************END OF OPERATION DOCUMENTATION***************************************************** --> | ||
| + | <!-- ******************************************************************************************* --> | ||
<div class="mw-collapsible mw-collapsed" data-collapsetext="Show Less" data-expandtext="Read More" style="width:700px"> | <div class="mw-collapsible mw-collapsed" data-collapsetext="Show Less" data-expandtext="Read More" style="width:700px"> | ||
| − | <div id=" | + | <div id="SetReviewDate"></div> |
| − | * | + | * Set Review Date |
<div class="mw-collapsible-content"> | <div class="mw-collapsible-content"> | ||
<div style="border:1px solid #e6e6e6; background:#f2f2f2; width:99%; padding:4px; margin-bottom:10px;"> | <div style="border:1px solid #e6e6e6; background:#f2f2f2; width:99%; padding:4px; margin-bottom:10px;"> | ||
| Line 95: | Line 250: | ||
|- valign="top" | |- valign="top" | ||
|style="width:700px"| | |style="width:700px"| | ||
| − | [[File: | + | [[File:DM_Set_Review_Date.png|thumb|Set Review Date]] |
| − | ==== | + | ====Set Review Date==== |
| − | + | Use this node to set the next review date for the document | |
==== Options ==== | ==== Options ==== | ||
| − | :* ''' | + | :* '''Document ID''' |
| − | :: This is | + | :: This is the ID of the document the lifecycle process is running against and can be left as '''Auto''' |
| − | + | :* '''Review Date''' | |
| − | + | :: Add the date the document should next be reviewed | |
| − | :* ''' | ||
| − | :: | ||
| − | |||
| − | |||
|} | |} | ||
</div> | </div> | ||
| Line 113: | Line 264: | ||
<!-- **************************************END OF OPERATION DOCUMENTATION***************************************************** --> | <!-- **************************************END OF OPERATION DOCUMENTATION***************************************************** --> | ||
| + | <!-- ******************************************************************************************* --> | ||
<div class="mw-collapsible mw-collapsed" data-collapsetext="Show Less" data-expandtext="Read More" style="width:700px"> | <div class="mw-collapsible mw-collapsed" data-collapsetext="Show Less" data-expandtext="Read More" style="width:700px"> | ||
| − | <div id=" | + | <div id="StatusChange"></div> |
| − | * | + | * Status Change |
<div class="mw-collapsible-content"> | <div class="mw-collapsible-content"> | ||
<div style="border:1px solid #e6e6e6; background:#f2f2f2; width:99%; padding:4px; margin-bottom:10px;"> | <div style="border:1px solid #e6e6e6; background:#f2f2f2; width:99%; padding:4px; margin-bottom:10px;"> | ||
| Line 121: | Line 273: | ||
|- valign="top" | |- valign="top" | ||
|style="width:700px"| | |style="width:700px"| | ||
| − | [[File: | + | [[File:DM_Status_Change.png|thumb|Status Change]] |
| − | ==== | + | ====Status Change==== |
| − | Use this | + | Use this node to change the status of a document |
==== Options ==== | ==== Options ==== | ||
| − | :* ''' | + | :* '''Document ID''' |
| − | :: This is | + | :: This is the ID of the document the lifecycle process is running against and can be left as '''Auto''' |
| − | :* ''' | + | :* '''Status''' |
| − | :: | + | :: Choose the status to change the document too |
| − | + | :* '''Comment''' | |
| − | + | :* Optionally add a comment which will be posted to the document timeline when the status is changed. | |
|} | |} | ||
</div> | </div> | ||
</div> | </div> | ||
</div> | </div> | ||
| − | <!-- | + | <!-- **************************************END OF OPERATION DOCUMENTATION***************************************************** --> |
| + | <br> | ||
| + | == Using your Lifecycle Processes == | ||
| + | As soon as one or more processes have been created and published, they can be invoked using the "Lifecycle" button which will appear at the top right of a document. | ||
| + | [[File:Using a Document Lifecycle Process.JPG|center|1000px|thumb|<div align="center">'''Published lifecycle process can be started against a document using the "Lifecycle" button located at the top right of a document '''</div>]] | ||
| + | <br> | ||
| + | [[File:Example_Document_Lifecycle_Process.JPG|center|1000px|thumb|<div align="center">'''Example Document Lifecycle Process in progress'''</div>]] | ||
| + | |||
[[Category:Document Manager]] | [[Category:Document Manager]] | ||
Latest revision as of 11:58, 13 February 2020
Home > Administration > Document Manager > Lifecycle Processes
IntroductionThe Document Manager lifecycle Processes are used to automate and manage lifecycle events of a document. This page contains information on the Document Manager specific automated tasks that can be used in the Business Process Designer to build unique and powerful lifecycle processes for your documents |
Related Articles |
Document-Specific Process Operations
The available process operations most useful when building document lifecycle processes are outlined below. These include nodes to automatically get information about a document, change it's status, set a review date, publish to a library, and post to it's timeline.
Email Notifications
Use these options to send email communications relating to documents
- Email Coworker
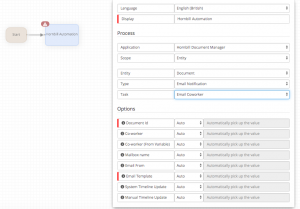
Email Coworker
Use this node to send an email to a named or variable coworker
Options
- Document ID
- This is the ID of the document the lifecycle process is running against and can be left as Auto
- co-worker
- This is the ID of the co-worker who the email will be sent to
- co-worker (from variable)
- This option should be used with the variable picker to inject the co-worker id for whom the email it going to be send to - this should be the id not display for the co-worker
- This option should only be used if the co-worker field is not set
- Mailbox Name
- Select the Hornbill Mailbox from which you want this sent.
- Email From
- Select the email address that you want listed as the sender.
- Email Template
- Select the email template that you want to use for this email - in the admin console > system > email > templates you can create your own email templates under the Document Manager and Document entity options, as well as using either of the default DocumentNotification or DocumentReviewDue templates which are provided.
- System Timeline Update
- Select if the default system text will be added to the timeline for this action
- Manual Timeline Update
- Select Manual to override the default System timeline Text, and add your own text which will appear in the timeline update for this action
- Email Document Owner
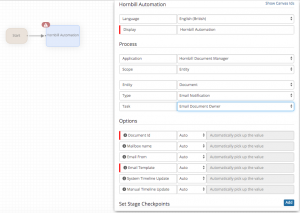
Email Document Owner
Use this node to send an email to owner of the document
Options
- Document ID
- This is the ID of the document the lifecycle process is running against and can be left as Auto
- Mailbox Name
- Select the Hornbill Mailbox from which you want this sent.
- Email From
- Select the email address that you want listed as the sender.
- Email Template
- Select the email template that you want to use for this email - in the admin console > system > email > templates you can create your own email templates under the Document Manager and Document entity options, as well as using either of the default DocumentNotification or DocumentReviewDue templates which are provided.
- System Timeline Update
- Select if the default system text will be added to the timeline for this action
- Manual Timeline Update
- Select Manual to override the default System timeline Text, and add your own text which will appear in the timeline update for this action
- Email External Email Address
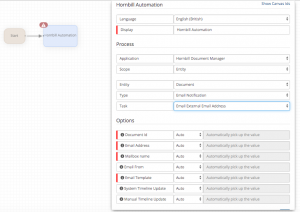
Email Document Owner
Use this node to send an email to specific external email address
Options
- Document ID
- This is the ID of the document the lifecycle process is running against and can be left as Auto
- Email Address
- Use a comma to email multiple
- Mailbox Name
- Select the Hornbill Mailbox from which you want this sent.
- Email From
- Select the email address that you want listed as the sender.
- Email Template
- Select the email template that you want to use for this email - in the admin console > system > email > templates you can create your own email templates under the Document Manager and Document entity options, as well as using either of the default DocumentNotification or DocumentReviewDue templates which are provided.
- System Timeline Update
- Select if the default system text will be added to the timeline for this action
- Manual Timeline Update
- Select Manual to override the default System timeline Text, and add your own text which will appear in the timeline update for this action
Get Document Information
Use these options to get information about documents or document owner, which in turn can be used in other nodes - i.e task / approval assignees, or to inject variables into email templates
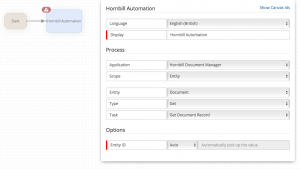
- Get Document Record
- Get Document Owner's' Manager
Library
Use these options to get information about or publish documents to libraries
- Get Library Info
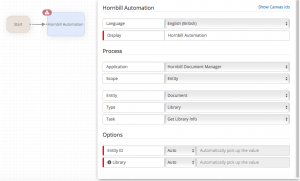
Get Library Info
Use this node to get information about a specific library (Owner etc)
Options
- Document ID
- This is the ID of the document the lifecycle process is running against and can be left as Auto
- Library
- This is the name of the library which for which the information is required
- Publish to Library
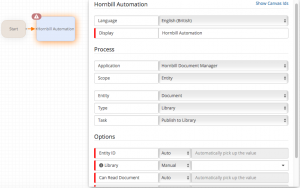
Publish to Library
Use this node to publish a document to a library
Options
- Document ID
- This is the ID of the document the lifecycle process is running against and can be left as Auto
- Library
- This is the name of the library you wish to publish too
- Can Read Document
- Allow members of the library to view the document
- Can Edit Content
- Allow members of the library to edit the document content
- Can Edit Metadata
- Allow members of the library to edit the documents metadata
Update
Use these options to update attributes of documents
- Post to Timeline
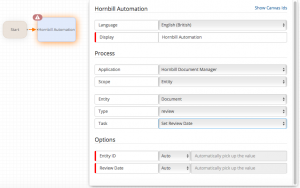
- Set Review Date
- Status Change
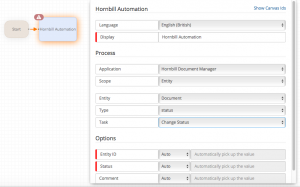
Status Change
Use this node to change the status of a document
Options
- Document ID
- This is the ID of the document the lifecycle process is running against and can be left as Auto
- Status
- Choose the status to change the document too
- Comment
- Optionally add a comment which will be posted to the document timeline when the status is changed.
Using your Lifecycle Processes
As soon as one or more processes have been created and published, they can be invoked using the "Lifecycle" button which will appear at the top right of a document.
