Difference between revisions of "Dashboards"
Jump to navigation
Jump to search
| Line 37: | Line 37: | ||
* Adding Columns to rows | * Adding Columns to rows | ||
| − | :* In order to add additional columns to a row, select the [[File:Screen_Shot_2015-11-24_at_21.20.49.png]] | + | :* In order to add additional columns to a row, select the [[File:Screen_Shot_2015-11-24_at_21.20.49.png]] button from the top right hand corner of the row. This will add a column to the row. |
| + | :* In order for the columns to correctly display on the Dashboard ensure each each column is set to '''50% Width''' (next to the '''Chart''' button in each column). | ||
| + | :* To add additional columns to a row select the [[File:Screen_Shot_2015-11-24_at_21.20.49.png]] button from the top right hand corner of the row. additional columns will appear on the row. | ||
| + | :* If adding multiple columns to a row, ensure that each column is allocated a '''% Width''' value and that the total % width of all columns on a single row equals 100%. | ||
| + | |||
* Adding Widgets to columns | * Adding Widgets to columns | ||
Revision as of 21:29, 24 November 2015
Home > Administration > Reporting > Dashboards
Introduction
Dashboards are used to display widget content.
- Dashboards can be customised to include multiple rows and columns to which widgets can be added.
- Dashboards can be shared with specific users
- Dashboards can be displayed on large screens or consumed into slides and displayed in Slideshows.
Features
Creating a Dashboard
Start by selecting the + Create New Dashboard button on the Dashboard landing page, and give the Dashboard a name.
In order to access the configuration options for the Dashboard select the Edit Mode button in the top right of the Dashboard canvas
Defining Dashboard Layouts
In order to create a Dashboard which contains multiple widgets, it is important to understand how to configure rows, columns, heights, widths and how to add multiple widgets to a single column.
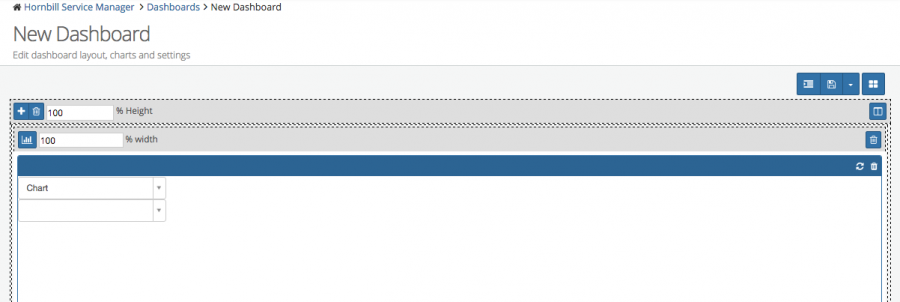
Default Dashboard Layout
The default Dashboard layout includes a single row, and a single column. The row is set to 100% of the Dashboard Height, and the column is set to 100% of the Dashboard width as shown above.
- Adding additional rows
- In order to add an additional row below the default row, select the + button in the top left hand corner of the default row. This will add a new row directly below.
- In order for the rows to correctly display on the Dashboard ensure that each row is set to 50% Height (next to the + and dustbin buttons on each row)
- To add additional row's, select the + button on the row to which you want the new row to appear below. If adding multiple rows, ensure that each row is allocated a % Height value and that the culmination of all the row heights % equals 100.
- Adding Columns to rows
- In order to add additional columns to a row, select the
 button from the top right hand corner of the row. This will add a column to the row.
 - In order for the columns to correctly display on the Dashboard ensure each each column is set to 50% Width (next to the Chart button in each column).
- To add additional columns to a row select the
 button from the top right hand corner of the row. additional columns will appear on the row.
 - If adding multiple columns to a row, ensure that each column is allocated a % Width value and that the total % width of all columns on a single row equals 100%.
- In order to add additional columns to a row, select the
- Adding Widgets to columns
- Adding multiple widgets to a single column
- Row and column heights and widths
- Moving Columns between rows
- Adding Widgets
- Access (Users and Roles)
