Difference between revisions of "Customising Self Service"
| (35 intermediate revisions by 4 users not shown) | |||
| Line 3: | Line 3: | ||
==Introduction== | ==Introduction== | ||
| − | It is possible to customise the Service | + | It is possible to customise the Service and Customer Portals to include your company logo, branding, as well as the icons which are used to represent the Services you provide to your customers. |
| − | Hornbill Service Manager Self Service is one of the apps which can exist inside the Service Portal framework (future line of business applications which have a requirement for customer engagement will also be available through the single Service Portal interface). Therefore we need to consider | + | Hornbill Service Manager Self Service is one of the line of business apps which can exist inside the Service Portal framework (future line of business applications which have a requirement for customer engagement will also be available through the single Service Portal interface). Therefore we need to consider both the Service Portal framework and the Service Manager app content when customising the customer experience. |
| − | ==Customising the Service Portal Framework== | + | ==Customising the Service Portal Framework== |
| + | [[File:Service_Portal.png|300px|thumb|<div align="center">'''Main Home Page of Self Service'''</div>]] | ||
| − | == | + | Via the '''Administration Console > Instance Configuration > Manage Portals''' you are able to configure the Internally facing '''Service Portal''' and the externally facing '''Customer Portal'''. The Service Portal is used to support your internal staff, and the Customer Portal is used to support external organisations and their contacts. |
| − | + | ||
| + | '''Customise the Service Portal and or Customer Portal''' | ||
| + | |||
| + | Choose '''Customise Service Portal''' or '''Customise Customer Portal''' as required. | ||
| + | |||
| + | In these sections you can customise the Service Portal and the Customer Portal to include your company logo, branding, background colours and text, as well as configure and make contact and other useful information available to your supported customers. | ||
| + | |||
| + | ===='''Settings'''==== | ||
| + | :* '''Auto Login''' - This toggle switch is only applicable if Single Sign On (SSO) has been enabled. It determines whether or not a customer will always arrive at the main portal home page, or whether they are taken directly to the "My Services" page. If Auto-Login is set to "ON" and SSO is configured, the customer will be taken straight to the My Services page. | ||
| + | :* '''Allow Profile Update''' - This toggle switch governs whether the "profile" tab in the Hornbill Portal is read only. If this is set to "ON", a customer will be able to update their details via the Profile tab. | ||
| + | :* '''Logo''' - The image needs to be a web facing url using https - (eg. https: //www.mycompany.com/images/mycompanylogo.png). The image needs to be either a .png or .jpg type. The URL referenced must point directly to the image, i.e. the image has to be hosted in such a way that the URL only presents the image, not an entire web page. A possible solution is to create a new directory in the same location to where your company website images are hosted. The advantage here is that the location is already publicly available and in creating a new suitably-named directory, this should indicate what the images are used for. | ||
| + | :* '''Home Page Image''' - The image needs to be a web facing url using https and again of type .png or .jpg - for best the background image should be around 1024 x 768 | ||
| + | :* '''Colours''' - Configure the colours to reflect your corporate brand | ||
| + | |||
| + | ===='''Home Page Text'''==== | ||
| + | |||
| + | :Configure the text which your supported customer will see when they visit the home page. If you do not wish to display text in any of the available fields, simply insert a '''0''' into the field and no text will be displayed. | ||
| + | |||
| + | ===='''Social Information'''==== | ||
| + | |||
| + | :If you wish to publish links to your organisations social profiles, define the links here. if you do not wish to display one or all of these linksi simply insert a '''0''' into the field and no link will be displayed. | ||
| − | + | ===='''Contact Information'''==== | |
| + | :If you wish to publish contact information simply configure each contact field as required. If you do not wish to display text in any of the available fields, simply insert a '''0''' into the field and no text will be displayed. | ||
| + | Useful Resources: '''[[Practical_Advice_for_Configuring_your_Hornbill_Portals| Practical advice for configuring your Portal]]''' | ||
| + | ''' | ||
| + | ==Customising Service Manager Service Icons== | ||
| + | [[File:Service_Details_Section.png|300px|thumb]] | ||
| + | In Service Manager it is possible to configure the Services you provide to your customers, and define which of your customers are subscribed to these Services. Customers will only see the Services they are subscribed to when using the Service Portal. When defining your Services it is possible to assign each service a specific icon, this icon will then represent the service on the Service Portal. See '''[[Service Details|Services]]''' for selecting the icons you wish to use per service, this can be configured in the '''Service Details Section''' from a library of available icons. | ||
| + | <br> | ||
| + | <br> | ||
| + | <br> | ||
| + | <br> | ||
| + | <br> | ||
| + | <br> | ||
| − | ==Customising Service | + | ==Customising Service Manager Icons and text colours== |
| + | [[File:Service_Self_Service.png|300px|thumb]] | ||
Once you have configured the Service Portal Framework with your choice of colours , it is also possible to extend these colour schemes to the Service Manager content inside the Service Portal. | Once you have configured the Service Portal Framework with your choice of colours , it is also possible to extend these colour schemes to the Service Manager content inside the Service Portal. | ||
| − | Via the '''Administration Console > Service Manager > Settings | + | Via the '''Administration Console > Service Manager > Application Settings''' you will have the options to configure the following colours, by defining a hexadecimal colour code for each. The expected value for each property is # followed by six digits - a good resource for colours is available here '''[https://en.wikipedia.org/wiki/Web_colors Web colors] |
| − | * '''guest.colour.common.buttonBorder''' - Border colour which surrounds the navigation buttons (Favourites, Active, Impacted, | + | ''' |
| + | * '''guest.colour.common.buttonBorder''' - Border colour which surrounds the navigation buttons (Favourites, Active, Impacted, All Services) | ||
* '''guest.colour.common.buttonHover''' - Background colour when a navigation button is selected | * '''guest.colour.common.buttonHover''' - Background colour when a navigation button is selected | ||
| − | * '''guest.colour.common.icon''' - | + | * '''guest.colour.common.icon''' - The icon which represents each service |
* '''guest.colour.common.iconTitle''' - | * '''guest.colour.common.iconTitle''' - | ||
* '''guest.colour.common.link''' - Clickable links - '''More''' on service description, '''Breadcrumbs''' form service list, '''Request link''' on request list per service | * '''guest.colour.common.link''' - Clickable links - '''More''' on service description, '''Breadcrumbs''' form service list, '''Request link''' on request list per service | ||
| Line 36: | Line 71: | ||
* '''guest.colour.servicedetails.tabIcon''' - Request list Icon on Requests tab of each Service | * '''guest.colour.servicedetails.tabIcon''' - Request list Icon on Requests tab of each Service | ||
* '''guest.colour.servicedetails.tabText''' - Request list title on Requests tab of each Service | * '''guest.colour.servicedetails.tabText''' - Request list title on Requests tab of each Service | ||
| + | |||
| + | ==Customising Service Icons Number, Size and Attributes== | ||
| + | |||
| + | * '''guest.servicemanager.portal.home.defaultNumberOfServicesToShow''' - Decide how many Service Icons will be displayed, by default 6 | ||
| + | * '''guest.servicemanager.portal.home.iconSize''' - Decide if the Icons should display as Large, Medium or Small - Large is the default | ||
| + | * '''guest.servicemanager.portal.home.showDescription'''- Decide if each Service Description is displayed with the Service Icon - On by default | ||
| + | * '''guest.servicemanager.portal.home.showMoreOption''' - Decide if the '''More Option''' is displayed with the Service Icon - On by default | ||
| + | * '''guest.servicemanager.portal.home.showRequestCount''' - Decide if the Request Count is displayed with the Service Icon - On by default | ||
| + | * '''guest.servicemanager.portal.home.showStatus''' - Decide if the Service Status icon is displayed with the Service Icon - On by default | ||
| + | |||
| + | |||
| + | Should you wish to align these colours with those defined in the Service Portal framework, all the hexidecimal colour values for the colours you have used, are accessible via the '''Administration Console > Instance Configuration > Manage Portals > Advanced Settings''' | ||
[[Category: Service Manager]] [[Category:Administration]] | [[Category: Service Manager]] [[Category:Administration]] | ||
Revision as of 14:50, 23 October 2018
Home > Service Manager > Customising Self Service
Introduction
It is possible to customise the Service and Customer Portals to include your company logo, branding, as well as the icons which are used to represent the Services you provide to your customers.
Hornbill Service Manager Self Service is one of the line of business apps which can exist inside the Service Portal framework (future line of business applications which have a requirement for customer engagement will also be available through the single Service Portal interface). Therefore we need to consider both the Service Portal framework and the Service Manager app content when customising the customer experience.
Customising the Service Portal Framework
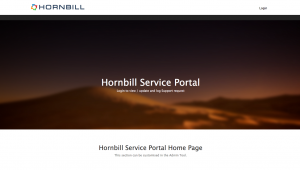
Via the Administration Console > Instance Configuration > Manage Portals you are able to configure the Internally facing Service Portal and the externally facing Customer Portal. The Service Portal is used to support your internal staff, and the Customer Portal is used to support external organisations and their contacts.
Customise the Service Portal and or Customer Portal
Choose Customise Service Portal or Customise Customer Portal as required.
In these sections you can customise the Service Portal and the Customer Portal to include your company logo, branding, background colours and text, as well as configure and make contact and other useful information available to your supported customers.
Settings
- Auto Login - This toggle switch is only applicable if Single Sign On (SSO) has been enabled. It determines whether or not a customer will always arrive at the main portal home page, or whether they are taken directly to the "My Services" page. If Auto-Login is set to "ON" and SSO is configured, the customer will be taken straight to the My Services page.
- Allow Profile Update - This toggle switch governs whether the "profile" tab in the Hornbill Portal is read only. If this is set to "ON", a customer will be able to update their details via the Profile tab.
- Logo - The image needs to be a web facing url using https - (eg. https: //www.mycompany.com/images/mycompanylogo.png). The image needs to be either a .png or .jpg type. The URL referenced must point directly to the image, i.e. the image has to be hosted in such a way that the URL only presents the image, not an entire web page. A possible solution is to create a new directory in the same location to where your company website images are hosted. The advantage here is that the location is already publicly available and in creating a new suitably-named directory, this should indicate what the images are used for.
- Home Page Image - The image needs to be a web facing url using https and again of type .png or .jpg - for best the background image should be around 1024 x 768
- Colours - Configure the colours to reflect your corporate brand
Home Page Text
- Configure the text which your supported customer will see when they visit the home page. If you do not wish to display text in any of the available fields, simply insert a 0 into the field and no text will be displayed.
Social Information
- If you wish to publish links to your organisations social profiles, define the links here. if you do not wish to display one or all of these linksi simply insert a 0 into the field and no link will be displayed.
Contact Information
- If you wish to publish contact information simply configure each contact field as required. If you do not wish to display text in any of the available fields, simply insert a 0 into the field and no text will be displayed.
Useful Resources: Practical advice for configuring your Portal
Customising Service Manager Service Icons
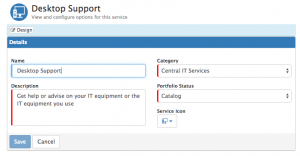
In Service Manager it is possible to configure the Services you provide to your customers, and define which of your customers are subscribed to these Services. Customers will only see the Services they are subscribed to when using the Service Portal. When defining your Services it is possible to assign each service a specific icon, this icon will then represent the service on the Service Portal. See Services for selecting the icons you wish to use per service, this can be configured in the Service Details Section from a library of available icons.
Customising Service Manager Icons and text colours
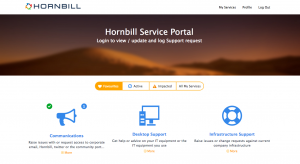
Once you have configured the Service Portal Framework with your choice of colours , it is also possible to extend these colour schemes to the Service Manager content inside the Service Portal.
Via the Administration Console > Service Manager > Application Settings you will have the options to configure the following colours, by defining a hexadecimal colour code for each. The expected value for each property is # followed by six digits - a good resource for colours is available here Web colors
- guest.colour.common.buttonBorder - Border colour which surrounds the navigation buttons (Favourites, Active, Impacted, All Services)
- guest.colour.common.buttonHover - Background colour when a navigation button is selected
- guest.colour.common.icon - The icon which represents each service
- guest.colour.common.iconTitle -
- guest.colour.common.link - Clickable links - More on service description, Breadcrumbs form service list, Request link on request list per service
- guest.colour.common.serviceCategory - Each service will exist within a service category
- guest.colour.common.serviceDescription - The description text for each service (Configured against the Service)
- guest.colour.common.serviceName - The Name for each service
- guest.colour.common.text - Request List column titles, and Request column values on Requests tab per Service
- guest.colour.home.requestCounterBadge - Shows a value for any active requests against a service
- guest.colour.servicedetails.tabIcon - Request list Icon on Requests tab of each Service
- guest.colour.servicedetails.tabText - Request list title on Requests tab of each Service
Customising Service Icons Number, Size and Attributes
- guest.servicemanager.portal.home.defaultNumberOfServicesToShow - Decide how many Service Icons will be displayed, by default 6
- guest.servicemanager.portal.home.iconSize - Decide if the Icons should display as Large, Medium or Small - Large is the default
- guest.servicemanager.portal.home.showDescription- Decide if each Service Description is displayed with the Service Icon - On by default
- guest.servicemanager.portal.home.showMoreOption - Decide if the More Option is displayed with the Service Icon - On by default
- guest.servicemanager.portal.home.showRequestCount - Decide if the Request Count is displayed with the Service Icon - On by default
- guest.servicemanager.portal.home.showStatus - Decide if the Service Status icon is displayed with the Service Icon - On by default
Should you wish to align these colours with those defined in the Service Portal framework, all the hexidecimal colour values for the colours you have used, are accessible via the Administration Console > Instance Configuration > Manage Portals > Advanced Settings


