Custom Expression Builder
Jump to navigation
Jump to search
The printable version is no longer supported and may have rendering errors. Please update your browser bookmarks and please use the default browser print function instead.
| Home > Configuration > Business Process Designer > Custom Expression Builder | Index |


Building Expressions

The custom expression builder allows you to create one or more tests which can be evaluated when a workflow reaches the decision node.
Adding your first Expression
Following a decision node, draw out a line and add a new node. On the line you have drawn out you will see ?? icons. Click on the icons and a pop up window is presented, this will contain a drop down with default outcomes and an option for Custom Expression.
- Provide a display name for the Custom Expression
- Select Edit Expression and + to add
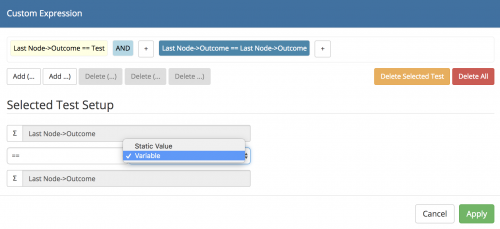
Options
- By default the rule question will be presented in the Selected Test Setup section, picked up from the node proceeding the decision node. This can be left the same or using the Variable Picker Icon you can change what you want to evaluate by choosing from the list of available variables (See the variable picker to understand what options can be presented here)
- Operators - Choose what condition for the chosen question you are looking to test ( ==, Contains, <,> etc)
- Value - Choose to insert:
- Static Value - Here you can manually insert a value to evaluate against
- Variable - Here you can choose to use the variable picker to look up a value to evaluate against, examples maybe an answer to a progressive capture question, a customers custom field value or a custom filed on a task
- Value to evaluate, choose to use either the raw value or display value for the variable - the raw value is unlikely to change so maybe more consistent to use, compared with the display value which may be changed or different language variants of the variable may exist.
If only one rule (expression) is required click apply to save.
Adding Additional Rules
It is possible to add multiple rules (expressions) to a single custom expression and you can do so by simply selecting the + icon and repeating the steps above.
When more than one rule (expression) exists you can add conditions which can be evaluated:
- AND / OR - Decide if the defined rules (expressions) must all match or if there is a combination of AND or OR conditions
- Groupings ( ) - Use the expression groupings to build out more complex (rule / expressions)
Administration
- Select a rule (expression) to either edit or delete it
- Select a grouping bracket to delete it
- Use the Delete All option to delete all the rules (expressions)