Difference between revisions of "Business Process Designer"
| (30 intermediate revisions by the same user not shown) | |||
| Line 1: | Line 1: | ||
| − | {{breadcrumb|[[Main Page|Home]] > [[ | + | {{breadcrumb|[[Main Page|Home]] > [[Configuration]] > [[Business Processes]] > Business Process Designer|Configuration}} |
{{Section| | {{Section| | ||
== Introduction == | == Introduction == | ||
| − | + | The Business Process Designer lets you define and build workflows that can then be used to standardize and automate your business processes. You can define a logical sequence of activities in a workflow that can then be repeated reliably. | |
| − | The Business Process Designer lets you define and build | + | <br><br> |
| + | Each process can contain multiple stages with each stage containing its own workflow. Progression through the stages travels in a forward direction only. Once a stage is complete, the process cannot return to that stage. | ||
| + | <br> | ||
| + | [[file:bpmworkflow.png|left|link=https://wiki.hornbill.com/images/a/a3/Bpmworkflow.png]] | ||
| | | | ||
| − | {{rightBox| | + | {{rightBox|In This Article| |
| − | :* [[ | + | :* [[#Tool Bar|Tool Bar]] |
| − | :* [[ | + | :* [[#Nodes|Nodes]] |
| − | + | :* [[#Node & Canvas Options|Node & Canvas Options]] | |
| − | :* [[ | + | :* [[#Groups|Groups]] |
| − | :* [[ | + | :* [[#Workflow Failure and Recovery|Workflow Failure and Recovery]] |
| − | :* [[ | ||
| − | |||
}} | }} | ||
}} | }} | ||
| + | <br><br> | ||
| + | {{Section| | ||
== Tool Bar == | == Tool Bar == | ||
| − | |||
:* '''Grid''' | :* '''Grid''' | ||
:: [[File:bpmgridbutton.png|left|link=]]The ''Grid'' option displays a faint grid on the background of the canvas. While the grid is visible, the moving of a node on the canvas will snap in to the grid to allow for easier alignment of the nodes. | :: [[File:bpmgridbutton.png|left|link=]]The ''Grid'' option displays a faint grid on the background of the canvas. While the grid is visible, the moving of a node on the canvas will snap in to the grid to allow for easier alignment of the nodes. | ||
| Line 57: | Line 59: | ||
<br> | <br> | ||
:* '''Validate Process''' | :* '''Validate Process''' | ||
| − | :: [[File:bpmvalidatebutton.png|left|link=]]The validation is an important step in your process creation. The validation will do a check on your workflow to make sure all connections between nodes are correct, mandatory settings have been set, and looks for illogical flow design that could cause loops. | + | :: [[File:bpmvalidatebutton.png|left|link=]]The validation is an important step in your process creation. The validation will do a check on your workflow to make sure all connections between nodes are correct, mandatory settings have been set, and looks for illogical flow design that could cause loops.| |
| − | + | {{rightBox|Related Articles| | |
| + | :* [[Service Manager Business Process Workflow]] | ||
| + | :* [[Board Manager Business Process Workflow]] | ||
| + | :* [[Document_Manager_Lifecycle_Processes|Document Manager Lifecycle Processes]] | ||
| + | :* [[Business_Process_Automation_%26_Orchestration|Automation & Orchestration Connectors]] | ||
| + | :* [[Hornbill iBridge]] | ||
| + | :* [[Auto Tasks]] | ||
| + | :* [[Email_Templates|Email Templates]] | ||
| + | :* [[Core Hornbill Automations]] | ||
| + | }} | ||
| + | |}} | ||
| + | {{Section| | ||
:* '''Publishing Manager''' | :* '''Publishing Manager''' | ||
:: [[File:bpmpublishbutton.png|left|link=]]Once a process has been saved and validated you can now publish the workflow for use in its associated app. Each time a process is published, a new version is created. | :: [[File:bpmpublishbutton.png|left|link=]]Once a process has been saved and validated you can now publish the workflow for use in its associated app. Each time a process is published, a new version is created. | ||
| − | + | ||
| − | |||
| − | |||
:::* '''''Publish''''' | :::* '''''Publish''''' | ||
:::: The ''Publish'' button is displayed on the draft version of the process which has been saved and validated. Clicking on the ''Publish'' button will create a new version of the process and make it active. | :::: The ''Publish'' button is displayed on the draft version of the process which has been saved and validated. Clicking on the ''Publish'' button will create a new version of the process and make it active. | ||
| Line 75: | Line 86: | ||
:::: Use this option to view a previous version of a process. This is presented in a read-only mode and process access to all of the configurations for each node. | :::: Use this option to view a previous version of a process. This is presented in a read-only mode and process access to all of the configurations for each node. | ||
:::* '''''View Process Notes''''' | :::* '''''View Process Notes''''' | ||
| − | :::: Use this option to view the notes that were recorded when that version was published. | + | :::: Use this option to view the notes that were recorded when that version was published.| |
| − | + | {{rightBox|Watch Me| | |
| + | {{#ev:youtube|nILwBA3C17Q|350}} | ||
| + | }} | ||
| + | }} | ||
| + | {{Section| | ||
:* '''Manage Process Settings''' | :* '''Manage Process Settings''' | ||
:: [[File:bpmmanageprocessbutton.png|left|link=]] Use this option to set properties that apply to the entire process | :: [[File:bpmmanageprocessbutton.png|left|link=]] Use this option to set properties that apply to the entire process | ||
| Line 88: | Line 103: | ||
:* '''Download a Process Definition File''' | :* '''Download a Process Definition File''' | ||
:: [[File:bpmdownload.png|left|link=]] Downloads a definition file to be saved to your local computer. This definition file contains the entire BPM workflow. | :: [[File:bpmdownload.png|left|link=]] Downloads a definition file to be saved to your local computer. This definition file contains the entire BPM workflow. | ||
| − | + | ||
<br> | <br> | ||
| + | | | ||
| + | }} | ||
| + | {{TOP}} | ||
==Nodes== | ==Nodes== | ||
{{#ev:youtube|E9C5nh-B3V0|350|right}} | {{#ev:youtube|E9C5nh-B3V0|350|right}} | ||
| Line 148: | Line 166: | ||
:* '''Finish Parallel Processing''' | :* '''Finish Parallel Processing''' | ||
::Use this node to bring together and finish the individual process lines which had been initiated from a '''Start Parallel Processing''' node. | ::Use this node to bring together and finish the individual process lines which had been initiated from a '''Start Parallel Processing''' node. | ||
| − | + | {{TOP}} | |
==Node & Canvas Options== | ==Node & Canvas Options== | ||
| Line 187: | Line 205: | ||
:# Click on the connector joining the two nodes you with to insert the fresh node between | :# Click on the connector joining the two nodes you with to insert the fresh node between | ||
:# Right click the highlighted connector and select the '''Add node between connected nodes''' option | :# Right click the highlighted connector and select the '''Add node between connected nodes''' option | ||
| − | + | {{TOP}} | |
==Groups== | ==Groups== | ||
A BPM Process has the possibility of having a large number of nodes which can result in a very busy and difficult to follow workflow. A Group feature is available that allows you to group together a number of nodes which can then be minimized and viewed as a single Group container. The nodes within the Group can be displayed again by maximizing the Group container. | A BPM Process has the possibility of having a large number of nodes which can result in a very busy and difficult to follow workflow. A Group feature is available that allows you to group together a number of nodes which can then be minimized and viewed as a single Group container. The nodes within the Group can be displayed again by maximizing the Group container. | ||
| Line 201: | Line 219: | ||
:* '''Locking a Group''' | :* '''Locking a Group''' | ||
:: When a group is unlocked, moving the group box over nodes will automatically add the nodes into the group. Locking the group box will prevent the adding of nodes to the group if the group box is moved over nodes on the canvas. | :: When a group is unlocked, moving the group box over nodes will automatically add the nodes into the group. Locking the group box will prevent the adding of nodes to the group if the group box is moved over nodes on the canvas. | ||
| − | + | {{TOP}} | |
== Workflow Failure and Recovery == | == Workflow Failure and Recovery == | ||
| Line 247: | Line 265: | ||
</div> | </div> | ||
</div> | </div> | ||
| + | {{TOP}} | ||
| + | [[Category:Configuration]][[Category:HDOC]] | ||
| − | + | <!-- bpm-workflow/workflow-designer --> | |
| + | <!-- bpm-workflow/workflow-nodes --> | ||
| + | <!-- bpm-workflow/node-and-canvas-options --> | ||
| + | <!-- bpm-workflow/manage-executed-processes --> | ||
Latest revision as of 20:58, 25 July 2023
| Home > Configuration > Business Processes > Business Process Designer | Index |
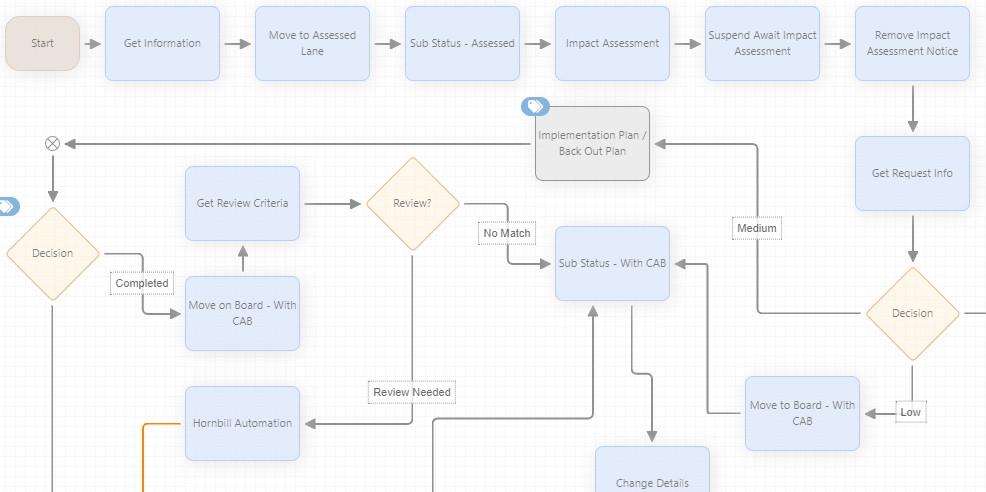
Nodes
Workflow is made up of a two or more nodes which have specific process functions. Nodes are connected to each other by lines, which can include branching from outcomes when associated with decision nodes.
- Via
- The via node serves no functional purpose, but can be used in the designer, between nodes to better align the layout of the business process on the design canvas.
- Start
- The Start Node indicates the starting point of the workflow. There are no parameters and you can can only have one per stage.
-
- Hornbill Automations are definable automated actions that will occur within the workflow. The available Hornbill Automation are provided by each application that utilizes Business Process Workflows. Each application can provide automated tasks.
- Used to define the decision makers for authorisations, set their approval weightings, add expiry options on the decision, and if required include useful variables from the parent request to assist with the decision making in the authorisation task information.
- Auto Assign Authorisation
- This node is used to invoke authorisation tasks for approvers which have been predefined using the Service Manager > Entity > Request > Suspend > Wait for List of Request Authorisers node or the Core > Application > Utility > Get Authorisers by Group. This node has no requirement to define approval weightings etc as these will have been configured in the preceding node. Options do include the configuration of outcomes, the authorisation task details and lifespan setting including optional due and expiry dates.
-
- This node is used to request an authorization decision from an external party via email. The node allows for a single email recipient, definable outcomes, and the option to inject variable content into a hardcoded email which will be sent to the email address (static or using a variable). The recipient of the email will receive a link to a web page; from where they can review the authorization decision, choose an outcome , and if configured provide a supporting reason. Where the node is used, the business process will be suspended awaiting an outcome and will resume once the recipient has submitted their response. This node would typically be followed by a decision node, like any other type of authorization, with branches configured to reflect the outcome choices of the node.
- The recipient of the email does not need to log into any interface when accessing the web page link.
-
- These nodes can be used after a number of other nodes including, Human Tasks, or Automated tasks where multiple outcomes are possible. The Decision node can be used to facilitate the drawing of multiple outcome lines to other nodes, and for each outcome to be individually set. It is also possible to join decision nodes, to other decision nodes through the use of a No Match outcome. This caters for situations where multiple outcomes per decision are needed and not simply the three which are available from a single decision node.
- Note: It is strongly advised that all Decision nodes have a No Match outcome to avoid the potential of a No Matching GotoIf error when none of the criteria are met.
- Human Tasks
- This is for a synchronous manual activity that needs to be carried out. The workflow will wait for someone to update the activity with one of the expected outcomes. You need to define the name and details of the activity, allocate a role or an individual co-worker, and expected outcomes, as well as optionally including variables from the linked parent request which may assist in the completion of the task.
-
- This node is used to invoke automated actions in a business process using either integrations with 3rd party solutions using Hornbill's Integration Bridge, or by invoking automations defined in 3rd party tools like Microsoft Orchestrator or HP OO. options will include choosing the connector to use, selecting the Method (automation) you wish to invoke and then supplying the required input parameters relevant to the connector and method you have chosen.
-
- This allows for the selection of a specific package and operation as in an ad-hoc IT Automation Job or as used within a Runbook
-
- This allows one to select a Runbook with the input and output parameters.
- End
- This stage will terminate the workflow. You can only use this node in the final stage.
- Next Stage
- This will take you either to the next sequential or a later stage and will only be available when you have 2 stages or more. You cannot go to a previous stage.
- Abort
- This node will end the workflow and will cause the heads up display to show as red.
- Set Checkpoint
- This node will allow you to set a visible indicator that a task / or important milestone in the process has been met - In order to use this node, checkpoints must have been defined for the stage of the process (Stage Properties). It is also possible to mark a checkpoint as having been met on the all the above nodes as a configuration option.
- Start Parallel Processing
- This node can be used where there is a need in a process stage to invoke more than one stream of actions, and for these to run in parallel. Adding this node, will enable multiple process streams to be defined, and these will run independently until brought back together by the Finish Parallel Processing node. An examples of where this would be used, would be where two tasks need to be assigned to different teams, but there is no dependency or need for one to be completed before the other, so they can be created and invoked in parallel.
- Finish Parallel Processing
- Use this node to bring together and finish the individual process lines which had been initiated from a Start Parallel Processing node.
Node & Canvas Options
Once a node has been added to the canvas a cog icon is visible and a number of of options are available by right clicking on the cog next to a node:
- Highlight nodes full process flow
- This option will highlight the full path of the process out of this node
- Highlight tasks or integrations referenced in this node
- This option will show which if any other nodes in the current stage are referenced or used in the current node, this is useful to know when making amends or considering removing nodes in your process
- Highlight nodes which reference this node
- This option will show which if any other nodes in the current stage reference the current node, this is useful to know when making amends or considering removing nodes in your process
- Cut selected nodes
- Use this option to remove one or more nodes from the stage. Once cut a paste option will be available across all stages of the process
- Copy selected nodes
- Use this option to copy one or more nodes. Once copied a paste option will also be available across all stages of the process
- Save selected nodes as template
- Use this option to create a template of a single or group of nodes.
- Provide the template with a name
- Right click to paste the template node/s into any stage in the existing process or other processes
- Right click to delete the template
- Delete
- Use this option to delete the highlighted node
- Replace Node
- This option allows you to change the node type, without having to delete the node and break any joins from other nodes. Selecting this option will present you with a list of the node types you can change the node too.
The following options are available both from the above cog icon but also by right clicking anywhere on the canvas
- New Stage Note
- Choose this option to add a notes box to the current stage. Click to add a title and note details and use move the note around the canvas using the arrows icon in the title bar.
- Notes are only visible and displayed on the canvas designer
- New Stage Group
- Choose this option to add a group box to the current stage
- Undo
- Undo the last action i.e undo the deleting or adding of a group or node
It is also possible to insert a node between two existing nodes
- Click on a blank area of the canvas to ensure nothing is selected
- Click on the connector joining the two nodes you with to insert the fresh node between
- Right click the highlighted connector and select the Add node between connected nodes option
Groups
A BPM Process has the possibility of having a large number of nodes which can result in a very busy and difficult to follow workflow. A Group feature is available that allows you to group together a number of nodes which can then be minimized and viewed as a single Group container. The nodes within the Group can be displayed again by maximizing the Group container.
- Create a New Group
- Using a right mouse click on the workflow canvas will display a context menu with an option for a New Empty Group. Resize the Group to a size that would accommodate the nodes that you
- Naming a Group
- Once a Group Box is highlight you can click on the Cog icon in the main workflow toolbar to open the properties of the Group and change then name
- Deleting a Group
- A Delete icon is provided in the title bar of the Group container. Clicking on the delete icon will only delete the Group container. The nodes contained in the Group will remain intact and retain the layout that they were in within the Group.
- Add Nodes to a Group
- To add nodes into a group simply drag either the node into the group box, or move the group box over the nodes you wish to include.
- Locking a Group
- When a group is unlocked, moving the group box over nodes will automatically add the nodes into the group. Locking the group box will prevent the adding of nodes to the group if the group box is moved over nodes on the canvas.
Workflow Failure and Recovery
Under certain conditions it is possible that workflows may fail. Failure of a workflow will be represented by the Head's Up Display on a request turning Red, and will be accompanied by an error message. Typical reasons why a workflow failure may occur include:
- Analyst permission rights to perform actions in the workflow
- Configuration errors in workflow design
- Deletion of email templates, or mailboxes defined in a workflow.
Workflow Recovery
In the event of workflow failure, under certain conditions it is possible to correct the reason for the workflow failure and to restart the workflow from the point of the failure.
Conditions under which a workflow can be restarted
- Adjusting analyst rights to perform the action in the workflow which caused the failure - for example rights to send an email from a specific mailbox.
- Adding an email template which is missing / deleted / misspelt in the workflow definition which caused the failure.
- Any Workflow that has failed within a Parallel Process cannot be restarted.
It is important to understand that once a workflow has been created in the admin tool, and the workflow has been started in a request, it is not possible to go back to the workflow, take corrective action and effect the reason for failure on a workflow which is running / In flight. The reason for this, is that as soon as a request invokes a business process, the workflow definition for that workflow is written to the database, and this definition is used.
It is possible to correct data which the process definition is expecting, for example for an email notification, if the process is expecting to use an email template that is misspelt, missing or has been deleted, it is possible to create an email template which reflects the misspelt, missing or deleted value defined in the process, and for the process to be restarted.
- In this scenario it is important to correct both the issue for the workflow in flight, but also in the actual workflow which will be used in subsequent requests.
How to restart a failed workflow
In order to restart a failed workflow you will need to be have been assigned the 'Service Desk Admin' role. When you view a request with a failed workflow, you will see a 'Restart Process' button on the Head's Up DIsplay. Without the specified role the restart button will not be visible.
Before pressing the restart button, ensure you have taken the required corrective action.
On pressing the restart button, the process will attempt to be restarted. There are two possible outcomes.
- If the process has been successfully restarted, the Head's Up Display will return to green, and a successful restart message will be presented.
- If the process can't be restarted, the Head's Up Display will remain red, and a failure message will be presented.
It is possible that the process can't be restarted, or you may have further failure issues which have been invoked once the original failure reason has been resolved. In this case the error message will indicate the source of the failure, and further corrective action may be required before successfully restarting the process again.
In the event of a successful or unsuccessful attempt to restart the process, an email will be sent to the email address specified in the app setting: app.email.restartBPM.feedback in the Service Manger configuration in the admin console. The email will contain the original failure details, if successfully restarted, and both the original failure reason, and the reason why the process can't be restarted if unsuccessful. The email will enable further failure diagnosis.