BPM Human Tasks

From Hornbill
Revision as of 19:20, 16 July 2017 by Stevenb (talk | contribs)
Jump to navigation Jump to search

Home > Administration > Business Process Designer > BPM Human Tasks

Introduction

When creating a human task it is possible to define this in one or multiple languages, by default this will be English, however it is possible to create copies of the human task in any other languages enabled on your instance. This is a consideration where those who maybe assigned tasks are working in different languages, and they will receive the human task either in the default language or in the language defined in their profile if the human task is configured in the different languages.

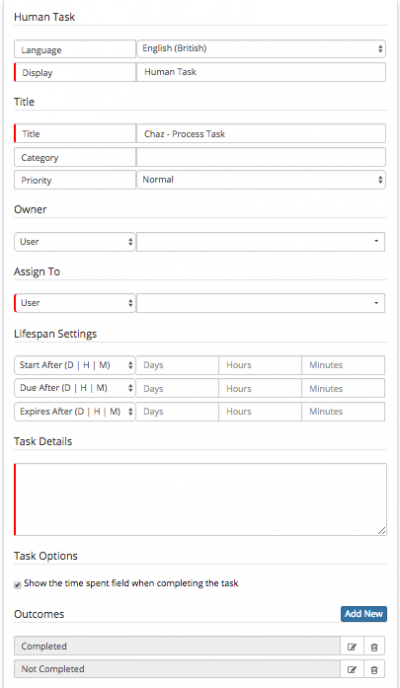
Human Tasks.png

Options

  • Display
This is simply the display name for the human task node in the business process designer, it will not appear on the human task
  • Title
This will appear as the title on the human task
  • Category
Set a category which will appear on the human task
  • Priority
Set a priority to indicate the priority of the task
  • Owner
The Owner is an important consideration, as they can be notified about the task in reminders, and will also have the ability to reassign the assignee if required. The Owner can be either a named user or a variable
  • User
Pick from a list of co-workers
  • Variable
In order to see see a list of possible variables like request owner, you will need to preceed the human task node with the Automated Task Node > Request Entity > Get Information > Request Details
  • Assign To
Choose who the human task will be assigned to, this can be a named user, group, role or variable.
  • User - Pick from a list of co-workers
  • Variable - In order to see see a list of possible variables like request owner, you will need to preceed the human task node with the Automated Task Node > Request Entity > Get Information > Request Details * Lifespan Settings
  • Role - This will be populated from the default roles and any custom roles defined on your instance. Any Users who are assigned the role will receive the human task, any notifications and will have the ability to complete the human task.
  • Group - This will be populated from the defined groups on your instance. Any Users who are members of the group will receive the human task, any notifications and will have the ability to complete the human task.* Task Details
  • Lifespan Settings - It is possible to set a start date, due date and expiry date for the task based on either a predefined value, or based on a variable like respond by or fix by from the parent request.
  • Start After - Set this to either X Days, X Hours and or X minutes after the creation of the Task, or base this on a variable like log date, resolve by, or fix by. If using the Variable option remember to preceed the node with the Automated Task Node > Request Entity > Get Information > Request Details
  • Due After - Set this to either X Days, X Hours and or X minutes after the creation of the Task, or base this on a variable like log date, respond by, or fix by. If using the Variable option remember to preceed the node with the Automated Task Node > Request Entity > Get Information > Request Details
  • Expires After - Expires is a valid outcome for a human task, and setting a value here will allow you to via a decision node following the task allow for branching based on an outcome not being selected but the task expiring.
Set this to either X Days, X Hours and or X minutes after the creation of the Task, or base this on a variable like log date, respond by, or fix by. If using the Variable option remember to preceed the node with the Automated Task Node > Request Entity > Get Information > Request Details
  • Task Details - Define the details for the human task, this can be a combination of text and if required variables from the parent request which the task is related too, this could be the summary or description fields, custom fields, or even answers to progressive capture questions - see more about inserting request variables here.
  • Task Options - Decide if you want to display the Time Spent option to the user who is completing the human task
  • Outcomes - Configure what possible options the user completing the human task can choose from when completing the human task. By default two are provided, Completed and not Completed.
  • Add Outcomes - Add a new Outcome using the Add New option
> Define the outcome value, a display name, and if the user completing the task is required to provide a reason when selecting this specific outcome.
> Optional provide the outcome a display colour and make the outcome available in multiple languages.
> Apply Settings to save.
  • Edit Outcomes - To edit any of the above values for an existing outcome click the edit icon next to the outcome you wish to edit
  • Delete an Outcome - To remove an outcome option click the trash can icon next to the outcome you wish to delete.
  • Expiry Outcome - It is not required to add a specific expiry outcome, this will be automatically enabled if you have configured an Expires After in the lifespan settings.
  • Using Outcomes to branch in the business process - If you require different behaviour in your business process depending on the outcome of the human task, use a Decision node directly after the human task and use the outcomes defined in the task as the decision branch options.