Aha!
IntroductionAha! is a cloud-based roadmapping tool. Create, update, and retrieve Ideas in Aha!. Aha! is a Premium Integration |
Related Articles |
Aha! Configuration
In order to integrate with Aha!, you will first need to register Hornbill as an authorised application within your Aha! instance.
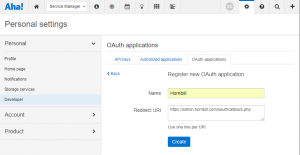
To do this, visit the Personal Settings page in your Aha! account, then click on the Developer option on the left-hand menu, and then click the OAuth Applications tab. Once the tab had loaded, click the Register OAuth Application button.
This will present you with a form containing 2 inputs (see first image to the right):
- In the first input, give the registered application a name. i.e. Hornbill
- In the second input, enter the following:
https://admin.hornbill.com/oauthcallback.php - Click the Create button
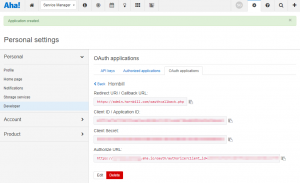
Once the application has been registered, Aha! will provide you with the information you need to create a key in the Hornbill Keysafe (see second image to the right).
KeySafe Configuration
Once Hornbill has been registered as an OAuth application in your Aha! instance, you will need to configure and securely store the authentication credentials for the Aha! instance and Accounts you want to use with the Hornbill App.
Configure your Aha! account authentication in KeySafe in order to use the Aha! options.
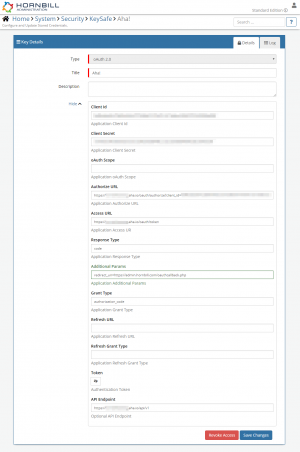
In the admin console > System > Security > KeySafe
- Select on + and select oAuth 2.0 option
- Give the Aha! KeySafe a Title (this is the name / identifier for the Aha! account as you will see it when using the Integration Call node in your business process)
- Optionally add a description
Configuration
- Client Id - The value of Client ID / Application ID provided when you registered Hornbill in Aha!
- Client Secret - The value Client Secret provided when you registered Hornbill in Aha!
- oAuth Scope - Leave Blank
- Authorise URL - The value Authorize URL provided when you registered Hornbill in Aha!
- Access URL - The Application Access URL: https://yourinstancename.aha.io/oauth/token where yourinstancename should be replaced by your Aha! instance name
- Response Type - Set this to code
- Additional Params - Copy & paste this exact string to redirect_uri=https://admin.hornbill.com/oauthcallback.php
- Grant Access - Set this to authorization_code
- Refresh URL - Leave Blank
- Refresh Grant Type - Leave Blank
- Token - Leave Blank at this stage, it will be auto-populated later
- API Endpoint - The Aha! API endpoint for your instance: https://yourinstancename.aha.io/api/v1 where yourinstancename should be replaced by your Aha! instance name
- Select Create Key to save
- Select Connect
- Login with your username and password and authorise the Hornbill App to use the Aha! account (ensure the user account has the appropriate rights to perform the Aha! actions).
- When successful, this will auto-populate a valid oauth_token into the Token field
Managing Aha! Configurations
- Use KeySafe to create, store and enable integrations with multiple Aha! accounts for use in your business processes
- From the Keysafe List, select an Aha! account, and use the Trash Can to permanently delete it, or the Revoke Access option to remove access rights but retain the configuration and option to connect again later
- Note, this will remove the rights of any existing Aha! Integration Calls in your business processes, which are using the now deleted Aha! Account, so you will need to edit your business processes accordingly.
Business Process
Options (Methods)
Once you have your Aha! Account Authorised, you're all set to use it with the Integration Call in your business processes. The following options are now available for you to use with Aha!:
- Create : Create new Ideas against products in your Aha! roadmap
- Get : Get details from Ideas against your Aha! products
- Update : Update Ideas in your Aha! products
Read more about using the Integration Call from the Related Articles section, and learn how to work with input and output parameters for each of the Aha! options.


