SQL Contact Import
About the Hornbill SQL Contact Import Utility
The utility provides a simple, safe and secure way to create contacts on the Hornbill platform by synchronizing with data held in your Database. The tool is designed to run behind your corporate firewall, connect to your database, query the required contact information, transform and load into the Hornbill instance. The tool connects to the Hornbill instance in the cloud over HTTPS/SSL so as long as you have standard internet access then you should be able to use tool without the need to make any firewall configuration changes. The tool supports both the initial bulk import as well as incremental adds and updates. You can schedule the tool to run periodically to perform the import/update tasks as required.
Installation Overview
Installation
- Download the architecture specific latest package from GitHub
- Extract zip into a folder you would like the application to run from e.g. C:\Hornbill_Import\
- Open conf.json and add in the necessary configuration
- Open Command Line Prompt as Administrator
- Change Directory to the folder with contact_import.exe C:\Hornbill_Import\
- Run the command contact_import.exe -dryrun=true
Configuration Overview
The following section will detail how to prepare the conf.json file to successfully import your Contact records.
Prerequisites
Before importing any contact records into your Hornbill instance, the Organisation records must be created first. This then allows the contact import utility to associate each contact record to an Organisation record based on what is specified in the "Company" field. Details on how to create a Hornbill Organisation record can be found here: external organization records
Prior to configuring the .json file, it is advisable to read the following wiki page regarding Hornbill Contact records as it will provide some context to what this import will create.
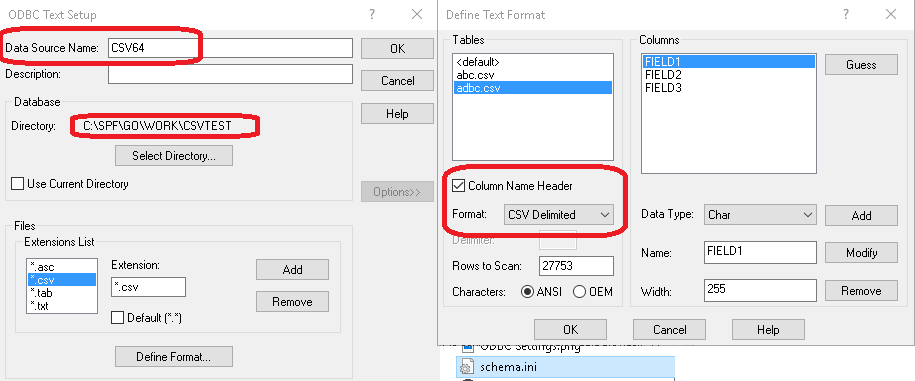
To create a 64-bit ODBC connector you would need the Microsoft Access Database Engine which can be found as a 2010 Redistributable (https://www.microsoft.com/en-us/download/details.aspx?id=13255) or as an optional part of the Microsoft Office Suite
Completing the conf.json file
A default configuration file is provided conf.json, if a configuration file is not specified as a command-line argument then conf.json must exist.
   {
   "KeysafeKeyID": "", /* this is the Keysafe Key ID for the Keysafe key that contains your database connection credentials */
   "ContactAction": "Create", /* options : Create/Update/Both ; on what action to assign roles to a user */
   "AttachCustomerPortal": true, /* options : true/false ; whether contact is allowed to enter the customer portal */
   "CustomerPortalOrgView": true, /* options : true/false ; whether contact is allowed to view orgaisation calls in the customer portal */
   "CustomerPortalOrgViewRevoke": false, /* options : true/false ; whether the contact visibility to organisation calls in the customer portal is to be revoked */
   "UpdateContactStatus": false,
   "SQLConf": {
       "Driver": "csv",
       "ContactID": "FIELD1",   /* FieldID is the Hornbill field against which the record */
       "FieldID": "h_logon_id", /* (identified by the data contained in the ContactID field) is searched */
       "Encrypt": false,
       "Query": "SELECT * FROM adbc.csv"
   },
   "ContactMapping":{
       "logon_id":"{{.FIELD1}}",
       "firstname":"{{.FIELD2}}",
       "lastname":"{{.FIELD3}}",
       "company":"{{.FIELD1}}",
       "email_1":"{{.FIELD2}}",
       "email_2":"",
       "tel_1":"{{.FIELD4}}",
       "tel_2":"",
       "jobtitle":"",
       "description":"",
       "notes":"",
       "country":"",
       "language":"",
       "private":"0",
       "rights":"0",
       "contact_status":"0"
   }
   }
- An API key is set up against a user within Hornbill (https://wiki.hornbill.com/index.php/API_keys). For example, if admin user is doing the import, enter the API Key for the admin user.
Configuring the ODBC Connector for CSV
Preparing to Run the Import
Ultimately, the executable will be scheduled in Windows task scheduler (see later) but to test, gain confidence, and perform the initial upload of users the utility can be executed from a command prompt window on an ad-hoc basis. The command used to execute the import can contain a number of command line parameters.
Command Line Parameters
- file - Defaults to conf.json - Name of the Configuration file to load
- dryrun - Defaults to false - Set to True and the XMLMC for Create and Update users will not be called and instead the XML will be dumped to the log file, this is to aid in debugging the initial connection information.
- concurrent - Defaults to `1` - Allows you to change the number of worker threads used to process the import, this can improve performance on slow import but using too many workers have a detriment to performance of your Hornbill instance.
- logprefix - add prefix to the log file
- version - outputs the tool version
- matchlike - defaults to false - Set to True if you want to mimick the post v1.0.3 behaviour which searches with LIKE instead of an exact match (eg "abc" would find "abc1" as the record to update between v1.0.3 and v1.4.0)
- nocol - defaults to false - Set to True for all CLI outputs to be in the default colours of the terminal/command line session running the tool
- creds - Defaults to false - Set to `true` to decrypt and output the API key that is stored locally. NOTE - the tool will prompt you for your instance ID, and this can only be decrypted by the user who originally performed the encryption, and only on the same machine that it was encrypted on.
First Run
From version 2.0.0 of the Contact Import utility, when you first run the utility it will prompt you for the ID of your Hornbill instance (case-sensitive), and the API key (also case-sensitive) that will be used to authenticate the API calls back into Hornbill. This information will be encrypted, and stored locally on the client PC that will be running the tool. For each subsequent import run, the utility will decrypt your instance ID and API key, and will use those to make the API calls back into Hornbill.
NOTE - the encrypted instance ID and API key can only be decrypted on the computer, and by the user, that performed the encryption, so please keep this in mind when scheduling your imports.
Should you wish to use a different API key to what has been previously encrypted, just delete the import.cfg file from the folder where the import binary resides, and re-run your import from the command line inputting the Instance ID and new API Key as you would have on its first run.
Testing Overview
If you run the application with the argument dryrun=true then no users will be created or updated, the XML used to create or update will be saved in the log file so you can ensure the LDAP mappings are correct before running the import.
contact_import.exe -dryrun=true
To actually do the import, use this:
contact_import.exe
Example
The following is an example of a successful import. The CSV file can contain the contacts you wish to import
- Ensure the order is as shown in the example otherwise the data may populate incorrect fields
eg:
Populate the API key with the Hornbill user's API Key, enter the instance id and username and password.
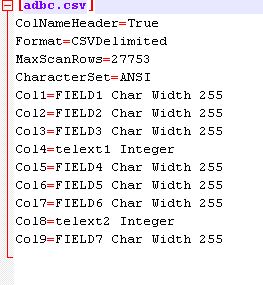
- This is an example of what the Schema.ini file would look like
eg:
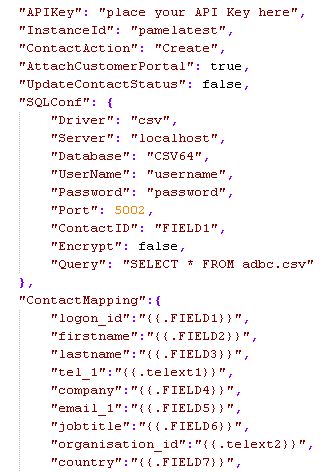
- The example JSON file below shows the fields that match the CSV file
eg:
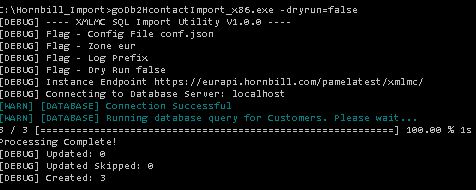
- This is an example of the actual run using the command prompt AS ADMIN user
eg:
API Key Rules
This utility uses (API keys):
- admin:keysafeGetKey
- admin:portalSetContactAccess
- data:entityAddRecord
- data:entityBrowseRecords2
- data:entityUpdateRecord
- system:logMessage
- apps/com.hornbill.core/Contact:changeOrg
- apps/com.hornbill.servicemanager/ContactOrgRequests:changeOrgRequestSetting
- apps/com.hornbill.servicemanager/ServiceSubscriptions:add
Troubleshooting
Logging Overview
All Logging output is saved in the "log" directory which can be found in the same location as the executable. The file name contains the date and time the import was run SQL_Contact_Import_2015-11-06T14-26-13Z.log
Common Error Messages
Below are some common errors that you may encounter in the log file and what they mean:
- [ERROR] Error Decoding Configuration File:..... - this will be typically due to a missing quote (") or comma (,) somewhere in the configuration file. This is where an online JSON viewer/validator can come in handy rather than trawling the conf file looking for that proverbial needle in a haystack.
- [ERROR] Get https://api.github.com/repos/hornbill/goDb2HcontactImport/tags: dial tcp xx.xx.xx.xx:xxx: ........ - this most likely indicates that you have a HTTP proxy server on your network between the host running the executable and your Hornbill API endpoint. Ensure the http_proxy environment variable is set (See the section on "HTTP Proxies" for more information) and that the proxy is configured to allow this communication.
- [ERROR] Unable to Create User: Invalid value for parameter '[parameter name]': The text size provided (31 characters) is greater than the maximum allowable size of 20 characters for column [column name] - the contents of your directory attribute exceed the maximum number of characters that can be placed in the Hornbill database column.
- panic: runtime error: invalid memory address or nil pointer deference [recovered]... - this error is suggesting an incorrectly specified attribute in the conf file. Where information is being obtained from a directory attribute, the attribute must be in the following format: {{.directoryAttributeName}}
- [ERROR] Unable to Create User: The value in element <userId> did not meet the required input pattern constraints. at location '/methodCall/params/userId' - the user id contains characters that are not allowed. The User Id should be made up of alphanumeric characters. Full stops (.) and underscores (_) are also supported.
- [ERROR] Unable to Update User: Invalid value for parameter '[parameter name]': Error setting value for column '[column name]'. bad lexical cast: source type value could not be interpreted as target - this error is indicating that the contents of your directory attribute are in a format that is not compatible with the type of the Hornbill database column. For example, you will get this when trying to place text into a database field that is of type "INT" (accepts integer values only).
- [ERROR] Unable to Load LDAP Attribute: '[LDAP attribute name]' For Input Param: '[Hornbill Parameter name]' - When the import utility is unable to load a particular LDAP attribute, this means that the attribute field in your directory does not contain a value. This error will not prevent the user account from being created or updated in Hornbill and can be considered more as a warning rather than an outright failure or problem.
Error Codes
- 100 - Unable to create log File
- 101 - Unable to create log folder
- 102 - Unable to Load Configuration File
HTTP Proxies
If you use a proxy for all of your internet traffic, the HTTP_PROXY and HTTPS_PROXY Environment variables need to be set. These environment variables hold the hostname or IP address of your proxy server. It is a standard environment variable and like any such variable, the specific steps you use to set it depends on your operating system.
For windows machines, it can be set from the command line using the following:
set HTTP_PROXY=HOST:PORT
set HTTPS_PROXY=HOST:PORT
Where "HOST" is the IP address or host name of your Proxy Server and "PORT" is the specific port number.
IF you require a username and password to go through the proxy, the format for the setting is as follows:
set HTTP_PROXY=username:password@HOST:PORT
set HTTPS_PROXY=username:password@HOST:PORT
URLs to White List
Occasionally on top of setting the HTTP_PROXY variable the following URLs need to be white listed to allow access out to our network
- https://files.hornbill.com/instances/INSTANCENAME/zoneinfo - Allows access to lookup your Instance API Endpoint
- https://files.hornbill.co/instances/INSTANCENAME/zoneinfo - Backup URL for when files.hornbill.com is unavailable
- https://eurapi.hornbill.com/INSTANCENAME/xmlmc/ - This is your Instance API Endpoint, eurapi can change so you should use the endpoint defined in the previous URL
- https://api.github.com/repos/hornbill/asset-rel-import/tags - Allows the utility to self-update. Optional
Scheduling Overview
Windows
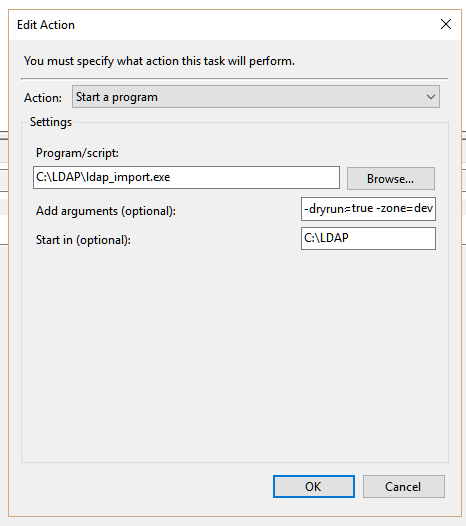
You can schedule the .exe to run with any optional command-line argument from Windows Task Scheduler.
- Ensure the user account running the task has rights to contact_import.exe and the containing folder.
- Make sure the Start In parameter contains the folder where the executable resides in, otherwise it will not be able to pick up the correct path. eg:
